Tutorial - Drop Shadows and Alternate Solutions
Sep 21, 2019 18:06:51 #

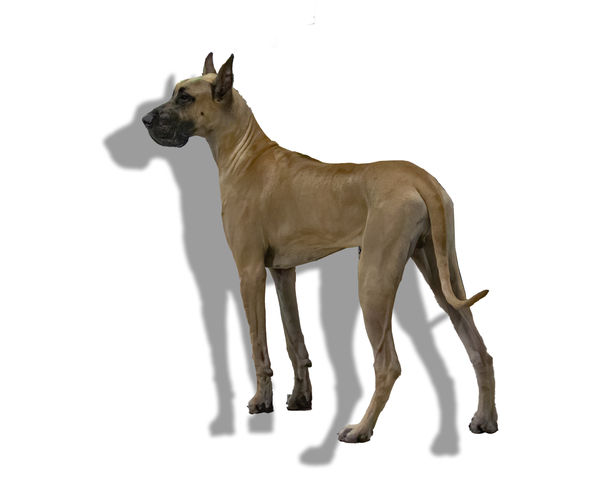
I love to attend Dog Shows because there are so many varied and interesting subjects to choose from. Unfortunately, it's not always easy getting a clear shot at the animals, and the background is usually very distracting. It has been my practice to isolate the dogs on their own layer, then treat the backgrounds separately. In the process, I have found that a "floating subject", not connected to a ground plane, is most upsetting to a lot of viewers. This tutorial suggests a number of ways to get around that problem.
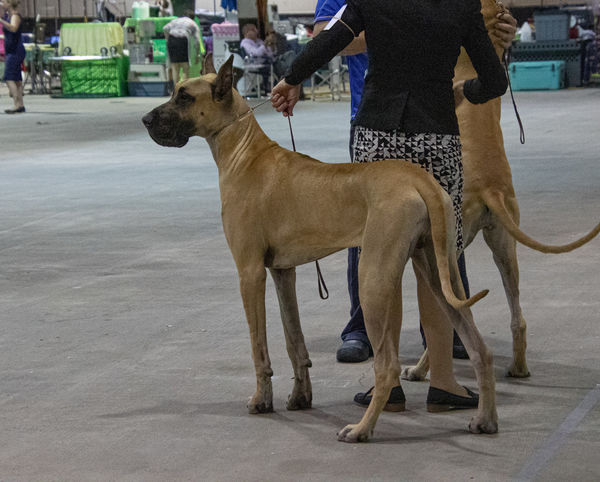
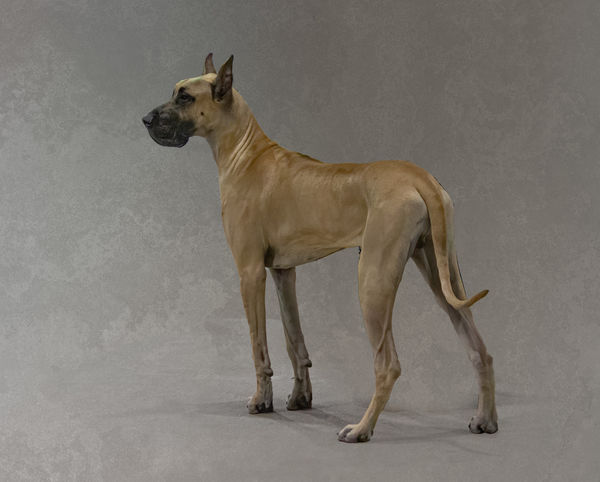
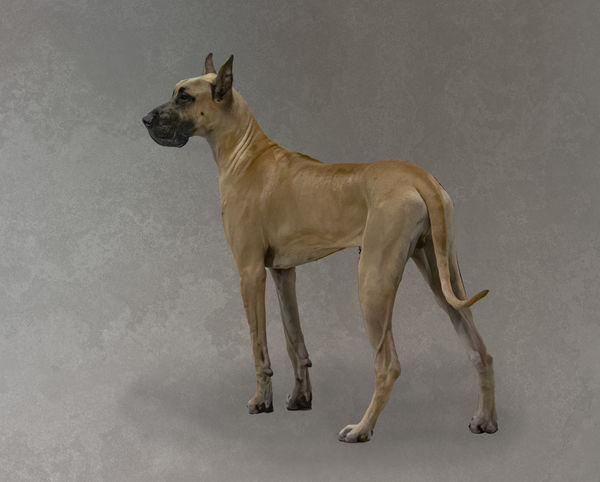
This is the original photo of a Fawn Great Dane I captured at the Raleigh Kennel Club Dog Show in September 2019.
.
This is the original photo of a Fawn Great Dane I captured at the Raleigh Kennel Club Dog Show in September 2019.
.
Sep 21, 2019 18:08:26 #
Selection
In PS CC 2019, there is a quick way to get started on selections. Click on the Quick Selection Tool in the icons at the left border. In the information pane at the top of the screen, there will be a menu item for Select Subject. Click on that, and PS will choose what it thinks is your main subject. This selection is not always entirely accurate and usually misses a few pixels/or chooses items you do not wish to include. At this point, one must refine the selection. If using the Quick Selection Tool, there are icons in the top pane, showing brushes with a plus sign (mouseover: Add to selection) or a minus sign (mouseover: Subtract from selection). Use whichever option to limit your selection to your main subject.
When I want to get down to very accurate borders on my selection, I use the Polygonal Lasso Tool to mark my refinements. It is an option accessed by right clicking the Lasso Tool. Like the Quick Selection Tool, it has options for "Add to Selection (two overlapping squares, both dark)" or "Subtract from selection (two overlapping squares, the bottom one white). I zoom in to the area where I need to make some intricate modifications. When one clicks on the border to separate the subject from the background, it leaves a mark then extends a black line as one moves the mouse. It is very easy to move the black line out from the selection, then bring it back until it is exactly placed, click to leave a mark, then move on the next point, click to leave mark, and so and so forth until the final mark, then double click. This will either add new material to the selection or remove the area of the selection that was marked.
At the end making a good selection, I save the selection for later use (Select>Save Selection>New then name it. In my case, I labeled this "GreatDane".
.

Sep 21, 2019 18:10:36 #
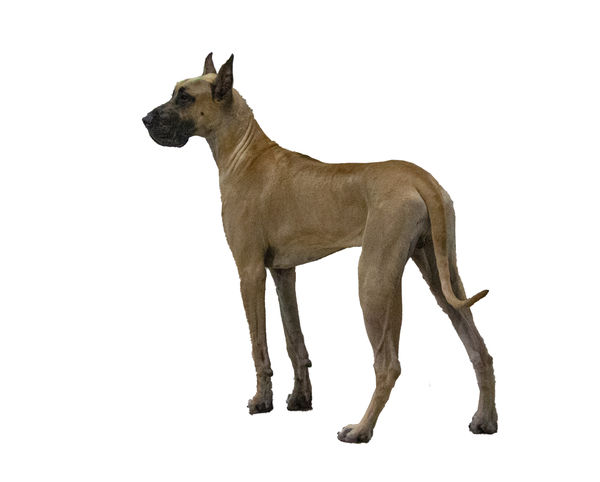
To move the Great Dane to its own layer on a Transparent background, click Ctrl-J. This will create the new layer. I labeled mine Great Dane. Turn off all layers beneath this layer so you can see the selection only.
Check to be sure your subject looks the way you had intended. If there are extra pixels outside your subject, you can select them, then click the Del (Delete) key. This will discard everything you don't want.
If you are missing some (like there is a hole in the center of the dog's back), you will have to delete this layer, go back and fix your selection, then try again. This involves turning on the background layer, and Loading the selection: Select>Load Selection>GreatDane, modify it to add the appropriate pixels, saving the selection once more, then hitting Ctrl-J to upload it to a Transparent background layer. Repeat this process as many times as necessary.
.
Sep 21, 2019 18:12:08 #
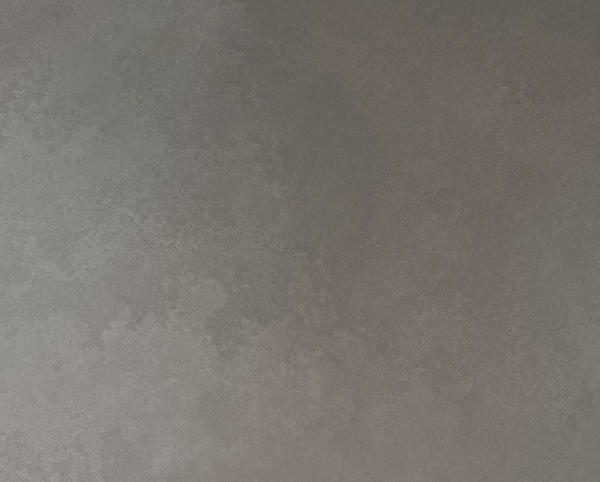
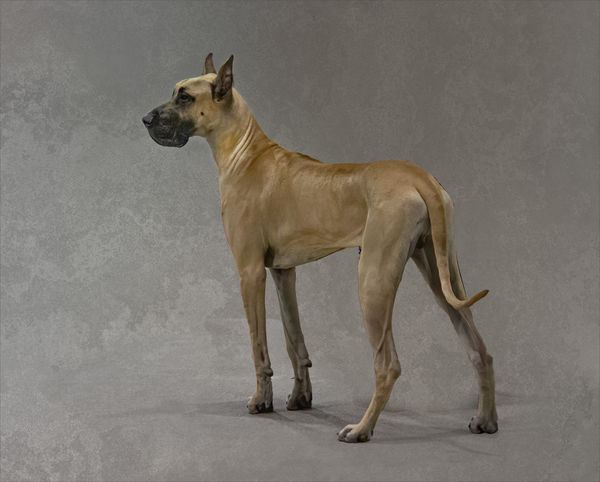
Textured background layer
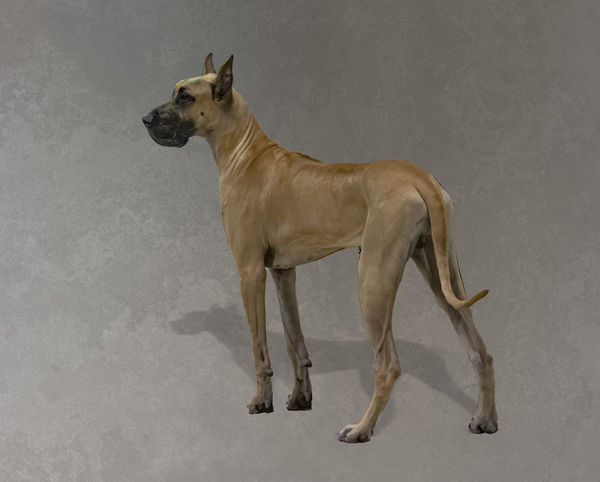
To create this layer, I duplicated the Original background layer, then applied Filter>Blur>Gaussian Blur>Radius: 1000 pixels. Over that I applied Filter>Anthropics>Smart Photo Editor>[Grungy Texture 007] preset, then lowered the opacity to about 40%, then File>Save and close.
I labeled this layer "Textured Background"
.
Sep 21, 2019 18:15:08 #
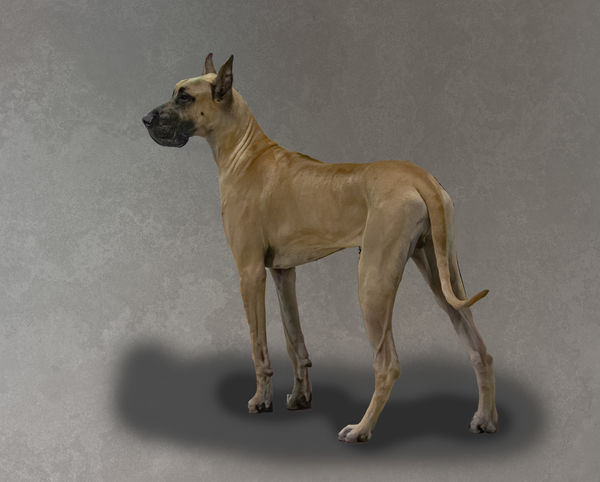
Use of existing shadows
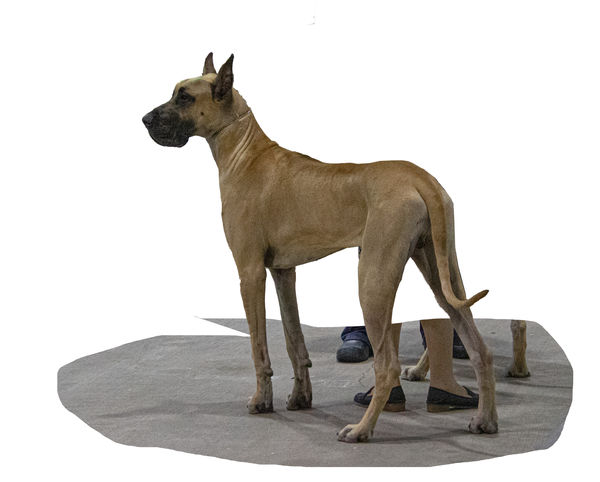
In some instances, the floor of the dog arena already has shadows on it, and they look MUCH more natural than anything I could create otherwise. To incorporate these into the image, I made the background layer visible, loaded the GreatDane selection, then use to the Lasso tool to Add to selection, selecting a wide path around the dog, and being sure to catch all the shadows that I can. I don't save this particular selection but hit the CTRL-J keys immediately to create a new Transparent Background Layer with the added material. I then go to my Layers Panel and move the new selection ABOVE the Textured Background layer.
** By the way, if you don't see your Layers panel, click the F7 key. This will display the Layers panel in the right hand panes. **
.
Sep 21, 2019 18:22:22 #
Blending Original Floor with Textured Background.
To blend layers, one uses a Mask. Select the layer which shows the dog and original floor. At bottom of the layer in the Layers Palette, click on the icon to "Add layer mask" (black box with a white circle in the middle). Once you've clicked that a white square will show up to the right of the layer preview. Now select the Brush Tool and adjust to a size you're comfortable with. Make sure the color of the tool is set to black. Then you must vary the Opacity of the brush, anywhere from 16% to 84%, and you should probably use a number of varying opacities to blend the layers (the higher the opacity, the stronger the masking option, and will remove "most" of the brushed area, whereas a lower opacity might only serve to make your brush strokes look a bit lighter. The trick is to get rid of hard edges and reshape the original floor shadows to your liking. I took great panes to remove people's shoes and legs from this layer.
.
Sep 21, 2019 18:24:08 #
The final image, color and lighting enhancements.
Use whichever lighting filters you are most comfortable with to put final touches on the image. I use On1 Develop, NIK Color Efex Pro, and Topaz Studio AI Clear among others.
.
Use whichever lighting filters you are most comfortable with to put final touches on the image. I use On1 Develop, NIK Color Efex Pro, and Topaz Studio AI Clear among others.
.
Sep 21, 2019 18:25:05 #
Manual brushing
Sometimes, the original ground or floor markings are just too bizarre to be considered. In those cases, one can use the Brush Tool to manually paint in a shadow.
.
Sometimes, the original ground or floor markings are just too bizarre to be considered. In those cases, one can use the Brush Tool to manually paint in a shadow.
.
Sep 21, 2019 18:26:25 #
This is my Great Dane layer with the Textured Background layer visible I executed Layer>Duplicate Layer .... so I could create a separate layer on which to manually brush in some shadow-like coloring. Now we come to one of the uses of a Saved Selection. When I paint with a brush, I don't want to inadvertently paint black on the dog itself. To prevent, do Select>Load Selection>GreatDane from the Channel pulldown, and click on Invert. This will allow to paint in anywhere BUT the Great Dane. I selected the duplicate layer, then used Brush Tool to manually paint in some almost-black settings. The gradations in color shown here were accomplished by changing the opacity of the brush (darker colors = higher opacity). I didn't worry about the shape or the actual colors in this layer as I later used a Mask to blend the colors with the background layer.
Caveat: the example here is very crude and is for illustration purposes only. If I truly wanted to use this method, I would spend a lot of time painting a most beautiful shadow (and this ain't it)
.
Caveat: the example here is very crude and is for illustration purposes only. If I truly wanted to use this method, I would spend a lot of time painting a most beautiful shadow (and this ain't it)
.
Sep 21, 2019 18:27:49 #
Blending brushed layer
To blend layers, one uses a Mask. Select the layer which shows the dog and brushed in shadows. At bottom of the layer in the Layers Palette, click on the icon to "Add layer mask" (black box with a white circle in the middle). Once you've clicked that a white square will show up to the right of the layer preview. Now select the Brush Tool (ensuring the tool's color is black) and adjust to a size you're comfortable with. Then you must vary the Opacity of the brush, anywhere from 16% to 84%, and you should probably use a number of varying opacities to blend the layers (the higher the opacity, the stronger the masking option, and will remove "most" of the brushed area, whereas a lower opacity might only serve to make your brush strokes look a bit lighter. The trick is to get rid of hard edges and reshape the brushed shadow to your liking. For this step, it is usually good to have the Textured Background layer turned on so you can see how the two layers blend together
.
Brushed layer, Textured Background turned off
(Download)
Brushed layer, Textured Background turned on
(Download)
Sep 21, 2019 18:28:13 #
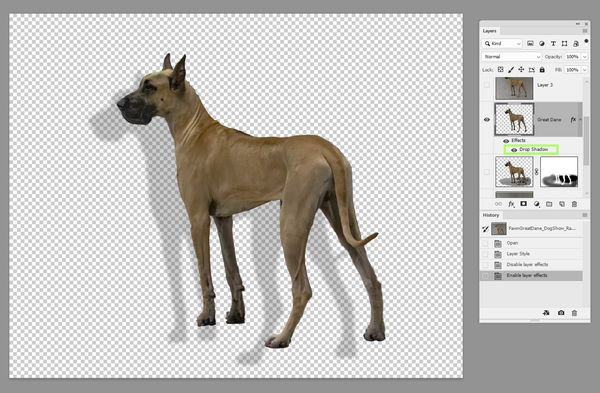
Adding a Drop Shadow
Photoshop has a Drop Shadow Style that may be used here, but with limited success. In this instance, the dog is considered a complex selection because its back legs are not on the same level as the front legs, and the light is coming from almost directly overhead.
Photoshop has a Drop Shadow Style that may be used here, but with limited success. In this instance, the dog is considered a complex selection because its back legs are not on the same level as the front legs, and the light is coming from almost directly overhead.
Sep 21, 2019 18:29:16 #
Creating a Drop Shadow
There are two ways to access the Drop Shadow panel. In the layers panel, double click on the layer and a Layer Styles panel will open. Near the bottom are a number of Drop Shadow Boxes, with plus signs in an icon to the right. Put an "x" in one or more of the Drop Shadow boxes, then click OK
The other way is to click on the layer, then on the bottom of the layers panel, click on fx>Drop Shadows. This also open the Styles panel.
Sep 21, 2019 18:30:05 #
Layer Style panel settings with access to Drop Shadow controls
Be sure to click the plus icon on the right of Drop Shadow to see these menu settings. The ones that are most important are Opacity (how much of shadow you will apply, you probably want something below 50%) and the Size slider - move it to the right to distort the shadows with feathered edges. You don't want a shadow with hard edges.
Be sure to click the plus icon on the right of Drop Shadow to see these menu settings. The ones that are most important are Opacity (how much of shadow you will apply, you probably want something below 50%) and the Size slider - move it to the right to distort the shadows with feathered edges. You don't want a shadow with hard edges.

Sep 21, 2019 18:31:19 #
Drop Shadow silhouette on its own layer
Remove the Drop Shadow to rest on its own, independent layer. To do this, right-click on the Drop Shadow element under this layer, and choose Create Layer. It may show a warning message, but disregard it and click OK
The reason for doing this is to make it possible to reshape the shadow by using Edit>Free Transform tool, then distorting the image, shortening, stretching or moving it to fit into the final image. Move this image under Great Dane, but above Textured Background.
Sep 21, 2019 18:32:52 #
Free Transform Drop Shadow
Highlight the Drop Shadow silhouette layer. Execute Edit>Free Transform, then holding the CTRL Key down, grab the various selection points to Distort the image; shortening, skewing and moving it. I chose to size the image so the shadows on the back feet were aligned with the Great Dane image, shortened it and aligned it as best I could. There were areas of shadow showing up under the front feet, but I didn't worry about them at this point as I was going to mask them out in the next step.
.
If you want to reply, then register here. Registration is free and your account is created instantly, so you can post right away.