HOW DO I CAPTURE WHAT I SEE
Sep 11, 2019 01:56:57 #
[quote=Bret Perry]
Thanks for your reply. I guess you noticed that everyone else ignored my post which is not unusual. I guess they thought it was a "trick question." I mostly shoot wildlife and have to take what I get so I've not had much occasion to consider this issue and it's always possible that I didn't catch some special scenario his guy was talking about that let him get away with what he does, maybe I missed a previous episode or something. I'd like to say that what you said makes a lot of sense but things keep on rattling through my head about how we should all be "exposing to the right" (ettr) with digital and how we can't fix blown highlights but we can pull detail out of the darks in post using ettr and it all just kinda runs together on me. I guess I just need to set up some stuff to shoot and find out for myself and decide which side of he argument I'm on. Thanks again.
gessman wrote:
but I'll run it by you and perhaps it'll make sens... (show quote)
Thanks for your reply. I guess you noticed that everyone else ignored my post which is not unusual. I guess they thought it was a "trick question." I mostly shoot wildlife and have to take what I get so I've not had much occasion to consider this issue and it's always possible that I didn't catch some special scenario his guy was talking about that let him get away with what he does, maybe I missed a previous episode or something. I'd like to say that what you said makes a lot of sense but things keep on rattling through my head about how we should all be "exposing to the right" (ettr) with digital and how we can't fix blown highlights but we can pull detail out of the darks in post using ettr and it all just kinda runs together on me. I guess I just need to set up some stuff to shoot and find out for myself and decide which side of he argument I'm on. Thanks again.
Sep 11, 2019 06:26:15 #
Besperus
Loc: Oregon
Blair Shaw Jr wrote:
This is why I love this Forum so much.....everyone jumps in and nails it down quickly and efficiently and in a kind and gracious manner. Cool Heads Prevail .......hopefully (depends ?)
I really enjoyed this session a lot . Thanks guys.
I really enjoyed this session a lot . Thanks guys.
Once upon a time there was a thing called the zone system....No, really, I haven’t had time to sit and read all of the solutions offered...I’m sure others are better than mine so I’ll try a simple solution. Shoot in manual. Meter the available light, using “studio” lights? Flash meter? Try a test shot. Look st the results, too grey (dark) try again open one stop (shooting in manual, remember) and shoot again. Brighter? (I hope) keep trying until you get the results you’re after. Depth of field may be an issue, a longer exposure may work instead but I don’t have the foggiest idea about the operation of a Sony APS camera. I use film still. This may not apply to your specific situation but experiments won’t hurt either.
Sep 11, 2019 10:23:07 #
amfoto1
Loc: San Jose, Calif. USA
cdesigns123 wrote:
I'm photographing an item on a table (shoebox size) with white background. I'm using studio lights. I'd like to take a picture of what I see but comes out off white to grey unless I crank up the exposure. I can always fix in post with lightroom but I'm seeking advice from the experience in this group. How do you approach this basic situation. I'm shooting with a Sony A6400. I have a variety of lenses.
It's a little difficult to say without seeing the image with the problem... but sounds as if you have an exposure problem.
All cameras uses a "reflective" light metering system. It measures the light being reflected off of the subject and it's surroundings.
Metering systems of this type are calibrated to "18% gray" tonality. (Actually the world isn't all gray, just imagine it were, for now. Some say "15% gray" is more accurate, but that's splitting hairs, IMO.)
This works out pretty well, most of the time. A lot of things are close to that tonality. And a scene with a lot of mixed tonalities often averages out about right.
The camera and it's metering system has no idea what it's being pointed at. It assumes it's all "average tonality".
But it's not. Sometimes things are darker than average... think of a black bear in a coal mine. The camera's metering system will try to make it average gray and will want to over-expose it. Other times things are lighter than average.... think of a bride in a white gown in a snow storm. The camera will try to make that average gray, too.... and will want to under-expose it.
From your description, it sounds like you are seeing the latter situations... a "scene" that's overall lighter than average, so the camera is under-exposing.
You wrote that you "cranked up exposure", but that can mean a number of different things. There are a lot of different ways to adjust exposure.
I don't have the Sony camera you mention, but most modern DSLRs have some means of "Exposure Compensation" for this exact purpose. Any time you are shooting using an auto exposure mode and the scene/subject are other than average tonality, you can use E.C. to adjust things. In this case, you'd dial in some + E.C. How much is hard to say, but you can learn to judge this yourself, with practice.
Again, E.C. only applies to auto exposure modes... It's a means of overriding what the camera will want to do. AE modes are "A", "S" and "P" on your camera. "M" is manual mode (unless you enable Auto ISO, which makes it another AE mode). When shooting manually, if you go by what the camera's meter is showing you and dial it to "0", you'll get the same result as if you were using one of the AE mode. If using M, you an similarly skew the exposure settings to adjust for the camera wanting to make everything "average".
There are ways to get a more accurate metering of the scene.... especially in a studio setting with controlled and consistent lighting.
You can use a "gray card" to take a meter reading with your camera's reflective meter. Those are widely available in different sizes. You just have to make sure the card... which is "18% gray"... is
in the same lighting and dominates the image area of your camera, so that the meter is predominantly reading from it. If using an AE mode, make note of the settings the camera is trying to make with the gray card, then adjust E.C. so that you achieve the same settings when the card is removed. Or, just switch to fully manual mode (M without Auto ISO) and, while reading the light reflected by the gray card, adjust the camera's shutter and ISO along with the lens aperture to bring the meter to "0". That should be correct.
You mention using "studio lights". If those are continuous lights of some sort (i.e., NOT flash or strobes), the above will work and you can use most any shutter speed you wish.
If your "studio lights" are flash or strobes, it's trickier to measure the momentary lighting. Many studio photographers use a separate, handheld incident/flash light meter. That's able to measure the short duration of the flash or strobes.
Another benefit of incident meters is that they measure the light falling onto the subject, rather than what's being reflected off of it. As a result, there's no need to "tweak" settings with E.C., the way you have to do with reflective meters. Use properly, this type of light meter provides settings that can be directly set on the camera to get a correct exposure (unless you want to skew things... for a high key or low key appearance). The only tricky thing is that you have to be sure to take the reading with the incident meter in the same light as the subject. When working with studio lighting, this usually means putting the meter right next to the subject, pointing the meter's sensor toward the camera.
If using strobes or flash, also be sure you are using a correct shutter speed. Your camera probably has a flash sync speed of 1/250... and probably 1/200 or 1/180 with slower firing studio strobes. These are the fastest shutter speed you can use (some flash with High Speed Sync feature allow faster shutter speeds, but the flash's power and "reach" drop dramatically).
Someone mentioned setting a custom white balance and that's a good idea too. That will insure that the color rendition under your particular lighting is as accurate as possible. (A gray card that's perfectly neutral can be used to set a custom WB too, in addition to determining a correct exposure.)
Once all is set up, the consistent lighting means that you can keep shooting under that setup with the same camera settings for as long as you like... especially if using M mode (no Auto ISO). In fact, some portrait studio cameras are designed so that shutter speed, ISO and aperture can all be "locked", to prevent accidental changes.
For more info and further explanations, I highly recommend Bryan Peterson's "Understanding Exposure". That's a good book, if you haven't already read it.
Sep 11, 2019 11:17:30 #

Timmers wrote:
Scroll up and look at the image that E.L.. Shapiro... (show quote)
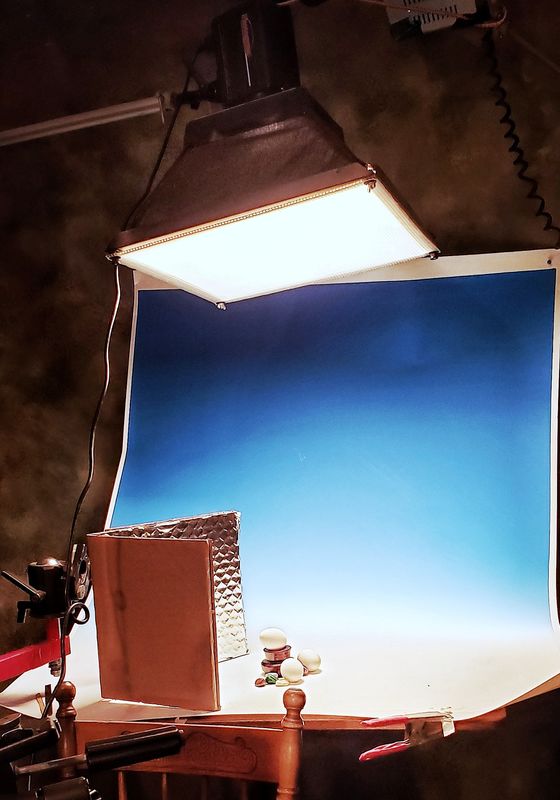
Thank you, Sir, for your kind words. The image of the eggs is far from a "master"-piece. It is a simple teaching aid to illustrate the rendition of a white object, among dark objects while maintaining a decent dynamic range. There is also a white background to contend with. If I had to overexposed to maintain the whites, the color of the other objects would have become desaturated so the formula is correct exposure and lighting.
The setup is not at all sophisticated. It consists of a small white tabletop cyclorama, one light in a softbox and a homemade a silver-like reflector.
Getting back to the original question. Sometimes it's difficult to believe this is a PHOTOGRAPHY forum where folks have a question or an issue that they are trying to solve and fail to post an example. Then, what's worse, is everyone responds with an "essay" on everything from the zome system to photography a snowy landscape. Yes, all of the contributions express valid points but very little of it is specific to the task at hand.
Good thing we are not doctors- we would have lots of dead patients! In medicine, there is symptomology- the doc has to recognize the symptoms. Troubleshooting in photography is the same. Imagine going to the doctor with a serious rash and not showing it to the doctor because you are embarrassed. It is said that a picture is worth 1,000 words but we don't need 1.000 words to correct an underexposed or improperly lighted image.
Funny thing around here- folks spend a ton of money and a whole lot of time on equipment issues- cameras, lenses, features, idiosyncrasies in meter systems, etc and virtually very little time, study and money are invested in lighting principles and equipment. The OP mentions "studio lights" and everyone was so preoccupied with exposure- perhaps a little bit of bracketing would have solved that issue. Nothing was mentioned about the ratio between the white item and the white background, the rendition of texture in a white object, the illusion of dimension in a white subject- all having to do with lighting, Nothing about the angle of incidence with effects exposure and dimension. Studio lights can deliver "LIGHTING" or ILLUMINATION. Lighting in photography implies that aesthetics, dimension, range and rendition of texture or surface all factors in. Illumination means there is enough light to make an adequate exposure. The photographer must have total command of his or her lights to address both components.
A white item the size of a shoebox? That can be an ice cube, a wad of absorbent cotton, a white electronic device, or a white cat with a black tail? Each requires different lighting.
Of course, the photographer should have a firm grasp of how the exposure system is their cameras function as to spot readings, matrix readings and how to sample from a zone on the subject to make the readings and possible apply exposure compensation when necessary. I think there might be some confusion pertaining to making hand-held incident light meter readings with in-camer reflected light exposure readings. An incident light meter reading simulates an 18% gray card reflected light reading and may render white as gray. Where ever the case may be with any internal TTL readings, the photographer should understand how the system in their cameras operated and be prepared to compensate when required. When shooting in a studio-like situation, it is easy enough to "chimp" and also refer to the histogram to preclude any serious exposure errors. Shooting to the right and bracketing is a good practice to avoid disappointment and unnecessary re-shoots.
If you got a technical question post a PICTURE!

Sep 11, 2019 11:33:23 #
E.L.. Shapiro wrote:
Thank you, Sir, for your kind words. The image of ... (show quote)
The OP didn't say the subject was white - he said the background is white. And if the white background was some distance from the subject, a correct exposure on the subject might make the background less than white. Again, it's all speculation since the OP hasn't seen fit to post a photo.
Sep 11, 2019 17:53:42 #
JohnSwanda wrote:
The OP didn't say the subject was white - he said the background is white. And if the white background was some distance from the subject, a correct exposure on the subject might make the background less than white. Again, it's all speculation since the OP hasn't seen fit to post a photo.
Yes- you are correct- I misread! In any event, the lighting I illustrated shows white
and dark items in both warm and cold colors on a white background. Agan, you are correct- if the background is some distance from the subject it has to be lighted separately or transilluminated by means of a Plexiglas cyclorama.
It woud be so much more efficient and effective if folks woud post a shot pertinent to their questions or even just show the setup as I have. It takes just a few minutes to shoot a record shot of the setup with a cellphone camera or just do up a quick lighting diagram to indicate the placement of their lights.
If you want to reply, then register here. Registration is free and your account is created instantly, so you can post right away.