Star trails - what went wrong
Sep 5, 2019 22:31:49 #
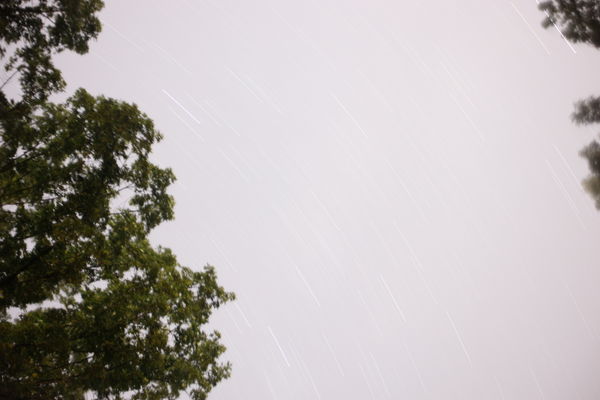
Hello! I tried my first star trail photo tonight using “bulb mode” for 25 minutes on a Canon EOS R and an EF 35-80mm lens (not sure if that matters here). I am not in a highly populated area but there are some lights from homes sparsely scattered around ours. This was taken in the pitch black dark at 10:30pm. It obviously looks like broad daylight because light from somewhere infiltrated, but where? And what can I do to prevent this next time? Thanks in advance for your advice!
F/5.0
ISO 400
F/5.0
ISO 400
Sep 5, 2019 22:37:55 #
melismus
Loc: Chesapeake Bay Country
Just plain old overexposure. Turn ISO down to 100; try f/16. If still overexposed, add ND filter.
Sep 5, 2019 23:09:56 #

A bit of editing to lower the brightness will help this image, say lower by 3-stops (-3.0 in LR for example). Less time, lower ISO and / or smaller aperture will all accomplish the same in the image capture, probably again with post editing to adjust the dark & light in the results.
Sep 5, 2019 23:14:41 #
TomV
Loc: Annapolis, Maryland
I would suggest experimenting with shorter durations to get more immediate feedback and guage how the effect of changing various parameters works. Also, a Google search for complete articles photographing star trails will be a good start.
Sep 5, 2019 23:50:03 #
larryepage
Loc: North Texas area
Sark17 wrote:
Hello! I tried my first star trail photo tonight u... (show quote)
Your exposure time for star trails is fine...your shutter needs to be open long enough to pick up the movement. But as noted, it is surprising just how much light the stars produce. Back way off on the ISO. Depending on your camera, somewhere between 100 and 200 will probably be about right. Then start experimenting with aperture. Once you find an aperture that produces a usable image, you can open up to capture more stars or close down to capture fewer. You want to manage what is captured to produce the result that you want.
Be aware that with these long exposures, it doesn't take much terrestrial light to overpower the starlight. I once had to give up for the night because light being spread by moisture in the air was filling in and ruining my images.
Just for reference, exposures at ISO 4000 and f2.8 for 30 seconds are all that is needed to capture good images of stationary stars. I've even done it at 3200, 20 seconds, and f2.8 when using a camera with good dynamic range.
When you get the exposure correct, you will be able to see a usable image on your camera's screen immediately. Post processing will be needed for best final results, but not to see your image. And just a hint...make sure you are set up for a fairly "standard" image. In particular, don't have the contrast cranked up. It is ok to have a little sharpness dialed in, though.
Sep 5, 2019 23:53:26 #
ahudina
Loc: Browns Point, WA
Sark17 wrote:
Hello! I tried my first star trail photo tonight u... (show quote)
Check out photopills.com click on the academy link and read their guide to photographing star trails. Their app is great for planning and their free resources are first rate Cheers.
Sep 6, 2019 01:55:35 #
Someone else told me that you should only shoot for 15 or so minutes because then the stars have move such that it blurs the image.
Sep 6, 2019 06:10:45 #
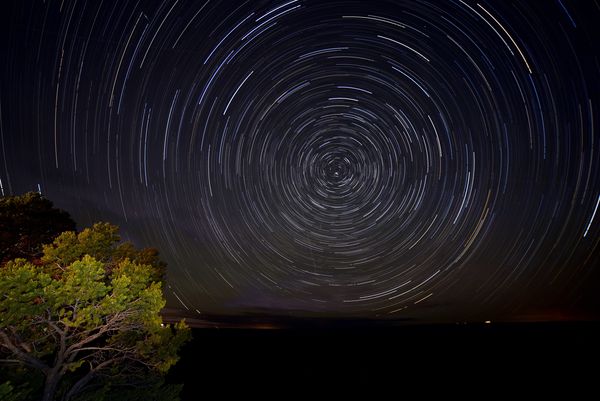
I have some minor success with star trails. I used the following setup on a tripod:
Camera -- Nikon D750
Lens -- Samyang 14mm f/2.8 wide open
ISO -- 200
Shutter Speed -- 5 mins
I took 15 exposures and stacked them using the free software Startrails (https://www.startrails.de). This was taken at the Grand Canyon's South Rim.
Camera -- Nikon D750
Lens -- Samyang 14mm f/2.8 wide open
ISO -- 200
Shutter Speed -- 5 mins
I took 15 exposures and stacked them using the free software Startrails (https://www.startrails.de). This was taken at the Grand Canyon's South Rim.
Sep 6, 2019 06:13:16 #

Triplets wrote:
I have some minor success with star trails. I used the following setup on a tripod:
Camera -- Nikon D750
Lens -- Samyang 14mm f/2.8 wide open
ISO -- 200
Shutter Speed -- 5 mins
I took 15 exposures and stacked them using the free software Startrails (https://www.startrails.de). This was taken at the Grand Canyon's South Rim.
Camera -- Nikon D750
Lens -- Samyang 14mm f/2.8 wide open
ISO -- 200
Shutter Speed -- 5 mins
I took 15 exposures and stacked them using the free software Startrails (https://www.startrails.de). This was taken at the Grand Canyon's South Rim.
Nice
Sep 6, 2019 06:13:18 #
TomV
Loc: Annapolis, Maryland
TomV wrote:
I would suggest experimenting with shorter durations to get more immediate feedback and guage how the effect of changing various parameters works. Also, a Google search for complete articles photographing star trails will be a good start.
As an addendum to this post, UHH has an Astronomical Photography forum that deals specifically with star trails.
Just sayin'.
Sep 6, 2019 06:42:57 #
Sark17 wrote:
Hello! I tried my first star trail photo tonight u... (show quote)
Suggest you post this in the Astrological Photography section: https://www.uglyhedgehog.com/s-109-1.html
They have tutorials on photographing the night sky there also.
Sep 6, 2019 06:58:05 #

Get PhotoPills app for $10. Study their tutorials... wasn’t the moon partially out last night adding to the light? I believe I saw it among the clouds of western Pennsylvania...
Sark17 wrote:
Hello! I tried my first star trail photo tonight u... (show quote)
Sep 6, 2019 07:02:18 #

There is some good info here. Now I shoot Canon but I want to share some insight to all young photographers. You can also set the camera for "LIVE VIEW" or "EXP SIM." It will activate the screen to show you what the camera "sees." Each camera maker will call this by various other names. This isn't a cure all but can help someone just starting out. You'll understand the exposure settings a little more. You should cover the rear view finder with masking tape to avoid ambient lighting affecting your camera's sensor. Also, be mindful of exposure "noise". It looks like blurryied horizontal line against a dark screen especially when magnified. The first time it happens you'll know it. It is not what you intended.
Don't be afraid to float your shutter speed, f/stop and ISO. You do this because lighting will change from time to time and place to place. Also vary your exposure modes. It is important to "experiment." Don't just leave it on "A". You should work with "P," "Tv" and "M". You need to do this so you can become familiar with your camera. Remember there is a huge learning curve to appreciate and a specific muscle memory to develop.
Happy Shooting!
Sep 6, 2019 07:20:26 #
Triplets wrote:
I have some minor success with star trails. I used the following setup on a tripod:
Camera -- Nikon D750
Lens -- Samyang 14mm f/2.8 wide open
ISO -- 200
Shutter Speed -- 5 mins 20 seconds
I took 15 exposures and stacked them using the free software Startrails (https://www.startrails.de). This was taken at the Grand Canyon's South Rim.
Camera -- Nikon D750
Lens -- Samyang 14mm f/2.8 wide open
ISO -- 200
Shutter Speed -- 5 mins 20 seconds
I took 15 exposures and stacked them using the free software Startrails (https://www.startrails.de). This was taken at the Grand Canyon's South Rim.
Update -- I've taken a couple of workshops where they say "shoot far and wide" -- i.e., wide angle lens and at least f/3.5, although most suggest f/2.8 or wider. Also, I don't want to wait 5 minutes to see if my settings are correct, so I'll start off with ISO 3200 for 20 seconds for test shots. If I like the results, then I make adjustments. I normally like my final ISO to be 200. So to get from ISO 3200 to 200, I have to "half" the ISO 4 times (1600, 800, 400, 200). Therefore in order to maintain the correct exposure triangle ratio, I have to double the 20 second exposure 4 times (40s, 80s, 160s, 320s). This is how I arrived at ISO 200 for 5 mins 20 sec.
Sep 6, 2019 08:25:59 #

Vector wrote:
Someone else told me that you should only shoot for 15 or so minutes because then the stars have move such that it blurs the image.
Fifteen seconds (+/-) I believe for "dot" stars.
If you want to reply, then register here. Registration is free and your account is created instantly, so you can post right away.