White balance question
Aug 23, 2019 06:57:48 #

selmslie wrote:
I started looking at the 21:30 mark where you indi... (show quote)
OMG Scotty - buy yourself an ColorChecker Passport and try it for yourself. Now you are sounding like Ken Rockwell - known for reviewing things without actually having tried them or even having held them in his hands.
The Dual Illuminant camera profile technology has been around 10 years - I've been doing it since 2013, when I first became aware of the capability - extremely useful for architectural and interior design shots. Before that I struggled getting good color even when using a Minolta Color Meter, a Spectra Tri-Color meter or a Gossen Sixticolor. All of these worked, but required constant calibration. I also had a collection of Wratten CC gels to make corrections for light color variations. It was a really big PITA which is why i did most of my architectural work in black and white - far more manageable.
Here is a video that explains how to create the Dual Illuminant profile that I think you can understand.
https://www.youtube.com/watch?v=PJYdmM89EmE
And this thread, from around the same time I started using the CCP, reveals how someone, not familiar with creating dual illuminant profiles, struggled at first with unclear instructions and a bit of overthinking.
https://forums.adobe.com/thread/1318608
Things have improved - the software is better, the directions are better, and we have new software. The way LR uses camera profiles has changed a bit but you can still end up in the same place.
In the future if you are going to pass judgement on a process or a tool, at least make the effort to use it and speak from a position of knowledge and experience. It will make you sound smarter. Otherwise you sound like every other Keyboard Kommando on this forum - lots of opinions, often powerfully or stubbornly stated, but without a shred of experience or evidence to back them up. And don't overthink things - sometimes the exact mechanism that makes something work is beyond analysis - but not being able to understand how something works doesn't mean it doesn't work.
BTW - On1 Raw 2020, just announced yesterday, will include the specific functionality to work with the CCP to create and use camera profiles. It must work, otherwise why go through the motions . . . Just sayin'
Aug 23, 2019 06:58:23 #
selmslie wrote:
Was my last post clear enough?
No, it wasn't.
Aug 23, 2019 06:59:37 #
selmslie wrote:
Capture One makes it very easy (two clicks) to copy almost any setting from one image to another. I suppose that Adobe can do that too but I don't know how easy it would be.
With layers you can get two white balance settings into different parts of the same image. I can imagine a case for wanting to do that but I have never tried it.
With layers you can get two white balance settings into different parts of the same image. I can imagine a case for wanting to do that but I have never tried it.
That's how I used to do it with mixed results. It involved layers, graduated masks and lots of feathering, along with adjusting layer opacity - PITA enough for one image, but for multiple images that need to be stitched - as they say in Brooklyn - FUGGEDABOUDIT!
Aug 23, 2019 07:00:30 #
camerapapi wrote:
Do a custom white balance.
You'd need two, and you'd have to balance them in post processing.
Aug 23, 2019 07:24:01 #

Gene51 wrote:
OMG Scotty - buy yourself an ColorChecker Passport and try it for yourself. Now you are sounding like Ken Rockwell - known for reviewing things without actually having tried them or even having held them in his hands ...
Like many of us, I had a Macbeth ColorChecker about 40 years ago when I was using Kodachrome and printing on Cibachrome. I also used it with color negative film, and when I started using the Zone System.
The ColorChecker is not the issue. Neither is the creation of two or more separate color profiles. I already showed how I could easily do that using just Capture One and any reasonably neutral target.
But the devil is in the details. Once you have two or more profiles, how do you apply them to a single image? None of the videos you provided got into that sticky issue.
An example of how you do this would help. But if it's too much trouble for you to do that then maybe the whole concept is academic.
Aug 23, 2019 07:27:32 #
Gene51 wrote:
That's how I used to do it with mixed results. It involved layers, graduated masks and lots of feathering, along with adjusting layer opacity - PITA enough for one image, but for multiple images that need to be stitched - as they say in Brooklyn - FUGGEDABOUDIT!
That's exactly my point! If it's a PITA just for a single image then the whole approach is useless. Why bother?
Aug 23, 2019 08:44:02 #
Gene51 wrote:
... BTW - On1 Raw 2020, just announced yesterday, will include the specific functionality to work with the CCP to create and use camera profiles. It must work, otherwise why go through the motions . . . Just sayin'
The difference between a marketing decision and a technical effort is that marketing wants to make more money and the developers want to remain employed.
Aug 23, 2019 10:09:07 #
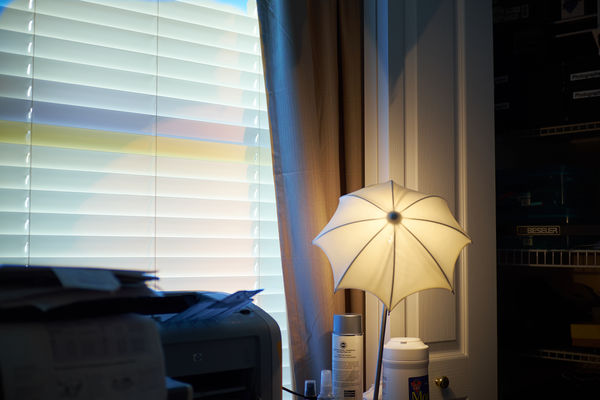
selmslie wrote:
That's exactly my point! If it's a PITA just for a single image then the whole approach is useless. Why bother?
Just to see how much of a PITA it can become, I took a stab at the image in Capture One Pro using layers.
I used the tungsten WB for the base image. Then I created a layer for just the window and applied the other WB to it.
Besides the difficulty in creating a slightly feathered layer, you can see that it uncovered another problem. The lampshade is casting some of its light on the inside of the blinds. That throws off the green/magenta balance in part of the window. The curtain is also casting a shadow of the lamp's light so the space right next to the curtain does not have this issue.
Since I am not a masochist, this is an exercise that I am unlikely to ever repeat.
Aug 24, 2019 19:40:20 #
lsupremo
Loc: Palm Desert, CA
burkphoto wrote:
It is easier than it sounds. I did it all with lens filters and lighting gels back in the 1980s. Custom white balance off of a Delta 1 18% gray card works great in many situations. I've been using one of those since the early days of digital, along with the ExpoDisc and the Photovision One Shot Digital Calibration Target. I only use the ColorChecker Passport when results have to be spot-on for a client.
Thanks I’ll try to use these.
If you want to reply, then register here. Registration is free and your account is created instantly, so you can post right away.