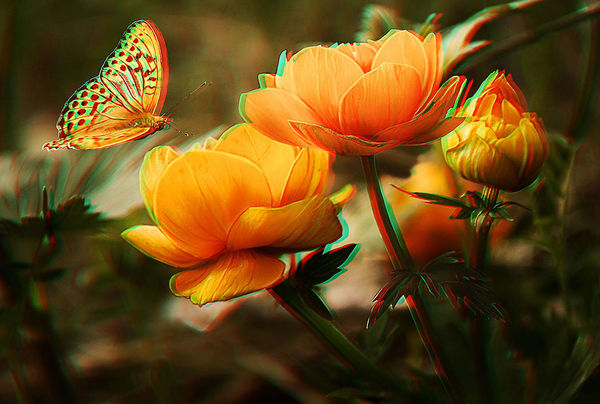
3D - Flowers
Jun 29, 2019 11:19:44 #

You will need a pair of anaglyph glasses to view in 3D.
2D converted to 3D.
2D converted to 3D.
Jun 29, 2019 11:27:22 #

Jun 29, 2019 12:17:14 #
dhroberts
Loc: Boston, MA, USA
That’s neat. I have two questions:1) How do you make the image pairs, and 2) where can I get a good pair of anaglyph glasses (don’t say “Google it!”)?
Jun 29, 2019 14:17:08 #
Terrymac wrote:
Good one. Thanks.
Thanks for being a responsive viewer and Thank you.
Jun 29, 2019 14:22:17 #
dhroberts wrote:
That’s neat. I have two questions:1) How do you make the image pairs, and 2) where can I get a good pair of anaglyph glasses (don’t say “Google it!”)?
***
I need some clarification.
1. Is your question how do you make image pairs with a camera or how do you make image pairs from a single photo?
2. I got a pair of clip on's via Amazon but it takes several weeks to get them as they come from China.
They are also available in regular glass frames and only cost a few dollars.
There may be other vendors but that would require "Google it."
Jun 29, 2019 14:30:35 #
dhroberts
Loc: Boston, MA, USA
SoHillGuy wrote:
***
I need some clarification.
1. Is your question how do you make image pairs with a camera or how do you make image pairs from a single photo?
2. I got a pair of clip on's via Amazon but it takes several weeks to get them as they come from China.
They are also available in regular glass frames and only cost a few dollars.
There may be other vendors but that would require "Google it."
I’d like to know how to do both ways of making pairs.
Thanks.
Jun 29, 2019 16:50:04 #
dhroberts wrote:
I’d like to know how to do both ways of making pairs.
Thanks.
Thanks.
***
The following is text from the internet.
1. CREATING ANAGLYPHS WITH 2 IMAGES
2. The 2 image technique really helps you understand the science behind stereoscopic images. Anaglyphs are created by combining two images from different angles, much like the way our eyes work. Try looking at an object on your desk and close one eye, then the other. Notice how the object appears to move? This technique uses the same principle. Two photos are taken, either with two cameras strapped together at a set distance apart, or from one camera which is moved on a tripod. Take shots just a few inches apart for close up subjects, and a couple of feet for scenes with lots of distance.
3. Open up your two photographs in Photoshop These particular images are a ready made stereoscopic pair from Shutterstock. Select All (CMD+A) and Copy (CMD+C) one image, then Paste (CMD+V) it into the other image document. Double click the Background to convert it into a normal layer. Remember which image is the ‘left’ photo and which one is the ‘right’ photo. Name the layers accordingly.
4. Double click the ‘left’ layer again to open up the Layer Style options. Uncheck the Red channel then hit OK.
5. Open the Layer Style options for the ‘right’ layer, but this time uncheck both the Green and Blue channels. You’ll immediately see the anaglyph effect come to life.
6. Move the layer to align the offset images on a focal point in the foreground or background to fine tune the image and reduce any double vision issues you might be experiencing.
7. Use the Crop tool to trim the document to the area where both layers overlap.
8. The depth of the scene is automatically generated by the point of view shift between the two images. The exciting thing about this technique is you don’t know how the effect will turn out until you process the images, which relates to the fun of traditional photography.
9. CREATING ANAGLYPHS WITH JUST 1 IMAGE
10. It is still possible to create Anaglyphs with just one image. This technique requires additional work in Photoshop, but it allows for more control over the final effect. It uses a depth map with Photoshop’s Displace filter to shift the second image out of place and thus creates the 3D effect.
11. Open your single image in Photoshop. We first need to create a depth map, which uses black and white tones to determine how much each specific area of the image needs to be displaced. Create a new layer, then draw a long thin rectangular selection and fill this area with a black to white gradient. This will be a handy reference for the range of tones.
12. We’ll start by highlighting the areas closest to the camera. Create a new layer and trace any foreground elements with the Polygonal lasso tool (or Pen tool), then fill the selection with white.
13. Set the Burn tool to target Highlights and reduce the opacity to 50%. Paint over areas of the white shapes that are slightly further away with a soft brush, changing them to a light grey instead. This gradual change of tone will be reflected as a gradual change of depth.
14. Create another new layer, and move it below the white layer. Draw a selection around any elements that are beyond the foreground. Take a mid-grey sample from the gradient reference and fill the layer so the tones are gradually darker.
15. Repeat the process of creating a new layer, move it below the previous layer, then trace and fill elements of the scene with tones to represent their depth. The darker the tone, the further away that portion of the image will recess when viewed with 3D glasses.
16. The final layer at the bottom of the stack should be pure black, which will only be visible in the far distance areas of the image.
17. Press CMD+A to Select All, the CMD+Shift+C to Copy Merged. Paste (CMD+V) this merged image at the top of the layer stack and apply a 10px Gaussian Blur from the Filter menu. This blurring will reduce the harshness of the edges after the displacement of the image.
18. Save the document as a .PSD with the filename ‘displace.psd’.
19. Open up the original photograph again then use the shortcut CMD+Shift+U to desaturate it. (Desaturation is totally optional, but it adds to the retro style of the anaglyph effect)
20. Press CMD+J to create the duplicate layer, then double click on the Background to convert it into a normal layer.
21. Double click the top layer to open up the Layer Style options. Uncheck the Red channel then hit OK.
22. Open the Layer Style options for the second layer, but this time uncheck both the Green and Blue channels. Unlike the previous technique, nothing has changed yet!
23. Select the top layer, then go to Filter > Distort > Displace. Enter 10px in the horizontal option and 0 in the vertical setting. Click OK, then navigate to the displace.psd file.
24. The layer will then be displaced according to our black and white depth map. Grab your 3D glasses to see the background recess into the distance.
25. Move the top layer to align the images on a focal point to reduce any unwanted double vision issues, then crop the document to size.
26. The benefit of this technique is you have full control over the manipulation of the image. Since we preserved the layers in the displacement map, you can head back and adjust the tones and blur to alter the 3D effect.
This is just one of several different methods of arriving at similar results.
If you want to reply, then register here. Registration is free and your account is created instantly, so you can post right away.