Indexed - Basics of noise processing
Jun 11, 2019 08:31:58 #

Image noise is extraneous visible artifacts that degrade image quality. Image noise includes luminance (grayscale) noise, which makes an image look grainy, and chroma (color) noise, which is usually visible as colored (blue / red) artifacts in the image. Photos taken with high ISO values and / or older or less-sophisticated digital cameras can have noticeable noise.
Although this discussion focuses on Adobe software and RAW processing, the definitions of the two types of noise and how the controls operate is common to all software and the processing of both JPEG and RAW images; where for your JPEGs, the camera will perform much of the Noise Reduction (NR) processing. The RAW shooter receives a file with no NR applied and must determine the optimal values in post processing of their RAW images.
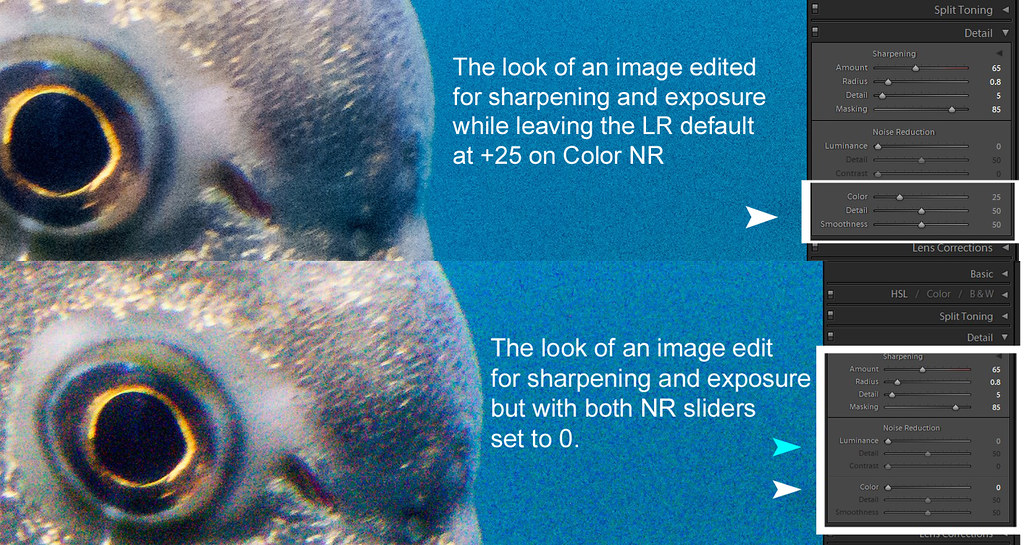
Example 1 - Sony a7II at ISO-3200 with both Adobe LR sliders set to '0' for Luminance and Color NR

Every digital camera creates imperfections in images called 'noise', which appears as unwanted dots of color, or lines or smudges of color (or some of all three) as well as causing a grain across the entire image. An excessive amount of noise can ruin an image by taking attention away from the content of the image.
Your image files were created by a specialized hand-held computer we call a "digital camera". Your desktop / laptop computer can use specialized software to remove or otherwise lessen the digital noise in the files. But, too much noise reduction takes away the fine details and sharpness of the image while removing the noise, a negative impact sometimes worse than the original image noise.
The Adobe products, both Lightroom (LR) and Adobe Camera Raw (ACR), default to +25 on the Color NR for all RAW files (all cameras, all models). As shown in the series of examples below, an image is likely to need less Color NR and more Luminance NR.
Example 2 - Sony a7II at ISO-3200 with just the Adobe LR default and all NR removed
The two 'detail' sliders provide control over the impact of the type of noise reduction. Higher values preserve more detail but may produce noisier results. Lower values produce cleaner results but may also remove some detail.
Example 3 - Sony a7II at ISO-3200 with both Adobe LR sliders adjusted to different values of Luminance and Color NR

So, the 'art' of noise processing is finding the Luminance and Color NR values that best balance the application of sharpening with reduction of both types of noise that tends to soften the image details.
Although the digital camera manufacturers express ISO as "sensitivity" just like analog film, digital sensors only have a single "base" sensitivity, regardless of the ISO setting. This 'base' ISO is typically ISO-100, but some cameras it is ISO-200, or somewhere in this range.
Digital cameras "act like" they change the sensor sensitivity; but actually, the camera brightens the sensor data to correspond to the specified ISO value, as if the specified ISO-rated film had been used for the same level of light hitting the sensor. The process that brightens (amplifies) the data captured on the sensor introduces much of the noise seen in the "high ISO" result. Newer cameras use newer technology to reduce this digital noise so that less noise is observed at similar ISOs when compared to older cameras.
Many cameras require no NR or only the most minor values, say in the +1 to +5 values for both Luminance and Color NR, when shooting at the camera's base ISO. The need for no or minor NR may range as high as ISO-400 for these cameras. As noted above, Adobe defaults to Color +25 for all RAW files, with no analysis of the ISO value of the image, nor the camera model, nor the brand. When shooting in RAW at or near base ISO, the RAW photographer should reduce the +25 Color NR default during their processing workflow.
The example below shows screen-captures of the LR / ARC 'defaults' in terms of both NR and Sharpening. The feather details, particularly between the eye and beak, seem to have lost detail along with the noise in the processed version. Alternative approaches would be to use less NR from Lightroom / ACR; and instead, let a third-party product like Topaz DeNoise or Noise Ninja process the noise, or to use completely different RAW editors like Affinity, Luminar, DxO PhotoLab, etc.
Example 4 - Canon EOS 5DIII at ISO-5000 with default RAW import settings and adjustments for Sharpening, Luminance and Color NR

Noise becomes less pronounced as the tones of the image become brighter. When the sensor data is amplified from the base ISO to the specified ISO, the darker portions of the image are amplified more than the brighter portions. As a result, digital noise will tend to be more visible in the relatively darker portions of the image at higher and higher ISOs.
My own experience with several different digital cameras (of different ages, sensor sizes and brands) is that each camera is consistent at different ISO values. That is, images from Camera-A at ISO-2000 will tend to need the same NR values for image after image all at ISO-2000. The same camera will need different NR values at ISO-1000; but again, for image after image at ISO-1000, the files will tend to need the same NR values. This lets me develop LR Develop Presets that are applied specific to each camera model at each specific ISO value. After importing images into Lightroom, I use metadata filters to isolate all the images at each ISO value for the unique camera models. I select all the images at the same ISO value and apply the appropriate preset. While editing, I may tweak the NR and sharpening on individual images, possibly syncing that refinement across similar images at the same ISO.
SUMMARY
1. Look closely at any / all default values your tool applies to your RAW files.
2. Look for consistency of Noise Reduction values at unique ISO values (for each camera model, if applicable)
3. Seek a consistent and efficient RAW workflow where you apply our own custom-developed NR defaults to your images.
Although this discussion focuses on Adobe software and RAW processing, the definitions of the two types of noise and how the controls operate is common to all software and the processing of both JPEG and RAW images; where for your JPEGs, the camera will perform much of the Noise Reduction (NR) processing. The RAW shooter receives a file with no NR applied and must determine the optimal values in post processing of their RAW images.
Example 1 - Sony a7II at ISO-3200 with both Adobe LR sliders set to '0' for Luminance and Color NR
Every digital camera creates imperfections in images called 'noise', which appears as unwanted dots of color, or lines or smudges of color (or some of all three) as well as causing a grain across the entire image. An excessive amount of noise can ruin an image by taking attention away from the content of the image.
Your image files were created by a specialized hand-held computer we call a "digital camera". Your desktop / laptop computer can use specialized software to remove or otherwise lessen the digital noise in the files. But, too much noise reduction takes away the fine details and sharpness of the image while removing the noise, a negative impact sometimes worse than the original image noise.
The Adobe products, both Lightroom (LR) and Adobe Camera Raw (ACR), default to +25 on the Color NR for all RAW files (all cameras, all models). As shown in the series of examples below, an image is likely to need less Color NR and more Luminance NR.
Example 2 - Sony a7II at ISO-3200 with just the Adobe LR default and all NR removed
The two 'detail' sliders provide control over the impact of the type of noise reduction. Higher values preserve more detail but may produce noisier results. Lower values produce cleaner results but may also remove some detail.
Example 3 - Sony a7II at ISO-3200 with both Adobe LR sliders adjusted to different values of Luminance and Color NR
So, the 'art' of noise processing is finding the Luminance and Color NR values that best balance the application of sharpening with reduction of both types of noise that tends to soften the image details.
Although the digital camera manufacturers express ISO as "sensitivity" just like analog film, digital sensors only have a single "base" sensitivity, regardless of the ISO setting. This 'base' ISO is typically ISO-100, but some cameras it is ISO-200, or somewhere in this range.
Digital cameras "act like" they change the sensor sensitivity; but actually, the camera brightens the sensor data to correspond to the specified ISO value, as if the specified ISO-rated film had been used for the same level of light hitting the sensor. The process that brightens (amplifies) the data captured on the sensor introduces much of the noise seen in the "high ISO" result. Newer cameras use newer technology to reduce this digital noise so that less noise is observed at similar ISOs when compared to older cameras.
Many cameras require no NR or only the most minor values, say in the +1 to +5 values for both Luminance and Color NR, when shooting at the camera's base ISO. The need for no or minor NR may range as high as ISO-400 for these cameras. As noted above, Adobe defaults to Color +25 for all RAW files, with no analysis of the ISO value of the image, nor the camera model, nor the brand. When shooting in RAW at or near base ISO, the RAW photographer should reduce the +25 Color NR default during their processing workflow.
The example below shows screen-captures of the LR / ARC 'defaults' in terms of both NR and Sharpening. The feather details, particularly between the eye and beak, seem to have lost detail along with the noise in the processed version. Alternative approaches would be to use less NR from Lightroom / ACR; and instead, let a third-party product like Topaz DeNoise or Noise Ninja process the noise, or to use completely different RAW editors like Affinity, Luminar, DxO PhotoLab, etc.
Example 4 - Canon EOS 5DIII at ISO-5000 with default RAW import settings and adjustments for Sharpening, Luminance and Color NR
Noise becomes less pronounced as the tones of the image become brighter. When the sensor data is amplified from the base ISO to the specified ISO, the darker portions of the image are amplified more than the brighter portions. As a result, digital noise will tend to be more visible in the relatively darker portions of the image at higher and higher ISOs.
My own experience with several different digital cameras (of different ages, sensor sizes and brands) is that each camera is consistent at different ISO values. That is, images from Camera-A at ISO-2000 will tend to need the same NR values for image after image all at ISO-2000. The same camera will need different NR values at ISO-1000; but again, for image after image at ISO-1000, the files will tend to need the same NR values. This lets me develop LR Develop Presets that are applied specific to each camera model at each specific ISO value. After importing images into Lightroom, I use metadata filters to isolate all the images at each ISO value for the unique camera models. I select all the images at the same ISO value and apply the appropriate preset. While editing, I may tweak the NR and sharpening on individual images, possibly syncing that refinement across similar images at the same ISO.
SUMMARY
1. Look closely at any / all default values your tool applies to your RAW files.
2. Look for consistency of Noise Reduction values at unique ISO values (for each camera model, if applicable)
3. Seek a consistent and efficient RAW workflow where you apply our own custom-developed NR defaults to your images.
Jun 11, 2019 08:38:40 #
Jun 11, 2019 08:40:13 #

Jun 11, 2019 08:41:47 #

As usual, you have provided an interesting, useful, succinct post on a subject many photographers view as complicated.
Jun 11, 2019 08:51:41 #
Thanks for the article, very informative. I had read elsewhere that order matters in some cases. That noise reduction should be one of the first things done. Not in Lightroom, because it does not apply the changes in the order we apply them (it has its own internal sequence), but for pixel based editors if you apply NR after doing other edits you can end up with artifacts you wouldn't otherwise have compared to doing noise reduction before other edits.
Jun 11, 2019 08:58:54 #

Definitely a thread to be bookmarked. Those of us who use smaller sensor cameras (M43 here) are all too well acquainted with the noise problem. My two cameras, though both by the same maker (Olympus) use two different sensors (one Sony and the other Panasonic), and they manage noise very differently. As you explain, we have to learn what kind of tinkering in Lightroom will get the best out of each camera we use. Your post helps make the controls more understandable.
Jun 11, 2019 09:08:56 #
Jun 11, 2019 09:28:50 #
Jun 11, 2019 09:38:11 #

Your experience and effort to create this comprehensive topic is greatly appreciated, Paul!
I've added to a tutorial list that was started by Searcher and I've tried to remember to update
https://www.uglyhedgehog.com/t-184368-1.html#10148446
Most of the entries are by still-active UHH users, so that folks can send a pm if they have further questions, or post to this forum.
I've added to a tutorial list that was started by Searcher and I've tried to remember to update
https://www.uglyhedgehog.com/t-184368-1.html#10148446
Most of the entries are by still-active UHH users, so that folks can send a pm if they have further questions, or post to this forum.
Jun 11, 2019 10:02:04 #
Thank you everyone! It's seemed to me that finding details on noise processing is more difficult than other topics of digital editing. Even experimenting with the tools / sliders is difficult to understand from your eyes what is occurring / being controlled. An 'aha moment' was when I learned LR was pretty much eliminating color (chroma) noise by their +25 default and they're doing nothing with luminance 'grain'. I took from Art Morris the idea of developing ISO-specific presets. Maybe the 'how' of developing presets will be another post ...
Jun 11, 2019 10:19:42 #
Jun 11, 2019 10:21:11 #
CHG_CANON wrote:
Thank you everyone! It's seemed to me that finding... (show quote)
Yes, please do one on presets - they are such a time saver! It will help a lot of folks and you'll probably have some new ideas for those of us who already use them.
(My import preset is my best friend!)
Jun 11, 2019 11:04:30 #
olemikey
Loc: 6 mile creek, Spacecoast Florida
CHG_CANON wrote:
Thank you everyone! It's seemed to me that finding... (show quote)
You are a good man to share all these things... Keep up the good work!!

Jun 11, 2019 11:28:15 #

Thanks for the tutorial. Though I understand noise and the effects of noise processing it's nice to see it explained in the manner you did with images to clarify the text. Great job.
Jun 11, 2019 12:17:10 #
Image averaging in photoshop is another arrow in the quiver, if one has the luxury of talking several identical exposures. Four images stacked is supposed to reduce noise in half without eating sharpness and enhance details. Simple as 4 layers with the opacity set from the bottom up at 100%, 50%, 33%, 25%. I've tried it a few times just to try it.
If you want to reply, then register here. Registration is free and your account is created instantly, so you can post right away.