What's the best camera and lens to take photos of flat artwork for under $1000?
Jun 6, 2019 11:49:37 #
jdubu wrote:
What camera you use is of less importance, IMO, th... (show quote)
I used to do a lot of copy work for an historical society. A lens with good flatness of field really helps on the edges. A polarizing filter and a polarized light source helps with glare and reflections. The lighting used polarizing sheet material.
Jun 6, 2019 12:17:23 #
If you live in a metropolitan area, consider out sourcing to a professional lab. If you have to do it yourself, camera is less important than the lens, and both are less important than the lighting. Pay particular attention to have the sensor plane parallel to the art object.
Jun 6, 2019 12:19:41 #
That’s a very tall order!! Gyclees are a scan and print process, produced on very, very expensive equipment, not likely to be equaled with a camera.
Jun 6, 2019 13:01:53 #
davesit
Loc: Media, PA
rmalarz wrote:
Lighting is crucial. Diffusion of the lighting is just as crucial.
--Bob
--Bob
I couldn't agree with you more. You can spend $5,000 for a setup and still would not get good shots of artwork. Glare is the most common problem to deal with.
Jun 6, 2019 13:07:54 #
If you live in a metropolitan area, consider out sourcing to a professional lab. If you have to do it yourself, camera is less important than the lens, and both are less important than the lighting. Pay particular attention to have the sensor plane parallel to the art object.
Jun 6, 2019 13:28:27 #
Lighting is first.
Rake lighting serves two purposes 1) reduces glare 2) enhances the texture of the canvas or oils.
You need good quality, soft even light. The more room you have to backup the light the less critical the light source.
Lighting options are going to be space you have and size of the art dependent.
Longest focal length space allows, reduces the "angle of incidence" to minimze glare and has less distortion. (No wide angle zooms)
Any prime portrait lens. Manual focus models are fine. Most prime macro lenses over 60mm are good choices too.
Your budget doesn't quite reach the full frame cameras. A used Nikon 7100 is a good start.
For working tethered, Digicam Control, free software, and a color correct computer.
Jun 6, 2019 13:42:12 #
fetzler
Loc: North West PA
kymarto wrote:
Not a good idea at all to use a wide lens, as they... (show quote)
I COMPLETELY Agree. No wide angle lenses for copy work
Jun 6, 2019 14:24:26 #
LWW wrote:
NIKKOR 10-20 AFP $276.95
NIKON D5600 $546.95
Magnus DLX-357 tripod $24.99
Neewer 750II TTL Flash $52.99
B+W 72mm Circular Polarizer $76.95
Total from B&H. $978.73
NIKON D5600 $546.95
Magnus DLX-357 tripod $24.99
Neewer 750II TTL Flash $52.99
B+W 72mm Circular Polarizer $76.95
Total from B&H. $978.73
Why the 10-20? Seems strange.
Jun 6, 2019 14:33:00 #
azted
Loc: Las Vegas, NV.
I have done what you are talking about for about 7 years. The only difference is that I do not sell giclees of my art, the photos are for my catalog. I have tried many different camera/lens combinations, and it always ends up the same story. Yes, lighting is very important. But the greatest difficulty I have found is that each camera/lens changes the colors slightly. The only camera that gives the truest color is my Sony RX-10 original, which you can find for $450.00 used on eBay. The lens and sensor seem to give the best accuracy, over my other cameras (Sony Full frame and APS-C, OlympusM43, and NikonPoint and shoot). The other problems will stem from your artwork.. do any have foil, texture, sunken colors? These will all cause headaches and compromises as you photograph them. Using a scanner is also limiting, as this causes higher costs, and it will be harder for you to make a profit. Good luck in your effort!
Jun 6, 2019 14:35:14 #
bcplimpton
Loc: Southern New Jersey
I use a Nikon D5600 with 80mm DX lens and cable release on a very sturdy tripod. I do this in my basement which has very little outside light. I set up an easel to hold the painting. I use two diffused (umbrella) lights set at 45º angle from either side of the easel. I turn our all the light fixtures except the two studio lights. This makes my basement pretty dark. Adjust the distance and angle of the lights to be sure that there will be no glare. I take a properly exposed shot of a gray card (filling the frame) and set the camera to use that for preset white balance. Now with only the studio lights on I clamp the painting vertically on the easel and photograph it. I generally open the lens very wide as DOF is not an issue if the painting is vertical and the lens angle of view to the painting is 90 º. Try to keep the edges of the painting square to the edges of the viewfinder. This reduce the need for rotation in post that may damage the resulting image. Exposures tend to be long which is the reason for the sturdy tripod and cable release. I also usually bracket +- .5EV. With this set-up the artist almost always likes the middle exposure with little to no processing beyond cropping. Most paintings are not the 2x3 aspect ratio of a DSLR, so I do my best to fill the frame and crop to the exact painting aspect ratio in post.
The set up and tear down require a significant amount on time so I tend to make my spouse (the painter) wait until she has at least 5 or more ready for imaging. It took a lot of trial and error to finally determine the exact process that works for me but since I've been using it, I have not had to take a shot over.
The critical steps are the lighting/white balance, having the camera aligned so that the lens angle of view to the painting is 90º and adjusting the camera to eliminate as much parallax and rotation as possible.
Jun 6, 2019 14:36:16 #
bcplimpton
Loc: Southern New Jersey
I use a Nikon D5600 with 80mm DX lens and cable release on a very sturdy tripod. I do this in my basement which has very little outside light. I set up an easel to hold the painting. I use two diffused (umbrella) lights set at 45º angle from either side of the easel. I turn our all the light fixtures except the two studio lights. This makes my basement pretty dark. Adjust the distance and angle of the lights to be sure that there will be no glare. I take a properly exposed shot of a gray card (filling the frame) and set the camera to use that for preset white balance. Now with only the studio lights on I clamp the painting vertically on the easel and photograph it. I generally open the lens very wide as DOF is not an issue if the painting is vertical and the lens angle of view to the painting is 90 º. Try to keep the edges of the painting square to the edges of the viewfinder. This reduce the need for rotation in post that may damage the resulting image. Exposures tend to be long which is the reason for the sturdy tripod and cable release. I also usually bracket +- .5EV. With this set-up the artist almost always likes the middle exposure with little to no processing beyond cropping. Most paintings are not the 2x3 aspect ratio of a DSLR, so I do my best to fill the frame and crop to the exact painting aspect ratio in post.
The set up and tear down require a significant amount on time so I tend to make my spouse (the painter) wait until she has at least 5 or more ready for imaging. It took a lot of trial and error to finally determine the exact process that works for me but since I've been using it, I have not had to take a shot over.
The critical steps are the lighting/white balance, having the camera aligned so that the lens angle of view to the painting is 90º and adjusting the camera to eliminate as much parallax and rotation as possible.
The set up and tear down require a significant amount on time so I tend to make my spouse (the painter) wait until she has at least 5 or more ready for imaging. It took a lot of trial and error to finally determine the exact process that works for me but since I've been using it, I have not had to take a shot over.
The critical steps are the lighting/white balance, having the camera aligned so that the lens angle of view to the painting is 90º and adjusting the camera to eliminate as much parallax and rotation as possible.
Jun 6, 2019 14:38:27 #
E.L.. Shapiro wrote:
A $1,000 limit may be a tall order for a decent co... (show quote)
For all the advice on here, this is the one that shows it is from someone who has doen this on a regular basis, and is not just fantasizing. I have a friend that owns a lab and does this regularly, and this will give you an idea how to do this right ti takes time and touble. And if you don't want to do it right, the just stop reading here.
He has a permanent setup in his lab for this. He went to a going out of business auction at a local print shop and bought an old process camera. This is a device with a massive cast iron frame, He retained the holder for the originals and the light supports, and removed the vacuum film back and replaced it with a standard 1/4-20 screw to mount a camera. he lights with studio strobes that are aligned exactly 45 degrees from the original, with polarizing filters attached. He includes a grey scale and color chart alongside every original. When originally installed, he used film, and as he had his own dip and dunk line that was carefully monitored every day with control strips, he had a highly controlled system. In the conversion to digital, he uses a Canon 5D. Of course he uses a dedicated macro lens, not some zoom that focuses close.
This isn't something for amateur night. This is serious business, a situation where half-assed work is a total fail.
Jun 6, 2019 14:43:22 #

fetzler wrote:
E. L Shapiro has good advice good advice for light... (show quote)
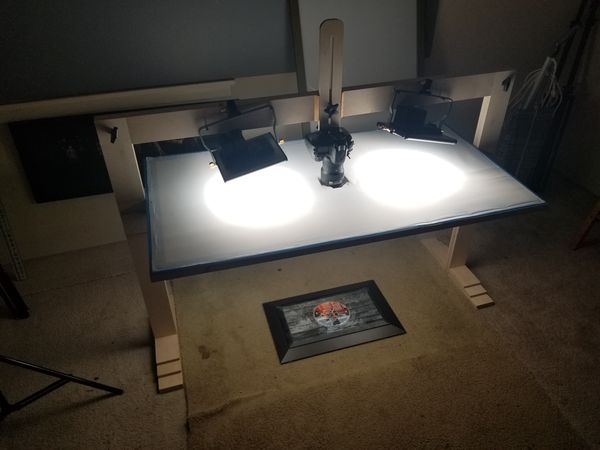
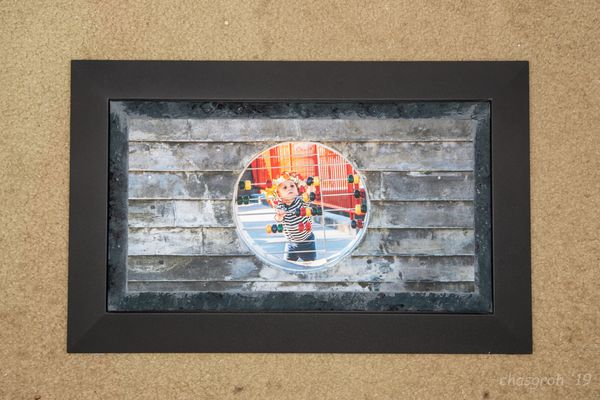
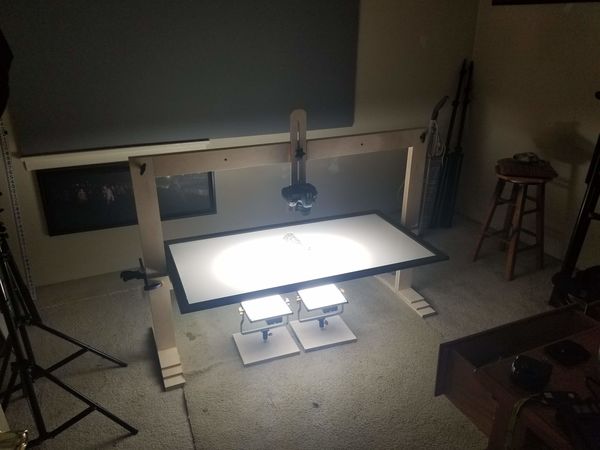
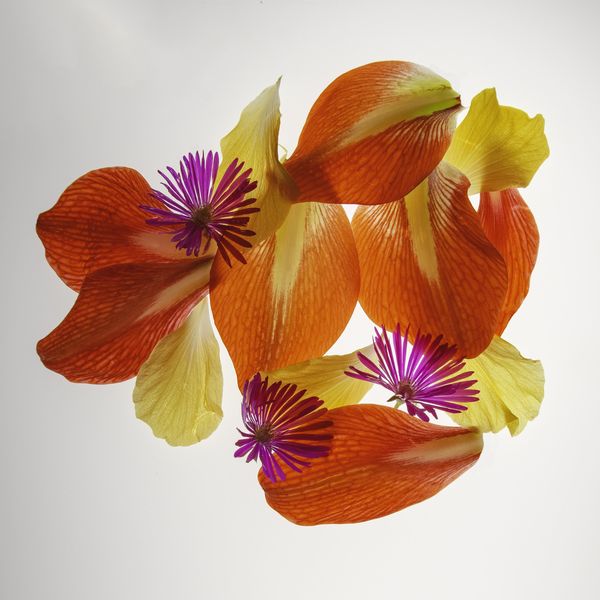
...light, light, light. I got frustrated trying to shoot my work on a wall with good equipment and studio lights. Too many facets were causing glare points that produced alot of Photoshop time. I eventually got it *sort of* right, but still grrrrr. So I built a copy table kinda thing that is big enough for *most* of my work (so far, at least) and allows me to explore up-lighting to boot. What you see is the first try at shooting one of my pieces, and another up-lit using my neighbor's flower petals. D800 with a 16-35 f4 (since, I've gone macro) with very little manipulation in post (mostly just the crop with a white balance tweak). Now, I'm a cabinet guy and this was pretty easy to make, but the concept is simple and doable for the average handy person with some tools. Scrim material was readily available (it's double layered and stretched over a simple frame) and I found the plexi at a local plastics company for 20 bux. My total outlay in materials was under $100...ply and plexi biggest, hardware next, some 1/4 20 knobs and mated inserts.
Jun 6, 2019 15:12:20 #
billnikon wrote:
Nikon D7000 and a Nikon 60 mm 2.8 D micro lens.
$299.00 for the D7000
https://www.ebay.com/itm/Nikon-D7000-16-2MP-DSLR-Camera-body-two-batteries-and-two-SD-cards-Only-3k-click/143283791675?hash=item215c61273b:g:imcAAOSwCtVc-JrL:sc:USPSPriority!33472!US!-1
About $200.00 for the Nikon 60mm 2.8 D lens
https://www.ebay.com/itm/Nikon-60mm-f-2-8D-AF-Micro-Nikkor-Lens/123790025117?hash=item1cd275e19d:g:aAwAAOSwZx5c8rij
So, for about $500.00 your good to go.
I agree with this setup; the 60 mm macro lense is perfect. Just shoot outside in natural light in front of a white garage door and there will be a minimal amount of distortion with the 60mm lense Even a D90 or D300 nikon body wold be just fine for this task. I use a D610 and a 50mm afd F 1.4 and get photos with no
out of focus around perimeter of image.
Jun 6, 2019 15:41:41 #
If you want to reply, then register here. Registration is free and your account is created instantly, so you can post right away.