First attempt at portrait photography
Jun 4, 2019 08:14:41 #

As a favor for a friend, I am going to shoot her daughter’s maternity photos. I have never done this type of photography, so I am practicing before the shoot (June 15).
Here are some shots I took of my nephew’s fiancé in an impromptu setting.
Can anyone give me any advice on how to improve....I know that there are several things I need to check (the table leg coming out of her hair in last photo🤪)...
Thanks in advance....
Here are some shots I took of my nephew’s fiancé in an impromptu setting.
Can anyone give me any advice on how to improve....I know that there are several things I need to check (the table leg coming out of her hair in last photo🤪)...
Thanks in advance....


Jun 4, 2019 08:20:57 #

Nice work.
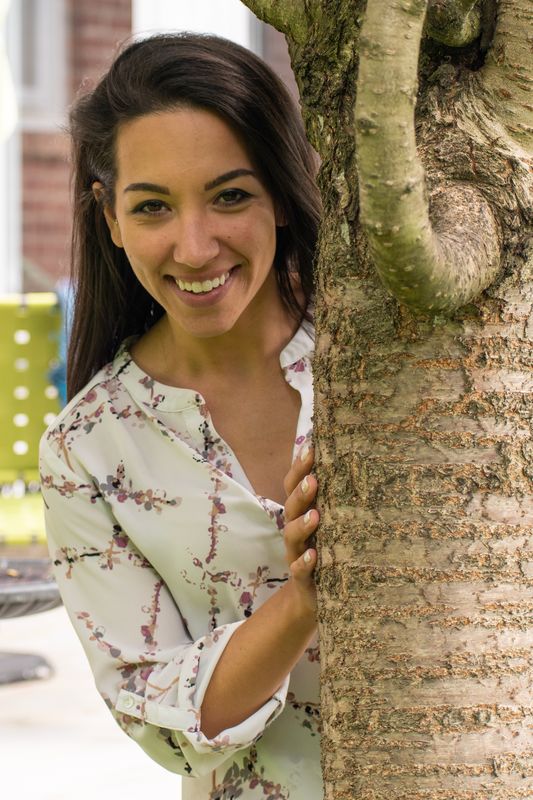
The close-up at the tree is much better than the one with the tree.
Just watch the background and avoid conflicting subjects or odd divisions.
Shooting a wider aperture will make the background fuzzier and less obtrusive. But it will also reduce the depth of field.
The close-up at the tree is much better than the one with the tree.
Just watch the background and avoid conflicting subjects or odd divisions.
Shooting a wider aperture will make the background fuzzier and less obtrusive. But it will also reduce the depth of field.
Jun 4, 2019 08:26:43 #

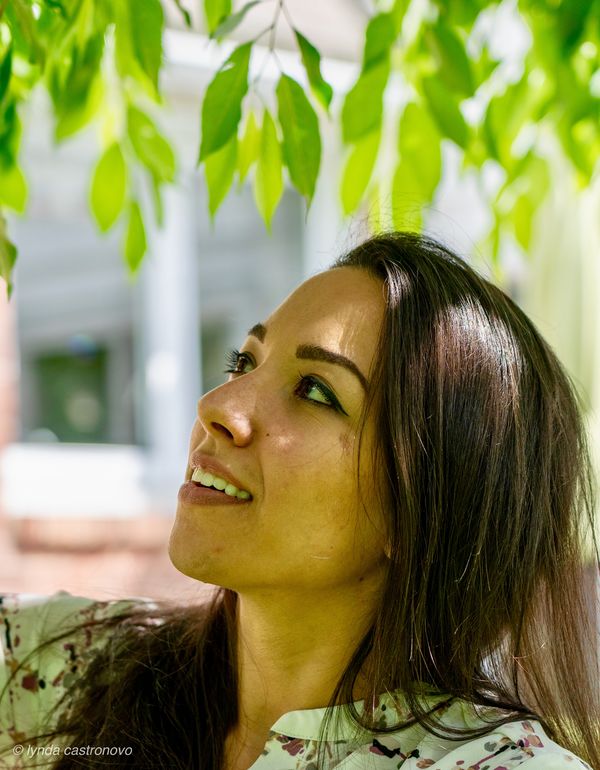
I like the top the best, but suggest revisiting the cropping and take away more of space above her head and possibly from the right side of the frame. You don't have to move her to the left-right center, but this crop seems like there's too much space around her on our right side (and at top). Also, lower the highlights just slightly on this image so her nose, cheeks and forehead are a bit less shiny. For situations like the final two, practice using your flash as a fill-light, both for a catch light in her eyes and adding light into these shadowed situations. Look at 'flash exposure compensation' in your manual so you can control the overall light output from the flash to add just the bare minimum.
Jun 4, 2019 08:40:59 #
StanMac
Loc: Tennessee
Select a lens and aperture that will better control the depth of sharpness and reduce the background distractions, or look for photogenic settings that will work to complement the image. Be aware that when shooting with available light around lots of foliage, the light you get will have a strong green component (images 1 and 2) you’ll have to deal with in post. Have someone on hand to ensure the subject’s appearance (hair, clothing, etc. are neat and in place) are at their best in each shot. That person can also help you control the lighting with reflectors, screens, etc as appropriate.
Stan
Stan
Jun 4, 2019 08:56:44 #
Kaib795
Loc: Maryland, USA
Go on instagram and see how others pose the model or better yet check out this gal on YouTube as she has a knack for outdoor shots with only her camera and lens (and she is good) https://www.youtube.com/user/juliatrotti. Just watch and learn, noting to say here. She does shoot wide open but her rig does very well as you'll see. I tend to shoot at f4 as it's very sharp on my lens and does blur the background enough. Set your camera to spot focus and aim for the nearest eye - always. Turn your metering to a confined circle to cover her but not all the background. If the pose is good, take several shots in case one or two are out of focus -- and some will be. If you use a flash, move it off camera and use a light modifier to soften the flashes light. Your shots are going to look good but when they don't pay attention to why. Maybe you cannot do this at a full wide open f stop so close it up (your shots are blurry). Julia has the midas touch, we may have a way to go to compare. Some people have f1.2 lenses but cannot focus well enough to hit the eyes perfectly and with such shallow DoF they miss the shot ... and end up shooting at f2 or f2.8 instead. Practice, test, learn and excel if this is your passion. Photography is your creativity so use whatever f stop you end up liking. I know of one photographer who shoots at f8 and f11 in studio but he wants every part of the model in focus. Many do not want this and go for a shallower field of view. Now you are in control, have fun.
Jun 4, 2019 09:18:11 #
You can see in the top image, the light is bothering the subjects eyes. And you have some glare on her skin. I'm guessing you shot this with a kit lens, I'd prefer longer focal length and faster aperture. You can crop in tighter, particularly at the top. A CPL shooting in this light is also useful.
Below her cheek in the second image you picked up a green cast. A processing artifact?
Portrait vs environmental protrait. Like in front of the hedge you have you subject in a controled portrait type background. The brights and shadows of the hedge are still not ideal. With the others the backgrounds are all distracting. You're tight but the backgrounds are there. I suggest switching to working on environmental portraits. Make the background part of the story, color, parallel story content, juxtaposition. You can't just ignore the content behind the subject.
Tough time of the day to be shooting.
Look up Nick Fancher's content.
Jun 4, 2019 11:10:01 #
kenievans
Loc: Dallas
I like the way you brought at personality in these shoots. Keep in mind that it is a maternity shoot so you want to include her body in the shots. There are lots of tutorials out there for maternity shoots and suggested poses. Good luck!
Jun 4, 2019 11:13:20 #


Jun 5, 2019 07:02:31 #
Thank you to all of you for so many good suggestions and insights into what will help me take these photos. I am grateful for your help. Not being even a seasoned hobbyist, this is really a challenge. I will be using my Sony a7iii with 24-105 and 50 mm 1.8 lenses. Hopefully, I won’t screw it up too badly🤪.
Jun 5, 2019 09:37:34 #

We all do things in different ways and for that first shot I tend to pose the model with the left shoulder moved more toward the left. On the second shot you moved the model under a tree and in my monitor I see a strong green cast. That is a no-no for skin colors. Perhaps you could fix it some by adding magenta in the Color Balance of your editor.
In No.3 and 4, I like the posing but the background does not help at all. In No. 3, I do not like that branch to the side of her face but that is me. With the last one my tendency is not to make the model lean so much and once again, the background does not help especially that bright object on top of her head.
In No.3 and 4, I like the posing but the background does not help at all. In No. 3, I do not like that branch to the side of her face but that is me. With the last one my tendency is not to make the model lean so much and once again, the background does not help especially that bright object on top of her head.
Jun 5, 2019 10:22:43 #
All of these, as nice as they are, may be cropped too tightly for a maternity shoot. Subject and mother may want to include baby bump.
Jun 5, 2019 13:20:56 #

Lynda, of the photos posted, the first one is more of a portrait than the others. The others have their own charm, though. The only critique I'd give the first one is the position of the subject within the portrait. Conventionally, she should be looking towards the center of the photograph, as opposed to looking at the left border of the photograph. Cropping from above and the right of the subject would place her in a more conventional position.
Otherwise, you did a very nice bit of work here.
--Bob
Otherwise, you did a very nice bit of work here.
--Bob
lyndacast wrote:
As a favor for a friend, I am going to shoot her daughter’s maternity photos. I have never done this type of photography, so I am practicing before the shoot (June 15).
Here are some shots I took of my nephew’s fiancé in an impromptu setting.
Can anyone give me any advice on how to improve....I know that there are several things I need to check (the table leg coming out of her hair in last photo🤪)...
Thanks in advance....
Here are some shots I took of my nephew’s fiancé in an impromptu setting.
Can anyone give me any advice on how to improve....I know that there are several things I need to check (the table leg coming out of her hair in last photo🤪)...
Thanks in advance....
Jun 5, 2019 23:48:56 #
Lucian
Loc: From Wales, living in Ohio
No one has mentioned it so I thought I would let you know that your lighting looks like it was all natural light, however, it all looks very flat, which is not something you want to do in a portrait. You need to either use a fill flash or light modifiers to add or subtract light to give the face more definition.
Never, ever shoot under a tree with available light because far too much green tinted light will be reflected onto the skin of your subject. So, unless you are shooting Kermit, that will always look very bad and is hard to colour correct.
You need to choose a different focal length for these portraits, start at a minimum of 80mm and go up from there, to see what works best for what you need. Of course you will also need to learn better posing, which is an art unto itself, so learn it. On that topic, there are many absolute rules of portraiture, and one of them is regarding a partial side view shot of a face.
The hard and fast rule is, and look at your second shot for this, never allow the nose to break through the cheek, when shooting a pose like the one in number two. the nose can move closer to the edge of the cheek as you rotate that face, but when it gets close to the edge of the face, which would be the cheek of course, do not allow the nose to break through that cheek.
If you want to study posing, just take your camera along to an art museum and study the way the old masters used light to emphasize a portrait and just as importantly, look at how those painters posed their subjects. Not only is it a pleasure to look at all those wonderful portraits, but take your time and study every detail of the pose. look at the position of the head to the tilt of the head and the amount of eye that is showing in every different pose, from left to right eye.
Look at the way the shoulders are positioned, the arms, the hands, the fingers. Note what they have used as a background and how that is also lit. Note the furniture that is used to seat the subject and how it is positioned. Take note of the clothing that the subjects are dressed in as well as the tones of their clothing.
You will suddenly have a new love for art museums and a new appreciation for all those old masters and be able to enjoy a painting far more than you ever imagined. You must allow your eye to go for a long walk all over the painting, looking at every detail and appreciating it plus remembering it all. Then take a friend or family member and try to reproduce several poses and lighting conditions using them in your images.
Take photos at the art gallery, of the portraits that mean something to you. Then print out a small booklet of the ones that you like best and keep that in your camera bag, referring to it often when you are positioning and lighting your future portrait subjects. Your images here are not the greatest, but with that said, we understand why and you are very brave to show your first attempts and that is very good of you. with practice you can only get better and better, that is, as long as you apply what you learn along the way.
It will be fun for you to look back on these first images you have shown us, in a year or two, and compare them to what you will be producing by then and see just how far you have come in your photography. I wish you well and look forward to seeing your future work. We all started somewhere and I'm sure we all remember our first images and how we thought they were fairly good but now looking back have a different opinion. with all that I have said above, the posing and lighting for maternity shots is very different to a standard portrait in many respects. Therefore, I would suggest looking up some well know maternity photographers and study the way they have posed and lit their subjects.
If you want to reply, then register here. Registration is free and your account is created instantly, so you can post right away.