Photographing very dark skinned people in fluorescent lighted cafeteria
May 31, 2019 08:59:57 #

Can anyone give me some pointers... I'm doing a free job for a school!
Whats the best settings for dark skinned people. Want them to have perfect shots!!
Whats the best settings for dark skinned people. Want them to have perfect shots!!
May 31, 2019 09:15:28 #

That is an interesting problem. Fluorescent lights cycle in brightness. A quick check of the general problem reveals that one needs to use a shutter speed that is equal to or slower than the cycle time. In the US that will be 1/60 of a second. Specific advice that I read is that the that shutter speeds should be whole multiples of the cycle time. Not sure if that is clear, but what is meant is that you should try either 1/60 (exposes for 1 cycle) or 1/30 (exposes for 2 cycles) or 1/15. If you shoot at other shutter speeds then different pictures come out with different exposures and colors since they are made under different amounts of ambient light.
I thought that the use of flash (bounce flash if possible) should also help to soften and fill in shadows.
Not sure if skin color matters here, so can't offer anything on that. But it might turn out to be easier since pale skin poses real challenges with strange color castes, especially under some fluorescent lights, and the tendency to show capillaries under the skin when shooting with a flash.
May 31, 2019 09:20:43 #
If you have an anti-flickr feature with your camera, this would be the time to use it. Set a custom white balance using a color checker if you have it available. If you are using a flash, use a meter to get an accurate exposure. An incident light meter isn't affected by different skin colors.
May 31, 2019 09:21:51 #
Mark Sturtevant wrote:
... Fluorescent lights cycle in brightness. A quick check of the general problem reveals that one needs to use a shutter speed that is equal to or slower than the cycle time. In the US that will be 1/60 of a second. Specific advice that I read is that the that shutter speeds should be whole multiples of the cycle time...
Actually, the fluorescent lamps fire at twice the line rate. For the US 60 Hz line the firing rate is 120 Hz. Once for the positive phase and once for the negative phase.
Also, here's too much information about fluorescent lighting: https://www.uglyhedgehog.com/user-page?upnum=2916
May 31, 2019 09:24:01 #
Mark Sturtevant wrote:
That is an interesting problem. Fluorescent lights... (show quote)
I've been using bounce flash for years, and I never noticed capillaries under the skin with light skinned people. That would be my recommendation.
May 31, 2019 10:34:43 #

All of the aforementioned electrical engineering and lightning science regarding fluorescent light is interesting and informative but with long experience in people/event/portrait and commercial photography t, I can tell you that depending on overhead fluorescent lighting is a bad idea, especially if you are concerned about rendering good skin tones and generally pleasant images of the people. Here's why:
Firstly, if the lighting fixtures are currently made and installed electronic models the "flicker" frequency may be high enough to not cause exposure issues, however, older fixtures can be more problematic. The slow shutter speeds needed to accommodate excessive flicker may be too slow for handheld camera operation and moving subjects even while engaging in a moderate activity- that making candid shooting difficult without the potential of motion blur.
Auto white balance can usually provide somewhat accurate color but this does not influence exposure or lighting aesthetics.
Aside from those electrical/exposure technical issues the aesthetics of lighting striking the subjects from directly overhead often causes under-illumination of the eyes and eye sockets referred to as "raccoon eyes"- dark circles around the eyes and no "sparkle" in the eyes.
As for skin tones in folks with darker complexions, this kind of available light can also cause a number of problems such as uneven lighting on groups of people, erratic exposure from area to another. Darker skin reflects less light than light skin but with correct exposure, there should be sufficient shadow detail and dynamic range to render natural results.
The best solution for, at least, clean and consistent results is the use of flash, perhaps bounce flash or ideally, modified flash. I don't know what flash equipment you have or have access to and if you are familiar with any of the mentioned flash techniques. If the cafeteria has very high or colored ceilings, some conventional bounce techniques would become impractical. A speedlight with an onboard modifier might be a better solution.
If you can supply some feedback with your equipment specifics and the conditions at the location, I can advise you more specifically.
May 31, 2019 11:20:50 #
a6k
Loc: Detroit & Sanibel
I think the OP needs to use some basic, common sense, too.
1. shoot raw so that colors can be corrected. Raw images are not affected by color balance settings in the camera but the light itself has a color shift.
2. make sure you have a proper gray or white (or both) target with which to correct the colors later
3. make sure you don't underexpose dark skin even a little. Many years ago I had a "dark skinned" friend and we'd compare notes about this problem and the complicating problem if the group shots had a mix of skin reflectivity. If there are pale people in the shot you have the additional problem of avoiding blown highlights.
4. unless you are using a mirrorless such as the current Sony line, don't be afraid to "chimp".
May 31, 2019 11:25:25 #

Capturing moments wrote:
Can anyone give me some pointers... I'm doing a free job for a school!
Whats the best settings for dark skinned people. Want them to have perfect shots!!
Whats the best settings for dark skinned people. Want them to have perfect shots!!
When I was an AV producer working for a yearbook company, I was often sent to schools to photograph a range of, well, everything, for their prima donna yearbook advisors. Candids, classroom activities, sports, etc. — I got it all. I knew how, because I grew up doing it in high school in the 1970s.
Later, in the mid-2000s, I was training school photographers. I went to a lot of trouble to write a manual on it, including spending several days at my kids' elementary school taking pictures for their memory book, which my wife was editing. So here's my formula, used a decade ago but still relevant:
Fluorescent lighting in schools is USUALLY from ubiquitous 2'x4' ceiling 'troffers'. If you're lucky, they all contain the same brand and type of fluorescent tubes... usually Cool White (4100K to 4200K). Those are actually heavy on the green part of the spectrum. If you're REALLY lucky, they use Daylight tubes (5000K). They're easy to work with. But whatever you encounter, you're going to average them together with a gray card and custom white balance.
To get the exposure and color balance right, I would carry a Delta-1 gray card and do a Custom White Balance on my Canon. (It's called a manual or preset white balance on some other brands.) Your camera manual will tell you how to do that. The procedure differs from brand to brand.
I first put the camera into 100% manual exposure mode. That means NO auto ISO, and manual aperture and shutter settings. With a 28-75mm f/2.8 zoom, I'd set my shutter speed to 1/60 at a minimum, and to avoid fluorescent light flicker, 1/125 at a maximum. (I know how to hold a camera very still, and use a monopod when I can.) I used ISO 400-800, because any higher on that old 20D or even the 50D I used would be too noisy. I used f/2.8 to f/4, because the lighting in schools is remarkably similar from room to room. I used NO flash.
Next, I would set the meter to center-weighted mode and meter a gray card in the light falling on my typical subject. Then I would adjust the aperture for the correct exposure readout (+/-0).
Finally, I would do a custom white balance, using Canon's two-step procedure for that. I would use that combination of manual settings to photograph everything I needed to in that same light. I might chimp a bit (review images on the back of the camera) and adjust slightly if part of the room were darker or lighter, but that would usually not be necessary. I worked in JPEG mode. And I did little, usually no, post-processing.
Now for the secrets to photographing dark people and objects. You can photograph anything or anyone black or dark toned, but to get a detailed image, you must make use of "specular highlights" — reflections of your light sources. Drum this principle into your head:
The size of the light source, relative to the size of the subject, determines the size of the specular highlight, the size of the diffuse highlight, and the shadow edge "acuteness" of the image.
The larger your light source (think: completely overcast sky, or 7-foot umbrella), the softer the image, and the more light wraps around the subject and creates specular highlights. On an overcast day, the specular highlight and the diffuse highlight will have about the same value. On a bright, sunny day, there will be harsh shadows, small specular highlights, somewhat larger diffuse highlights, sharp demarcation between highlights and shadows, and the shadows will be around two f/stops darker than the highlights.
In very specular lighting, such as direct flash from an on-camera strobe, African Americans tend to have a "soot and shiny chalk" look that they hate. In diffuse lighting — soft light that wraps all around them — they have a nice, soft, rounded tone. Classroom, lunchroom, library, and general office lighting in schools is nice and soft, and just bright enough to use with good results.
Back to the cafeteria:
If the lighting is reasonably soft and uniform, as I think it will be, you should have a light that is flattering to African Americans. The trick is to nail down that exposure and white balance. DO NOT use auto white balance or you will see lots of variations in color in the same room, as it reads brightly colored objects or clothing and tries to make them gray...
Here are some examples from the lunchroom and classrooms in that school. View in Download mode to see them properly. Yes, the background on the kid in red sweater eating dessert first is photoshopped in by my wife for the book she was building. There was a distracting kid behind him.


May 31, 2019 11:29:23 #
DirtFarmer wrote:
Actually, the fluorescent lamps fire at twice the line rate. For the US 60 Hz line the firing rate is 120 Hz. Once for the positive phase and once for the negative phase.
Also, here's too much information about fluorescent lighting: https://www.uglyhedgehog.com/user-page?upnum=2916
Also, here's too much information about fluorescent lighting: https://www.uglyhedgehog.com/user-page?upnum=2916
Correct. I have used up to 1/125 with no issues on cameras without anti-flicker settings.
May 31, 2019 11:29:30 #
"Perfect shots"? Then please carefully consider how you are illuminating the talent, k?
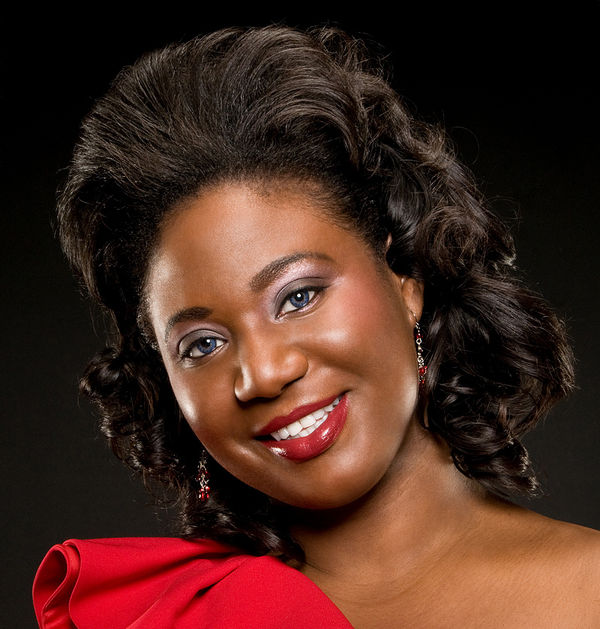
And thank you E.L.. Shapiro... Yes flash is SOP for this scenario... bounced at minimum, defused is better...As for darker skin tones? Specularity plays into the mix and typically is used effectively on darker skin tones to bring dimension and bias relief...
I wish you all the best on this endeavor Capturing moments
Example: PR shot for Preforming Artist: Emmanuelle Duncan-Williams (Opera Singer)
Paramount lighting with BD... two strip softboxes either side and an overhead hair light (silver parabolic)
This lighting scenario can easily be achieved on location with three or four speedlights w/ modifiers...
Hope this helps...
.
May 31, 2019 11:51:24 #
A few more notes:
Flash is generally a distraction and not conducive to good candid expressions. I've been in many schools where it was forbidden in most areas, and admissible by permission only in others, with advance notification.
If you're doing portraiture, that's a whole different ballgame, best handled with a four light setup (main, fill, hair-and-separation, and background light). For that, you need quite a bit of equipment, and a formal process.
For formal group photography, flash may be an absolute necessity. I like to place about 800 w/s into two 45 to 60" umbrellas, side by side as high above my camera as I can get them, so as to knock shadows down and keep them off people in back rows. I also like to put the camera slightly above the group and feather the light from the umbrellas to get the exposure as even as possible.
Yes, raw capture will give you more latitude to play around in post-production. You can use Lightroom to pull out shadow and highlight details that cannot be captured with in-camera JPEGs. But you may have to weigh the time to post-process against the marginal improvement in image quality.
I worked with transparency films for many years, doing multi-image slide shows and photojournalism for college yearbooks. That's essentially the same exact experience as working with JPEGs, except that we used color correction filters over the lens instead of custom white balance in the digital camera. Sometimes I used flash, bouncing it off the ceiling and firing a remote flash with an optical trigger, but that was rare.
Raw capture is ideal in higher contrast lighting situations like stage lighting, or any daylight scenes on clear days. That's where JPEG capture falls really short.
The OP didn't give us any details, so we all responded a bit differently. It will be interesting to hear her response.
May 31, 2019 11:58:53 #
amfoto1
Loc: San Jose, Calif. USA
Haydon wrote:
If you have an anti-flicker feature with your camera...
True, but only certain cameras have this feature:
Nikon DSLRs: D500 and D850 are the only models I know for sure have it.
Canon DSLRs: all current models have it except the most entry-level Rebel T7/EOS 1500D and EOS 4000D.
I think Nikon Z-series mirrorless and Canon R-series mirrorless cameras have it, too... but Canon M-series mirrorless don't.
I don't know if you'll find that feature on any Sony, Pentax, Olympus, Fujifilm, Panasonic, etc.
I use a pair of 7D Mark II, introduced in 2014 and the first Canon models to have the Anti-Flicker feature. It works very well under any sort of lighting that cycles the way fluorescent does.
The problem with that lighting is that it cycles on and off rapidly... 60 cycles per second in N. America... 50 cycles per second in other parts of the world.
That cycling is so fast that we usually don't notice it with our eyes. But the faster shutter speeds of our cameras sure capture it! Without anti-flicker, under fluorescent and similar lights you'll likely end up with a very high percentage of shots that are badly underexposed. Without anti-flicker, you can use a slower shutter speed (1/120 in US, 1/100 or slower elsewhere) to try to counteract it. The slower the shutter speed, the better. Another solution is to use flash, but it needs to be rather strong to act as the dominant or primary light source. Flash also limits the shutter speed you can use, but when it's the primary light source it can act like a fast shutter... most flash have a duration equiv. to approx. 1/720, at a minimum (standard studio strobes fire more slowly... but there are specialized strobes that fire much faster, too).
Shooting sports action without flash and where faster shutter speeds are usually wanted, under fluorescent, sodium vapor and some other similar types of lighting, without anti-flicker I saw 1/4 to 1/3 of shots ruined by severe underexposure and another 1/4 to 1/3 that weren't great but were recoverable with some careful post processing. I made a point of shooting RAW images, in order to have as much adjustability as possible in post-processing. Of course, the down side to this is that every image has to be post-processed!
Anti-flicker, if your camera has it, detects the cycle of the lighting and times the shutter release to coincide with peak output. Using anti-flicker in some of the same venues where I had a lot of exposure problems before, I now see almost no images being lost to underexposure and the vast majority are well exposed. It works quite well! Every once in a while I notice a slight lag in shutter release and might have an occasional shot ruined when my timing is thrown off.... But it usually works in a small fraction of a second and for the large part I don't notice anti-flicker working at all.
May 31, 2019 12:10:14 #
Thomas902 wrote:
"Perfect shots"? Then please carefully ... (show quote)
Nice example of portrait lighting (and finishing).
Somehow, I don't think this is what the OP has in mind. Schools usually have contracts with school portrait companies to do this sort of work. My former employers were school portrait companies. We sold several kinds of products, in exchange for services like ID cards, images for the yearbook, and thumbnails for the school administrative information system:
> K-11 Underclass, where the school gives you 45 seconds per subject — if you're lucky — and you have to photograph everyone in the entire school, including all the working adults. Sometimes, during high school registration days, we set up three cameras and printed plastic ID cards on-site, 30 seconds after the portrait.
> In high schools, senior portraits, which would be made in the summer or off-site or on the auditorium stage. By appointment, with paid sitting fees, 1-5 sittings, yearbook pose free.
> In elementary schools, classroom groups. These had to be set up and photographed in less than ten minutes per classroom.
> In secondary schools, music, dance, after-school clubs and sports team groups, with individual portraits of uniform-wearing activities (marching band, orchestra, chorus, teams...).
> In some schools, a limited number of visits for candid work for the yearbook (usually a service to the school performed in exchange for the privilege of photographing portraits).
> In some schools, prom or dance photography (father-daughter/mother-son, homecoming, proms...). These were for portrait packages of couples and singles, with some candids for the yearbooks.
> In some schools, graduation handshake or commencement ceremony photography. This included some candids, but mostly the stage walk and a portrait with diploma taken off-stage. Each scene took approximately 3-4 seconds! We had a disciplined system...
So lots of different kinds of in-school photography can be done. It will be interesting to hear the OP respond with more details.
May 31, 2019 13:01:25 #
DirtFarmer wrote:
Actually, the fluorescent lamps fire at twice the line rate. For the US 60 Hz line the firing rate is 120 Hz. Once for the positive phase and once for the negative phase.
Also, here's too much information about fluorescent lighting: https://www.uglyhedgehog.com/user-page?upnum=2916
Also, here's too much information about fluorescent lighting: https://www.uglyhedgehog.com/user-page?upnum=2916
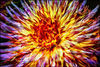
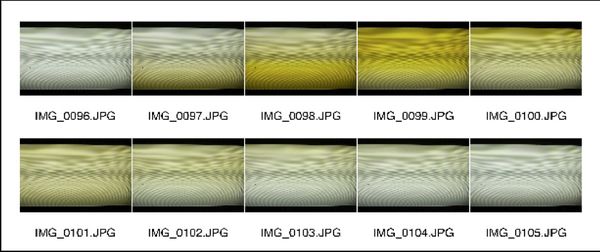
Here is an example of extreme fluorescent light color and brightness cycling. I set a high shutter speed and photographed a fluorescent light troffer directly, using continuous exposure mode setting on a Canon without the anti-flicker feature. Note the rolling band of dark and yellow vs. light and blue. In old-fashioned SD video, this can be seen in real time as an alternating white balance shift.
May 31, 2019 19:06:27 #
Use a flash powerful enough to overpower the fluorescent lights, add a stop, or two, of exposure. Experiment until you learn what works best for your gear.
If you want to reply, then register here. Registration is free and your account is created instantly, so you can post right away.