Understanding F-Stop, Shutter Speed, and ISO class update
May 1, 2019 12:03:34 #

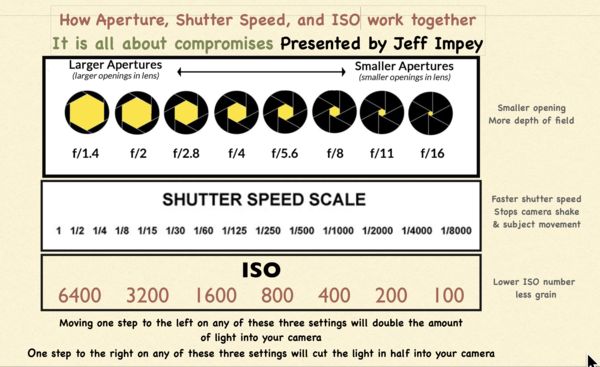
I just thought that I would report that around thirty something people attended my class last night. All brought real cameras, not cell phones, and before the class ended I made sure everyone could change these settings and change shooting modes and understood how each worked. This is a handout I made that each person received that I hope helps them understand the different settings and how the affect the photo they are taking. I made all settings one full stop apart so it would be easier to relate how each of the setting affected the amount of light. I left out the in between settings to keep it easier to follow and cut down on confusion. I received a lot of positive feedback and managed to get everyone in the class feeling a lot more comfortable with taking more control of their camera. I think everyone had a good learning experience and I am looking forward to my next class in the future.
May 1, 2019 12:12:59 #

That's a great visual tool. I would think most of your students would find it very helpful. I certainly would have benefitted from it when I was first getting started. Thanks for sharing.
May 1, 2019 12:16:22 #

Well done, clear and concise. Gives your students understanding of basic camera settings in one easy to use format. Good job!
::Ed::
::Ed::
May 1, 2019 12:17:15 #
Looks really good. You might want to modify the "Lower ISO number less grain" to "... less grain/noise." Most people these days have no idea about grain, let alone ASA vs. ISO. I ran into that while teaching a class as well. A couple of the dinosaurs (my age - very late 50s) remembered Kodachrome vs. Ektachrome, Plus-X vs. Tri-X, etc. When it came to 'exploring' the nuances/niceties of slide/film that's a topic that can't really be compared to digital. To most digital users outside of serious long-time amateurs/pros, archiving is simply doing back-ups. They get more excited over the differences between CF vs. XQD... so noted. Simply my humble $0.02 worth - since we no longer have the cents symbol on keyboards today.
May 1, 2019 12:18:46 #

That's very impressive! I think this would replace the exposure triangle as visual aid were I to attempt another class (did two for seniors a few years ago).
May 1, 2019 12:20:57 #
JCadell wrote:
Looks really good. You might want to modify the &q... (show quote)
I can't change it here but I will change it on my handout. Thanks, grandpaw
I have just changed it on my handout, thanks again for your suggestion.
May 1, 2019 12:25:27 #
Linda From Maine wrote:
That's very impressive! I think this would replace the exposure triangle as visual aid were I to attempt another class (did two for seniors a few years ago).
The exposure triangle photo seemed too confusing for me, I like things simple and easy to understand. Appreciate your comment, Thanks. grandpaw
May 1, 2019 12:31:44 #
Sounds like a successful class! I think you should market your handout so the whole camera world can use it. I see it as a laminated card reference tool for every camera bag, and especially every beginning photography class.
May 1, 2019 18:15:14 #
[quote=J Simply my humble $0.02 worth - since we no longer have the cents symbol on keyboards today.[/quote]
Ah-h, but we do!! It used to be <Alt>189, but no longer. Now, it's <Alt>0162 or ¢
https://www.alt-codes.net/cent_alt_code.php
Ah-h, but we do!! It used to be <Alt>189, but no longer. Now, it's <Alt>0162 or ¢
https://www.alt-codes.net/cent_alt_code.php
May 1, 2019 19:53:35 #

grandpaw wrote:
I just thought that I would report that around thi... (show quote)
Congrats on the successful class Grandpaw. It's not an easy task.
---
May 1, 2019 20:40:19 #

grandpaw wrote:
The exposure triangle photo seemed too confusing for me, I like things simple and easy to understand. Appreciate your comment, Thanks. grandpaw
I am glad that you don't use the triangle.
May 1, 2019 20:49:46 #
BebuLamar wrote:
I am glad that you don't use the triangle.
I have never been a fan of the exposure triangle and that is why I came up with this idea and I really like it. My diagram is simple and easy to understand. I am a firm believer in KISMIF.
May 1, 2019 21:22:39 #
Hamltnblue
Loc: Springfield PA
Nice chart
I don’t know how it is explained but at first glance the top row looks backwards if explaining the relationship of the 3 components.
Wouldn’t the far left f1.4 equate closer to shutter 1/8000
Moving to f2 would result in less light which would need a slower shutter 1/4000
Moving to f2.8 would further result in less light which would push the shutter slower yet towards 1/2000
Same goes for iso.
F 1.4 would equate closer to iso 100
F2 would result in less light which would need iso 200 (more sensitivity)
Etc etc
By reversing the top line you would stack the changes in relation to each other directly rather than inversely.
I’m sure the chart is explained well in the class but changing may make it easier. Besides increasing the ISO number does not increase the amount of light, just the sensitivity to the light.
May 1, 2019 21:48:31 #
They are just like I want it the whole concept of the diagram is that if you go any direction to change a setting you will need to compensate one of the others by going the same amount of steps in the opposite direction assuming you want to make a change and keep the same exposure. Let’s say your camera gave you settings of f4 at 1/125 of a second with an ISOof 400 and you needed a faster shutter speed 500 or two moves to the right on shutter speed to stop some action then it would require you to compensate the two moves to the right by moving one or both of the other two the equivalent of two moves to the left to maintain your same exposure
May 2, 2019 00:37:12 #

grandpaw wrote:
I just thought that I would report that around thi... (show quote)
Thanks for sharing 👍
If you want to reply, then register here. Registration is free and your account is created instantly, so you can post right away.