Darken mode
Apr 12, 2019 10:25:59 #

I get what some of you are saying about HDR, but in most cases you get some blooming and color casting that just doesn't look good "in my opinion".
Apr 12, 2019 12:54:52 #

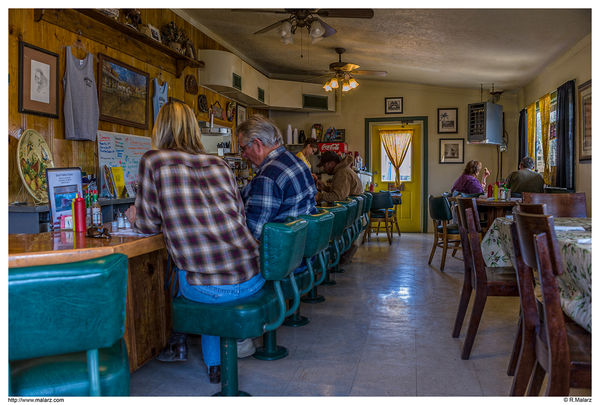
Lee, here's a similar setup where the predominant light was through windows. I spot metered the brightest part of the scene, increased the exposure to place that value where I wanted it and took the photo. No flash was used.
--Bob
--Bob
canon Lee wrote:
hi I am trying a new technique using my camera as ... (show quote)
Apr 12, 2019 14:55:17 #
rmalarz wrote:
Lee, here's a similar setup where the predominant light was through windows. I spot metered the brightest part of the scene, increased the exposure to place that value where I wanted it and took the photo. No flash was used.
--Bob
--Bob
You have blue on the floor from the window and the room looks dark. Real Estate agents want photos that are bright and show the true colors of the room.
Edit: Lee didn't mention that this is for real estate photos.
Apr 12, 2019 15:44:21 #

DWHart24 wrote:
You're doing way too much work. Set the camera on ... (show quote)
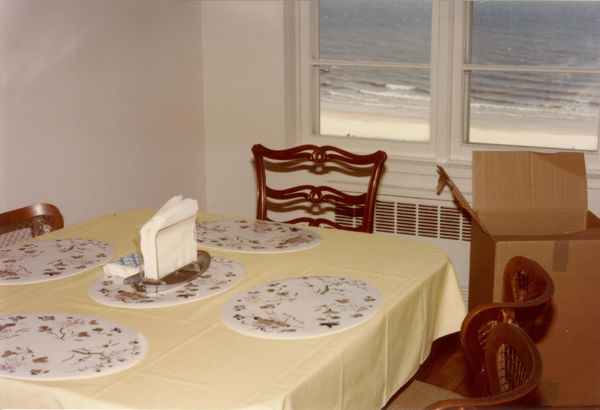
Also very complicated. In the attached shot I set the exposure needed for outside and slow enough for flash. I then used auto flash to brighten the inside to the same level. This was with film many years ago, so there is no EXIF data. BTW - YES, that is the Atlantic Ocean outside.
Apr 12, 2019 15:58:27 #
canon Lee wrote:
hi I am trying a new technique using my camera as ... (show quote)
Hi Lee,
Now that you've attached images showing what you tried, we can see the problem. As taken, the 'darken' blend mode won't work as you intended. You missed the key concept that Rich Baum's video described (from your post yesterday). The key concept in his video is located at 0:48-1:02, which your images didn't meet. Otherwise the concept works.
As others have discussed, there are many ways to accomplish the same thing. In the case of your posted images, you can accomplish the goal by just using 'blendif' to blend in the outside window scene into your interior shot. I tried it on your images, it works. One step only. A mask can be used to clean up any other areas that may have, inadvertently, been affected.
Mike
Apr 12, 2019 17:44:29 #
I'm well aware of what Lee is doing. This is obviously not a real estate photo. It's a photo showing a technique that would work for him.
--Bob
--Bob
DWHart24 wrote:
You have blue on the floor from the window and the room looks dark. Real Estate agents want photos that are bright and show the true colors of the room.
Edit: Lee didn't mention that this is for real estate photos.
Edit: Lee didn't mention that this is for real estate photos.
Apr 12, 2019 18:22:08 #
DWHart24 wrote:
Again, it's not that easy unless you want
a photo that is very flashy and not natural.
Again, it's not that easy unless you want
a photo that is very flashy and not natural.
You are assuming flash pix "look flashy".
And as usual that assumption is wrong.
.
Apr 12, 2019 18:28:14 #
amfoto1
Loc: San Jose, Calif. USA
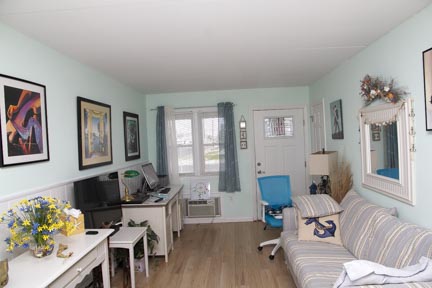
Your images are tiny and hard to work with, but I wanted to see what was possible.
As I understand it, you are basically trying to balance the indoor and outdoor light, so that the windows in the image aren't totally "blown out".
Using the two images you took...
I opened both in Photoshop.
Used "color selection" on the dark image to select all the blackest parts of that image, then I inverted the selection so that only the brightest parts of that image were selected.
Next I made a "new layer via copy", ending up with only the bright parts of the image, leaving the rest of the layer 100% transparent.
I next copied that layer onto the brighter "indoor" shot, aligned the windows from both images, then switched that layer to "Overlay" mode. This is what's shown in Edited Image #1 below. Other layer modes could have been used, but to me many looked too strong and unnatural in this case. Other layer modes were too weak and ineffective. However, "Hard Light" looked okay... with a stronger, but maybe not too strong effect, as shown in Edited Image #2 below.
I finally flattened the images and saved them as "Edited" images below. It's crude in this case because the images were so small to start with. Even the reflections of the window light in the computer monitor screen and the glass on the framed print on the wall were "toned down" to some extent. You can hardly see any difference here, though.
EDITED INDOOR IMAGE #1

ORIGNAL INDOOR IMAGE
EDITED INDOOR IMAGE #2
Apr 12, 2019 18:59:37 #

billnikon wrote:
OK, this is really simple. Use Manual exposure on your camera, make sure you are under 1/250 sec.
Take the exposure for the outside for the correct exposure and keep camera on manual.
Now, attach Nikon Flash and set it to TTL. Aim flash up and behind you. Take shot.
You will now have the correct exposure for both inside the room and outside.
Take the exposure for the outside for the correct exposure and keep camera on manual.
Now, attach Nikon Flash and set it to TTL. Aim flash up and behind you. Take shot.
You will now have the correct exposure for both inside the room and outside.
I know I have frustrated many here are with me. Actually most shots I am able to get a reasonable balance from the window and the ambient interior. ( reasonable not great ) I ran across a house that was dark and had small windows and I was not able to get a good balance between the inside and outside. this is why I chose to take separate outside and inside shots so that I could adjust both separately.
Then I discovered I had no experience with layer masking. I still cant get it. This is why in a few dark rooms I need to cut out the windows. It doesn't take me very much longer to cut out the windows, but I have to be pleased with the results.
Apr 12, 2019 19:05:58 #
DWHart24 wrote:
You have blue on the floor from the window and the room looks dark. Real Estate agents want photos that are bright and show the true colors of the room.
Edit: Lee didn't mention that this is for real estate photos.
Edit: Lee didn't mention that this is for real estate photos.
Yes David it for real estate.. I agree that the pix above is too dark and the door window is blown out and I would never submit a photo that is dark with blown out windows,.
Apr 12, 2019 20:31:08 #
What you see through the door window is a white outbuilding with some blue objects resting against it. Again, that wasn't taken to illustrate a real estate photo. It was taken because I liked the restaurant, but shot it much the same as I would any indoor shot with windows visible. Check the other windows.
--Bob
--Bob
canon Lee wrote:
Yes David it for real estate.. I agree that the pix above is too dark and the door window is blown out and I would never submit a photo that is dark with blown out windows,.
Apr 12, 2019 22:12:28 #
User ID wrote:
You are assuming flash pix "look flashy".
And as usual that assumption is wrong.
.
And as usual that assumption is wrong.
.
As usual? Umm ok...
If you want to reply, then register here. Registration is free and your account is created instantly, so you can post right away.