LUT - why
Apr 4, 2019 08:06:54 #

Hi all
I've been looking into the use and creation of LUTs (look up tables) and I thought I might summarise what i've found and why you might want to use them for post processing. You can create and use LUTs in several programs , e.g Affinity Photo and Photoshop and most video editing software. The best two Lut creation tools i've found are image2LUT and 3D LUT creator. Image 2 LUT is simplest and cheapest but is limited to generating a LUT from one image which you can apply to another set of images. In Affinity Photo and Photoshop you can perform certain adjustments and export them as a LUT. 3D Lut creator comes in 3 editions costing from $99 to $250 it is the photoshop of LUT creation.
There is also IWLTBAP LUT generator (converter) which you can get for free.
So why use a LUT? Our camera's essentially use Red Green and Blue filters over each pixel site, recording 1/3rd of each pixels colors and then interpolating from other pixels to calculate the other 2 colors.
These filters are not perfect and will record some of the other 2 colors as well as the color they are meant to be collecting. Camera manufacturers know this so they discount some of the recorded values in order to get something close. However light sources may not have a continuous spectrum. E.g a sodium street light doesn't put out much if any bluelight but the blue filter still lets some red light through, and most of this gets treated as blue frequency light, making the photo look terrible.
With a macbeth card or xrite color checker you have reference tiles of a known color the white to black tiles can be used to correct white balance to some extent with your regular white balance tool. But 3D lut creator can correct the colors on the card and give a more natural rendition of the scenes colors. The xrite software can create a profile for your camera and alter its bias to something closer to reality or to another camera.
It's good in so far as it goes but in bad light it's still going to look kinda funky.
What you can do is take a photo of your card under the conditions you are shooting create a LUT from that and then apply that LUT to other photos from that session, perfect color maybe.
Other Luts can give a style. E.g a currently over done trend is for orange and teal where the reds appear more orange and the blues more teal.
You can also pin some colors while changing others, commonly skin tones are locked while others are adjusted. You might have a model in a semi ripe cornfield and shift green towards yellow, with LUTs this can look quite natural. You can selectively darken a sky without haloing and then boost the overall exposure. Without the LUT the sky might be painfully bright and with obvious haloing.
LUTs are a very powerful tool for photography and video, especially video. Post processing frame by frame would be both impractical and look terrible as the color would likely vary between frames. For best results its best to keep each shot consistent with the rest, fixing the exposure and white balance. If shooting Raw, you can impose a white balance after the fact. The in camera white balance can be thought as an in camera LUT as it changes the colors for the conditions, you could say the same for contrast and tone. For video makers they will tend to use a flat or log profile which tries to keep the application of curves in camera to a minimum. Unfortunately different sensors and brands will give different results but you can match footage with Luts to give a very similar result.
I hope this brief skim overview of LUT's has been interesting enough to encourage you to investigate further. You don't have to create your own LUTs but a single LUT applied to a Canon image and a Nikon image is likely to look different as the sensors are different and how the manufacturer set the response will be different. Even if you don't go on to use LUT's use of a color chart can help speed up processing and create more consistent results. I'm only a few days into looking at LUTs but trust me they are an interesting tool.
Apr 4, 2019 10:40:18 #
I was asked to explain what a look up table is.
It's pretty much a series of corrections. As an analogy let's say we have an old set of weighing scales that is constantly out 2 oz so you weigh something that's 4 oz it says 6 oz you weigh something that is 8 oz and it says 10 oz. You could throw out the scales and buy new or just subtract the 2 oz from the answer it gives. Similar to how you might weigh yourself and deduct 5 pounds for clothes.
Let's take a look at the blue filter on a sensor: it mostly lets blue frequency light through and counts the photons (actually the charge on the site). Unfortunately some green and red frequency photons also get through. So maybe 100 photons got counted but 84 were blue and 12 red and 4 green.
So your count says 100 for blue but in reality it was 84. The more photons the brighter the shade so blue gets measured as being a brighter blue than it actually is.
The other problem is the cri of the light. ideally the frequency of light would cover the whole visible spectrum but it doesn't have to be and often isn't. If we were to illuminate our subject with a red laser beam there should be no blue or green recorded but the filters are not perfect and some blue and green does get recorded.
With analogue color film there would be a particular response from a film so your kodak X would look different from your fuji Y but on the whole if your lens wasn't tinted it made little difference what make of camera you used; the nikon guy got the same colors as the canon guy and the pentax guy. It's pretty common these days to emulate a film's look on a digital camera. These days the 'film' is controlled by the camera manufacturer, the sensor they are using and the profiles they apply to the raw data.
We are kind of limited to the best guess that the manufacturers can make for the light we are shooting in.
To do better than that we have calibration charts with tiles of particular colors. Let's say one is an R G B value of 10, 15, 20 and we photograph it and it records as 8, 13, 23. To get the correct value for that tile
in the lut there would be -2 -2 +3.
It's a simplification of course but essentially what a program like 3d lut creator does is create a number of values one for each color tile to create correction curves so each color is represented close to its correct value. We can't provide swatches for every color but the fit will be closer than without it.
The 3D part of a lut is that each color has a red, blue, green component and each needs to be adjusted to get an actual corrected color.
A lut combines contrast, hue, brightness, saturation all in one each pixel value is compared to the lut to see how it should be adjusted.
When you take a photo of your reference in the circumstances you are shooting in and create a lut then those other photos in that session should be able to be corrected with that LUT.
It's kind of a more sophisticated white balance. If you use the white balance dropper to balance a grey in one photo you can apply that white balance adjustment to the next shots you take. With the lut you tune the color to a greater extent. If you have tried to find a good grey in a photo, pretty often different greys will tint your photo green or magenta to different degrees. The best you can do is find a compromise and that may not be completely successful. The LUT will adjust a dark grey differently to a light grey and the more sample points it has in the table the closer the adjustment will be to something close to correct.
OK so that's trying to get to something close to natural but LUTs can be decidedly unnatural too. That's color grading and you might color grade to imitate a particular film stock to give a particular contrast curve. Luts can also Pin some values - usually skin tones so they are stable - but you can do things like change someone's jeans from blue to black while leaving most other colors unaffected. You can also mask areas so that some areas are left as is and others are adjusted by the Lut.
I think there is only so much I can explain with words. Search on you-tube for 3d lut creator and you should find examples of using LUTs to change the look of photos and video, e.g https://www.youtube.com/watch?v=b68ZqVwIt88
To use this methodology to best effect you need to be consistent, which means keeping the exposure and white balance fixed to gain optimal results. In raw you can choose a white balance after the fact; with jpegs a curve is applied in camera and you are attempting to fit another curve on top which never comes out very good. Film makers will try to get flat or log footage to minimise the curves applied in camera so they can set their own in post processing. Getting a good exposure is important since if that needs adjustment you are going to get distortion and results will be hit and miss. With video you can often use false color to make the majority of your scene green. Different light will change the exposure to achieve that green but the exposure will be consistent, which will make the LUT consistent too.
Apr 4, 2019 11:48:15 #

A new term for me! Thank you so much for taking the time to write extensive coverage of this very interesting subject, blackest.
Apr 5, 2019 10:44:17 #
LUT’s are something I’ve been aware of but not involved with. Your post has awakened my interest and I shall be doing the search you recommend for further info. Many thanks for taking the time.
Apr 5, 2019 12:47:34 #
magnetoman wrote:
LUT’s are something I’ve been aware of but not involved with. Your post has awakened my interest and I shall be doing the search you recommend for further info. Many thanks for taking the time.
Actually perfect timing :)
https://www.youtube.com/watch?v=3Sm120XC37Q
This is pretty clever , he takes the raw file develops it in 3d lut creator then exports the 3D lut and then applies the lut in photoshop.
he then duplicates the plain raw file fixing up noise issues ect. before it gets processed by the LUT.
It's the reverse of how you normally work in photoshop where first step is develop the raw , this way it's maybe the last step.
It's a great tool to have but the full version is $250 although there was a black friday sale before with 25% off.
Apr 5, 2019 12:58:32 #
blackest wrote:
Actually perfect timing :) br br https://www.yout... (show quote)
Thanks for that blackest, I’ll watch it.
Apr 5, 2019 13:21:53 #

blackest wrote:
Hi all br I've been looking into the use and crea... (show quote)
The later editions of Lightroom come with LUTS and support adding LUTS.
Apr 5, 2019 19:32:16 #
Apr 6, 2019 08:16:55 #
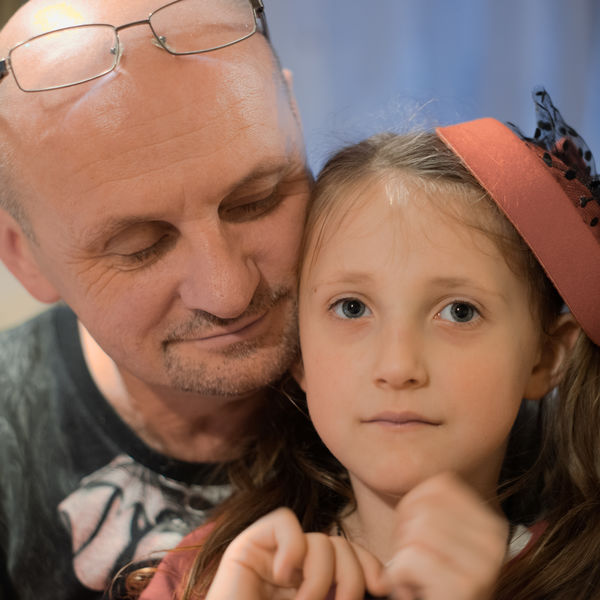
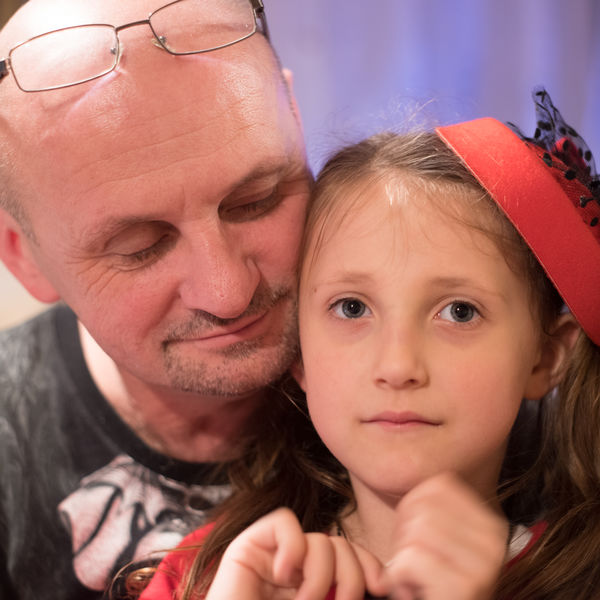
One thing I have been trying out is the match color option in 3d lut creator.
I saved an image from strange things and used match color to transfer the color grading to my image and saved the LUT.
The lut is then applied to the image as an adjustment layer saving as PSD then enables you to work further on the image in a non destructive way.
I will attach the LUT here.
I don't know if it will work for you but it seems quite good.
Apr 6, 2019 10:35:05 #

Can I, or how would I use a Macbeth card to create a LUT to calibrate a monitor so it showed what I see when I look at the card directly?
blackest wrote:
Hi all br I've been looking into the use and crea... (show quote)
Apr 6, 2019 13:46:41 #
wham121736 wrote:
Can I, or how would I use a Macbeth card to create a LUT to calibrate a monitor so it showed what I see when I look at the card directly?
I'm no expert but monitor calibration uses a tool to read the color from the screen, color checker software works through a series of patches and creates an icc profile for the monitor.
With the macbeth card you take a photo of it with your camera under the light you are going to be shooting in and the idea is to generate a lut to match the tiles on the macbeth card. If this is done right then a nikon photo and canon should be identical with the appropriate corrections applied
Jul 25, 2019 13:07:17 #
blackest wrote:
One thing I have been trying out is the match color option in 3d lut creator.
I saved an image from strange things and used match color to transfer the color grading to my image and saved the LUT.
The lut is then applied to the image as an adjustment layer saving as PSD then enables you to work further on the image in a non destructive way.
I will attach the LUT here.
I don't know if it will work for you but it seems quite good.
I saved an image from strange things and used match color to transfer the color grading to my image and saved the LUT.
The lut is then applied to the image as an adjustment layer saving as PSD then enables you to work further on the image in a non destructive way.
I will attach the LUT here.
I don't know if it will work for you but it seems quite good.
The "after" shot looks as if the man and the unhappy girl are wearing make up... the same make up...
kind of unnatural. as the mans and girls complexions are quite different.
A global white balance adjustment based on the white of the girls eye would work better;
not as flattering, but more accurate.
If you want to reply, then register here. Registration is free and your account is created instantly, so you can post right away.