Trying 3D Stereo
Mar 29, 2019 20:12:55 #
I am aware of some excellent 3D stereo photographers on the Forum, but if they will tolerate a restatement of one way to view 3D stereo I want to include it with the first 3D post I have tried on the Forum....more as a test than anything else.
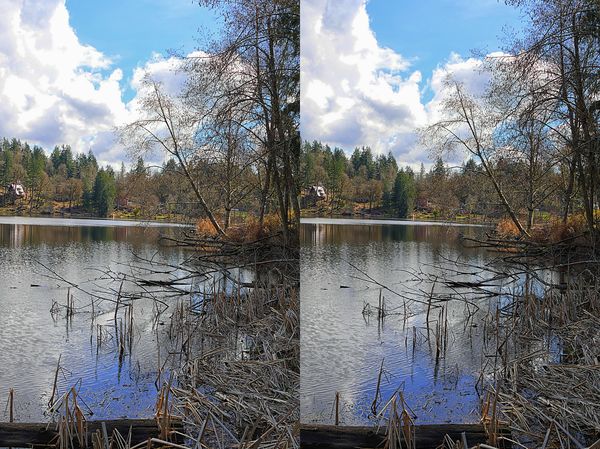
This 3D stereo image was taken yesterday ( March 28) from our dock. We live on a small lake in Washington State, and as you can see in the image, a log has drifted in during the winter and a sapling along the shore has fallen into the lake. Most of the dead stalks in the foreground will be cattails or tall lilies as spring arrives....which is just around the corner.
I have been taking 3D stereo photos for over 50 years! But it took one of our colleagues here (Scotty) to inspire me to take some more. And another (Dave) has already given me some new ideas.
The problem with 3D stereo is not in the taking, but in the viewing. And that reduces the audience, and thus the pleasures of sharing.
The taking of this pair was easy. Shoot one image and shift right (or left) and shoot another. Keep the camera level in both shots. Your shift should be about 4 to 6 inches horizontally so I just lean. If I wanted to exaggerate the 3D effect I might shift 8 to ten inches.
Post processing is with a terrific free program called Stereo Photo Maker. I can crop and align the photos with ease. I then mess with the resulting saved stereo pair in Photoshop to add my "magic," such as it is. You don't need Photoshop. I could do the whole basic post processing in the free Stereo Photo Maker.
That is the end of the easy part!! Now you have some decisions. How will people view your masterwork? Do you expect viewers to see it on a smart phone while in the mall, at home on a laptop or desktop, or with a 3D viewer? And do you want to use free viewing, mirror, anaglyph, etc.
All that is worth discussing, but for now I am cutting to my bottom line. I want you, the viewer to enjoy the image as you might any other photograph here, without concern for device or eyewear. So I am posting a side by side stereo pair which can be viewed "free view," which is to say with nothing but your two eyes (if you are one eyed, I have a different means, seriously).
Look at the stereo pair here. Bingo you see two 2D images. No problem. Enjoy either!! :) If you want to see a bigger image, download the dual image and just zoom in on one side. Nothing challenging yet....but I know, it isn't in 3D!! So far nothing lost, but also nothing gained.
Download the image. Cross your eyes while viewing it until there is a third central image in 3D!!
OK, lets assume that didn't work for maybe half of you. Then (I'm using Chrome in Windows 10) reduce the image pair to about 4 inches wide. I use the + and - keys. Now looking at the lake, cross your eyes slightly until a third image in 3D appears between them. Enlarge the images as you like. The smaller the distance you need to cross your eyes, the easier.
OK but about 20% of you are convinced you can't do it. Do this. With the screen around two feet from your nose and the lake images on the screen about 4 inches wide, put the tip if your index finger about 12-14 inches from your nose and point at the image. Focus your eyes on the tip of your finger, BUT note beyond your finger that now your view of the screen is cross-eyed, and a third image is formed between the two separate images of the lake. The middle image is in 3D! View it.
Now enlarge the size of the stereo pair on your screen (the + key on PC's) and soon the water will be on your lap along with some reeds. For almost everyone I have ever tried this with, the finger quickly becomes unnecessary.
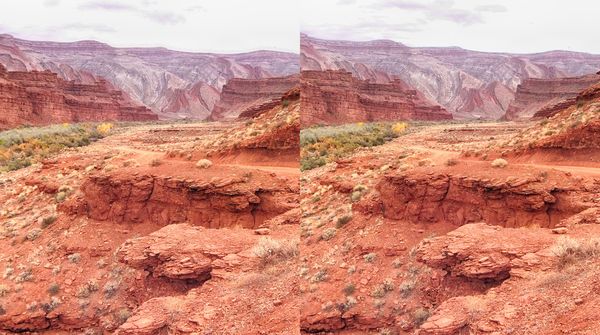
Maybe you don't like lakes. I have included a second 3D shot taken with a two lens camera in southern Utah on a heavily overcast November day near the base of the Mexican Hat overlooking the San Juan River. This was the campsite of the Motormen of 1917 when driving their Maxwell to Monument Valley blazing the Monumental Highway, They spent the night in old Raplee's abandoned stone house in the trees below. The Native Americans warned him that the River flooded, but he didn't listen.
The image is flat and hard to decipher in 2D, but comes to life in 3D.
I want to observe that the first shot was taken with my point and shoot camera, hand held, and produced in a free program.....point being, if I can do it, so can anyone.
This 3D stereo image was taken yesterday ( March 28) from our dock. We live on a small lake in Washington State, and as you can see in the image, a log has drifted in during the winter and a sapling along the shore has fallen into the lake. Most of the dead stalks in the foreground will be cattails or tall lilies as spring arrives....which is just around the corner.
I have been taking 3D stereo photos for over 50 years! But it took one of our colleagues here (Scotty) to inspire me to take some more. And another (Dave) has already given me some new ideas.
The problem with 3D stereo is not in the taking, but in the viewing. And that reduces the audience, and thus the pleasures of sharing.
The taking of this pair was easy. Shoot one image and shift right (or left) and shoot another. Keep the camera level in both shots. Your shift should be about 4 to 6 inches horizontally so I just lean. If I wanted to exaggerate the 3D effect I might shift 8 to ten inches.
Post processing is with a terrific free program called Stereo Photo Maker. I can crop and align the photos with ease. I then mess with the resulting saved stereo pair in Photoshop to add my "magic," such as it is. You don't need Photoshop. I could do the whole basic post processing in the free Stereo Photo Maker.
That is the end of the easy part!! Now you have some decisions. How will people view your masterwork? Do you expect viewers to see it on a smart phone while in the mall, at home on a laptop or desktop, or with a 3D viewer? And do you want to use free viewing, mirror, anaglyph, etc.
All that is worth discussing, but for now I am cutting to my bottom line. I want you, the viewer to enjoy the image as you might any other photograph here, without concern for device or eyewear. So I am posting a side by side stereo pair which can be viewed "free view," which is to say with nothing but your two eyes (if you are one eyed, I have a different means, seriously).
Look at the stereo pair here. Bingo you see two 2D images. No problem. Enjoy either!! :) If you want to see a bigger image, download the dual image and just zoom in on one side. Nothing challenging yet....but I know, it isn't in 3D!! So far nothing lost, but also nothing gained.
Download the image. Cross your eyes while viewing it until there is a third central image in 3D!!
OK, lets assume that didn't work for maybe half of you. Then (I'm using Chrome in Windows 10) reduce the image pair to about 4 inches wide. I use the + and - keys. Now looking at the lake, cross your eyes slightly until a third image in 3D appears between them. Enlarge the images as you like. The smaller the distance you need to cross your eyes, the easier.
OK but about 20% of you are convinced you can't do it. Do this. With the screen around two feet from your nose and the lake images on the screen about 4 inches wide, put the tip if your index finger about 12-14 inches from your nose and point at the image. Focus your eyes on the tip of your finger, BUT note beyond your finger that now your view of the screen is cross-eyed, and a third image is formed between the two separate images of the lake. The middle image is in 3D! View it.
Now enlarge the size of the stereo pair on your screen (the + key on PC's) and soon the water will be on your lap along with some reeds. For almost everyone I have ever tried this with, the finger quickly becomes unnecessary.
Maybe you don't like lakes. I have included a second 3D shot taken with a two lens camera in southern Utah on a heavily overcast November day near the base of the Mexican Hat overlooking the San Juan River. This was the campsite of the Motormen of 1917 when driving their Maxwell to Monument Valley blazing the Monumental Highway, They spent the night in old Raplee's abandoned stone house in the trees below. The Native Americans warned him that the River flooded, but he didn't listen.
The image is flat and hard to decipher in 2D, but comes to life in 3D.
I want to observe that the first shot was taken with my point and shoot camera, hand held, and produced in a free program.....point being, if I can do it, so can anyone.
Mar 29, 2019 20:50:41 #

I enjoy 3D stereo images!!!
I use the cross eyed way to view.
Both of these are well captured!
The first one is very nice.
If one can master the cross eyed technique, the beauty of these images are very enjoyable to view.
Looking forward to more!!
Pat
And thanks for the frees software name, Stereo Photo Maker.
I use the cross eyed way to view.
Both of these are well captured!
The first one is very nice.
If one can master the cross eyed technique, the beauty of these images are very enjoyable to view.
Looking forward to more!!
Pat
And thanks for the frees software name, Stereo Photo Maker.
Mar 29, 2019 23:02:06 #

Mar 30, 2019 02:53:54 #

theoldman wrote:
I am aware of some excellent 3D stereo photographe... (show quote)
You did a very nice job with both images. For anyone interested in producing 3D images, the only way to do it right is to capture two images.
You are correct that few people will bother to look at pairs because of the effort involved in viewing them.
However, both of these images can be converted to anaglyph and the 3D effect is clear. I will send you the results via PM. If you would like me to I can post them here for anyone who wants to see the full effect.
Mar 30, 2019 03:09:06 #
As a solution, I bought a box of inexpensive red/cyan 3D glasses and handed them out to friends. Now they too can view my 3D images (converted to red/cyan single image) without the uncomfortable eye strain associated with cross eye viewing.
Mar 30, 2019 07:46:27 #
rook2c4 wrote:
As a solution, I bought a box of inexpensive red/cyan 3D glasses and handed them out to friends. Now they too can view my 3D images (converted to red/cyan single image) without the uncomfortable eye strain associated with cross eye viewing.
Anyone can get them from Amazon for as little as $9.86 for 50 pairs (20¢ each) or $5.61 for a nice pair from Walmart.
Mar 30, 2019 08:36:03 #
I think that the lake picture has the images reversed. The background images seem to be in front of the background images.
Has anyone tried printing the two images and using a stereo scope?
Has anyone tried printing the two images and using a stereo scope?
Mar 30, 2019 09:00:50 #
secular wrote:
I think that the lake picture has the images reversed. The background images seem to be in front of the background images.
Has anyone tried printing the two images and using a stereo scope?
Has anyone tried printing the two images and using a stereo scope?
It's easy to get them switched and hard to detect during free viewing.
For cross eyed viewing, the left eye image belongs on the right and the right eye image belongs on the left. Backing away from the pair makes it easier to merge them.
For parallel viewing, as with a stereoscope, it's the other way around - left eye image on the left and right eye image on the right. This is the way that a stereoscope expects to have them.
The problem with a stereoscope is that the size of the image is limited by the distance from the lens to the image.
With StereoPhoto Maker, if you discover that you got them switched, a simple click will reverse them.
Mar 30, 2019 19:07:43 #
Mar 30, 2019 20:11:38 #
Eric02 wrote:
Is there any interest in taking 3D photos with film cameras?
I have done it with 35mm and medium format (6x6).
The 3D part is no different but the added resolution of MF is not that important.
It’s a lot easier using 16MP digital - Fujifilm X100T and Nikon Df.
Mar 30, 2019 20:25:38 #
To everyone who has thus far posted:
My test has been satisfying. Thank you!!
We have folks who are happy to view 3D pairs, and folks who are expert at taking and presenting them. I think I will produce more images to post in the pictures section. hoping them to be worthy of a look see in 2D or 3D.
Dave
My test has been satisfying. Thank you!!
We have folks who are happy to view 3D pairs, and folks who are expert at taking and presenting them. I think I will produce more images to post in the pictures section. hoping them to be worthy of a look see in 2D or 3D.
Dave
Mar 30, 2019 20:28:43 #
Eric02 wrote:
Is there any interest in taking 3D photos with film cameras?
There should be!! I have tons of slides taken with side by side mounted cameras using film. Viewing them in the proper viewer is a delight, and of course if you scan them you can do anything you like with them digitally. Personally, for quality of image and experience, I consider them hard to beat. They take you right into the scene in a way I seldom if ever experience on a computer screen.
Dave
Mar 30, 2019 21:46:49 #

Mar 30, 2019 22:44:52 #
Fly cessna wrote:
Excelint😉
I definitely am not a pilot, but if I were, and had even a passing interest in 3D, I think I would be trying some aerial 3D....which you may already do.
I own a collection from a WWII B17 pilot. It includes bombing images taken in a series as the bombs were dropped. I have used them in a "Then and Now" video of one of the targets, which believe it or not, is most appreciated by modern locals at the bomb sites. But in the process i discovered (recognized) that a moving aircraft is a great set of eyes, with a very wide base. It is like eyes set many hundred feet apart.
I suppose Google Earth does the same thing with sequential satellite images of towns. But imagine Yosemite or Grand Canyon (probably off limits, darn)! But National Parks are not the only places with relief.
I have photographed the massive coulees in Eastern Washington in 3D from the ground, but I wonder how they would look in 3D done from the air. I can see myself chartering a plane and pilot and maybe hanging my camera off a unipod out the window (is that possible?), with remote attached, and snapping either bursts or a 4k video, from which I could extract frames.
Just a thought generated by your handle.
Dave
Mar 31, 2019 00:20:29 #
Yes it’s possable and an interesting thought the big canyon that somebody left the water running too long ( my first impression of seeing the Grand Canyon ) from the air sounds fantastic and doable also some parts of Yosemite can be flown over🤔. Sounds like fun and a great way to see those places. Both within 2 hours away by my plane
If you want to reply, then register here. Registration is free and your account is created instantly, so you can post right away.