Haloing or artifacts.
Mar 7, 2019 09:55:04 #

What is the best way to rid of haloing or artifacts? For instance on the edge of a roof.
Mar 7, 2019 10:36:29 #

I had to look up the word haloing. I am including the definition below for other dummies like me:
a geometric shape, usually in the form of a disk, circle, ring, or rayed structure, traditionally representing a radiant light around or above the head of a divine or sacred personage, an ancient or medieval monarch, etc. an atmosphere or quality of glory, majesty, sanctity, or ...
a geometric shape, usually in the form of a disk, circle, ring, or rayed structure, traditionally representing a radiant light around or above the head of a divine or sacred personage, an ancient or medieval monarch, etc. an atmosphere or quality of glory, majesty, sanctity, or ...
Mar 7, 2019 10:51:11 #
Linary
Loc: UK
will47 wrote:
What is the best way to rid of haloing or artifacts? For instance on the edge of a roof.
This video might help
https://www.youtube.com/watch?v=DkTkjosZXXQ&feature=em-uploademail
I have also found that the Smudge tool can fill in the white band which may lie between the sky and the roof. (Use a large brush - 100% hard - and ease the sky to the roof.)
Mar 7, 2019 10:54:30 #

Linary wrote:
couldn't access the video, but halos are usually caused by over sharpening.
Mar 7, 2019 10:58:43 #
Linary
Loc: UK
JohnSwanda wrote:
couldn't access the video, but halos are usually caused by over sharpening.
Sorry, wrong link - this should do the trick. Also I edited my post with a note about the smudge tool.
https://www.youtube.com/watch?v=DkTkjosZXXQ&feature=em-uploademail
Mar 7, 2019 11:39:08 #
Cany143
Loc: SE Utah
will47 wrote:
What is the best way to rid of haloing or artifacts? For instance on the edge of a roof.
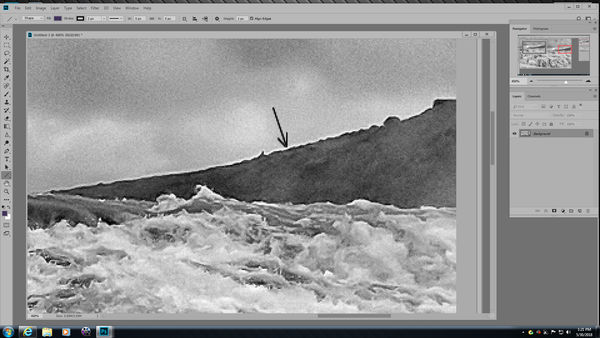
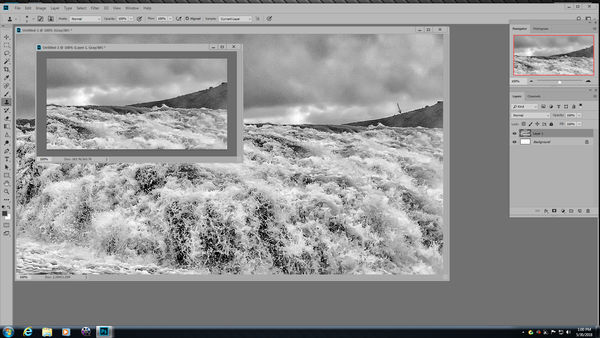
As most folks know, haloing is a result of certain somewhat 'pushed' methods of post processing, including sharpening, dehazing, structure, and/or clarity. In some instances, it can be almost imperceptible, producing a 2-3 pixel wide 'blank,' or effectively white, space between areas of high contrast. In other instances, where higher degrees of processing have been applied, that 'haloing' effect can extend far into the lighter tone (more often than not, the typically lighter sky portions of an image). Either of these --and in my estimation, even the seemingly almost imperceptible case-- detracts from the technical quality of the image itself, so yes, correcting or compensating for the condition may be warranted.
Attached are two images (not my own) that show the easiest form of haloing to correct. Doing so takes some practice, but after the process has been done a few times, it becomes fairly easy, even if it can sometimes be time consuming--lots of dark tree branches against a light/medium value sky, for example. The process itself is relatively simple, and is as follows:
In Photoshop (and most image editing programs will have a corresponding tool), using the Magic Wand selection tool (set perhaps at 50%), select the darker value (in the instance you mentioned, I'd assume that would be the roofline). It might be necessary to add or reduce portions of that selection, and doing so might best be done by using the Lasso Selection tool (keyboard Ctrl to + the selection/keyboard Alt to - the selection). Once the selection is complete, Invert the selection such that you're now working in the lighter portion where the halo exists, and using the Clone Brush, sample from the sky/lighter area that is active, and fill in the blank halo line.
Larger --gradiated-- halos that extend far into lighter portions may require more complicated masking techniques, and since it doesn't seem that's what you've described, I won't go into those here.
Like anything, practice makes perfect. Hope that helps.
Mar 7, 2019 11:53:52 #
jweeks
Loc: Phoenix
If the haloing is a result of over sharpening or increases in contrast, clarity etc. then reduce the amount of sharpening etc. until the haloing goes away. This is the basic test for over sharpening - sharpen until you see halos then back off until they go away.
Mar 8, 2019 07:29:07 #
mwsilvers
Loc: Central New Jersey
will47 wrote:
What is the best way to rid of haloing or artifacts? For instance on the edge of a roof.
As others have pointed out it's generally a result of over sharpening. Play with the various sharpening took and/or micro contrast tools in your software to reduce edge sharpening.
Mar 8, 2019 11:24:22 #

That's how I do it but I would add one thing. That is to set the Blend mode on your Clone Stamp or on your layer to "Darken". This makes it even more foolproof. In fact, sometimes you don't even need a selection or mask to do it this way.
Cany143 wrote:
As most folks know, haloing is a result of certain... (show quote)
Mar 8, 2019 11:26:01 #
Fotoartist wrote:
That's how I do it but I would add one thing. That is to set the Blend mode on your Clone Stamp or on your layer to "Darken". This makes it even more foolproof.
That's the way I do it, and it works great.
Mar 8, 2019 12:15:34 #
mwsilvers
Loc: Central New Jersey
Fotoartist wrote:
That's how I do it but I would add one thing. That is to set the Blend mode on your Clone Stamp or on your layer to "Darken". This makes it even more foolproof. In fact, sometimes you don't even need a selection or mask to do it this way.
The only problem I have with this approach is that's it is often just a bandaid to fix a problem created by applying too much edge sharpening and contrast in the first place. I would prefer to fix the root cause of the problem rather than cover it up. Of course if one is dealing with an exported jpg file and the original edited file is not available then masking is the way to go.
Mar 8, 2019 12:29:39 #
mwsilvers wrote:
The only problem I have with this approach is that's it is often just a bandaid to fix a problem created by applying too much edge sharpening and contrast in the first place. I would prefer to fix the root cause of the problem rather than cover it up. Of course if one is dealing with an exported jpg file and the original edited file is not available then masking is the way to go.
The OP's question was how to fix it. He has also been advised of the cause and how to prevent it.
Mar 8, 2019 13:11:01 #
mwsilvers
Loc: Central New Jersey
JohnSwanda wrote:
The OP's question was how to fix it. He has also been advised of the cause and how to prevent it.
If he has the original edited copy, reviewing and changing the applied edge sharpening is the way to fix it. It was not clear to me that the OP did not have the original with the applied edits. Now, if the edits were applied to a jpeg and saved to the only existing copy in software that doesn't have non-destructive editing, that's another thing. So I guess, the real question is, what is the format of the file and what software is he using.
Mar 8, 2019 13:16:42 #
Linary wrote:
This video might help
https://www.youtube.com/watch?v=DkTkjosZXXQ&feature=em-uploademail
I have also found that the Smudge tool can fill in the white band which may lie between the sky and the roof. (Use a large brush - 100% hard - and ease the sky to the roof.)
https://www.youtube.com/watch?v=DkTkjosZXXQ&feature=em-uploademail
I have also found that the Smudge tool can fill in the white band which may lie between the sky and the roof. (Use a large brush - 100% hard - and ease the sky to the roof.)
Ah, the wily Smudge tool! A great idea when used sparingly, a disaster when not...

If you want to reply, then register here. Registration is free and your account is created instantly, so you can post right away.