Shooting at high ISOs (ISO-5000)
Feb 28, 2019 07:42:12 #

In every situation where I need to move off of ISO-100, I seek to maximum the exposure via the shutterspeed and aperture before finally adjusting the ISO. The images shown here at ISO-5000, and earlier examples at ISO-4000 and ISO-3200, are based on extensive practice using each of the bodies in low light situations and then processing the resulting image files. The full exposure and equipment details of each image are available from the host Flickr page via the URL titles above the image.
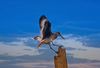
Canon EOS 5D mark III @ ISO-5000
Meerkat by Paul Sager, on Flickr

I try for the slowest shutter possible for the desired aperture, sometimes pushing the boundary of what is possible, many times missing. For birds in flight, I'll try working with 1/1200 to as slow as 1/800, particularly if I'm not in full sunlight. The goal being to maximize the light hitting the sensor before needing to raise the ISO. I'll also try to balance the aperture size, balancing between a depth of field, sharpness at certain apertures, and again, letting more (or less) light to reach the sensor. The last adjustment is the ISO needed to push the resulting image to the right of the histogram.
How high is too high? These examples show my own personal ISO-5000 limit for an EOS 5DIII. When cleaning the noise at higher ISO settings on this model, I lose too much of the detail of the image for settings above ISO-5000. Possibly other tools / techniques could raise that threshold, but I haven't found a low-light shooting situation where I need to push this body to a higher ISO to obtain the desired result.
Scarlet Mormon

When shooting JPEG, your primary noise reduction tool is the capabilities of your camera. You can also post process these JPEG images to further improve the result.
The images shown in this High ISO series are all processed RAW files. Although I strive for pretty good, I'm not striving for perfection. As a result, my tools (the cameras, lenses and software) are a balance of how much I want to spend in dollars and in time. Buying more and more software and always the newest body is an arms race I try to avoid. My advice is to find a shooting and processing style that fits your desired level of effort and your desired level of expense. My approach using Adobe Lightroom and Topaz Denoise works for me, whether working on 1 image or a batch of 50. The process can be cumbersome where it would be much more efficient to be able to "swap out" the LR noise module and replace directly with Topaz, probably not something Adobe would support.
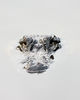
White-naped crane

There are several software tools available for noise processing, with several now rated as more powerful than Topaz DeNoise6 used for these images. The ETTR technique mentioned in this series seeks to maximize the image data in the RAW file while minimizing the random digital noise associated with higher ISO values. I try to address digital noise during the RAW image capture and at multiple steps through the digital processing workflow. My own workflow has grown organically over the past 14-years based on research and practicing and developing my shooting technique and processing technique. The use of other camera types and software would likely lead to a different but similar digital workflow.
Hopefully, this series of images shows a consistency of results across multiple cameras and multiple lenses over multiple years of shooting. Part of the consistency comes from the person handling the camera and running the keyboard. But also, the RAW files are always "fresh" where updates to software and / or processing technique can be used to revisit an older image. I've screwed up many of my oldest JPEGs over the years where today, the best I can do to re-process something that exists only as JPEG is to work with / to work around the edits permanently made to the file. The RAW file cannot be changed in a way that permanently alters the file or image. I can always start over again with the RAW file as if it was shot this morning.
The one thing I can't do to the RAW file is go back in time and reshoot with a better exposure. The Scarlet Mormon butterfly, above in this post, replaced another version originally selected as one of the ISO-5000 examples. When compared to the other three images shown here, I found the butterfly image was too noisy. So I tried to reprocess and over five separate tries, I couldn't get the noise in the image to "look better". But, while filtering within my LR catalog, I found a better example that is the one used in this post. The difference between the two versions was about 10-minutes clock time and more importantly, the better image was shot at 1/320 where the problem image was 1/640, both at f/8 and ISO-5000. Based on the wing damage, the images seem to be of the same butterfly. I use this example to prove the rule of: maximize the data to maximize the results.
Violaceous Turaco

Earlier posts in this series
Shooting at high ISOs (ISO-3200)
Shooting at high ISOs (ISO-4000)
These images are sized to fill your wide-screen display. Try using <F11> to maximize your browser window for the full effect. If the images overshoot your display, such as a laptop, just click on the image or the URL link and they'll resize to your screen from the host Flickr site. You can click a bit further into the image details on the Flickr page, if desired. EXIF data is available from the host Flickr pages as well. On the Flickr site, use your <L>key for Large and the <F11> for the full-screen.
If the images are not filling your widescreen display due to recent UHH changes, follow this link and update your UHH profile: https://www.uglyhedgehog.com/t-572300-1.html
Canon EOS 5D mark III @ ISO-5000
Meerkat by Paul Sager, on Flickr
I try for the slowest shutter possible for the desired aperture, sometimes pushing the boundary of what is possible, many times missing. For birds in flight, I'll try working with 1/1200 to as slow as 1/800, particularly if I'm not in full sunlight. The goal being to maximize the light hitting the sensor before needing to raise the ISO. I'll also try to balance the aperture size, balancing between a depth of field, sharpness at certain apertures, and again, letting more (or less) light to reach the sensor. The last adjustment is the ISO needed to push the resulting image to the right of the histogram.
How high is too high? These examples show my own personal ISO-5000 limit for an EOS 5DIII. When cleaning the noise at higher ISO settings on this model, I lose too much of the detail of the image for settings above ISO-5000. Possibly other tools / techniques could raise that threshold, but I haven't found a low-light shooting situation where I need to push this body to a higher ISO to obtain the desired result.
Scarlet Mormon
When shooting JPEG, your primary noise reduction tool is the capabilities of your camera. You can also post process these JPEG images to further improve the result.
The images shown in this High ISO series are all processed RAW files. Although I strive for pretty good, I'm not striving for perfection. As a result, my tools (the cameras, lenses and software) are a balance of how much I want to spend in dollars and in time. Buying more and more software and always the newest body is an arms race I try to avoid. My advice is to find a shooting and processing style that fits your desired level of effort and your desired level of expense. My approach using Adobe Lightroom and Topaz Denoise works for me, whether working on 1 image or a batch of 50. The process can be cumbersome where it would be much more efficient to be able to "swap out" the LR noise module and replace directly with Topaz, probably not something Adobe would support.
White-naped crane
There are several software tools available for noise processing, with several now rated as more powerful than Topaz DeNoise6 used for these images. The ETTR technique mentioned in this series seeks to maximize the image data in the RAW file while minimizing the random digital noise associated with higher ISO values. I try to address digital noise during the RAW image capture and at multiple steps through the digital processing workflow. My own workflow has grown organically over the past 14-years based on research and practicing and developing my shooting technique and processing technique. The use of other camera types and software would likely lead to a different but similar digital workflow.
Hopefully, this series of images shows a consistency of results across multiple cameras and multiple lenses over multiple years of shooting. Part of the consistency comes from the person handling the camera and running the keyboard. But also, the RAW files are always "fresh" where updates to software and / or processing technique can be used to revisit an older image. I've screwed up many of my oldest JPEGs over the years where today, the best I can do to re-process something that exists only as JPEG is to work with / to work around the edits permanently made to the file. The RAW file cannot be changed in a way that permanently alters the file or image. I can always start over again with the RAW file as if it was shot this morning.
The one thing I can't do to the RAW file is go back in time and reshoot with a better exposure. The Scarlet Mormon butterfly, above in this post, replaced another version originally selected as one of the ISO-5000 examples. When compared to the other three images shown here, I found the butterfly image was too noisy. So I tried to reprocess and over five separate tries, I couldn't get the noise in the image to "look better". But, while filtering within my LR catalog, I found a better example that is the one used in this post. The difference between the two versions was about 10-minutes clock time and more importantly, the better image was shot at 1/320 where the problem image was 1/640, both at f/8 and ISO-5000. Based on the wing damage, the images seem to be of the same butterfly. I use this example to prove the rule of: maximize the data to maximize the results.
Violaceous Turaco
Earlier posts in this series
Shooting at high ISOs (ISO-3200)
Shooting at high ISOs (ISO-4000)
These images are sized to fill your wide-screen display. Try using <F11> to maximize your browser window for the full effect. If the images overshoot your display, such as a laptop, just click on the image or the URL link and they'll resize to your screen from the host Flickr site. You can click a bit further into the image details on the Flickr page, if desired. EXIF data is available from the host Flickr pages as well. On the Flickr site, use your <L>key for Large and the <F11> for the full-screen.
If the images are not filling your widescreen display due to recent UHH changes, follow this link and update your UHH profile: https://www.uglyhedgehog.com/t-572300-1.html
Feb 28, 2019 08:22:41 #
Feb 28, 2019 10:23:53 #
Feb 28, 2019 11:38:20 #
Feb 28, 2019 20:57:54 #
Mar 1, 2019 05:42:25 #
Mar 1, 2019 06:52:32 #
Mar 1, 2019 07:27:13 #
Very nice. I have enjoyed your series on shooting with high ISO.
Mar 1, 2019 08:54:27 #
CHG_CANON wrote:
In every situation where I need to move off of ISO... (show quote)
1 & 4 really stand out for me!

Mar 1, 2019 09:55:04 #
olemikey
Loc: 6 mile creek, Spacecoast Florida
Another excellent set Paul. Probably an eye opener for many. Tutorial of the month club for sure!!!!
Mar 1, 2019 09:57:54 #
CanonTom
Loc: Birmingham
Thank you Paul for once again (and its not the first time) taking the time to teach us some of your wonderful techniques. I will continue to try to internalize your instructions. I have some of the same equipment that you do but never get equal results. Still I am improving as I expect others are who follow your instructions. Once again showing that the man or woman behind the camera is far more crucial than the equipment or software alone.
Mar 1, 2019 10:10:10 #
olemikey
Loc: 6 mile creek, Spacecoast Florida
CanonTom wrote:
Thank you Paul for once again (and its not the first time) taking the time to teach us some of your wonderful techniques. I will continue to try to internalize your instructions. I have some of the same equipment that you do but never get equal results. Still I am improving as I expect others are who follow your instructions. Once again showing that the man or woman behind the camera is far more crucial than the equipment or software alone.
And/or common misconceptions concerning ISO variance.
Mar 1, 2019 10:17:44 #

Paul....you need to publish your shots and methods as they are worth a lot to many of us and I think you would do very well in short order....like Mr. Rockwell who , like yourself , does exquisite work.
BRAVO
BRAVO
Mar 1, 2019 11:12:56 #
Mar 1, 2019 11:46:12 #

Thanks for sharing the information along with very good examples. This has been very helpful.
If you want to reply, then register here. Registration is free and your account is created instantly, so you can post right away.