Background Control
Feb 16, 2019 10:25:28 #

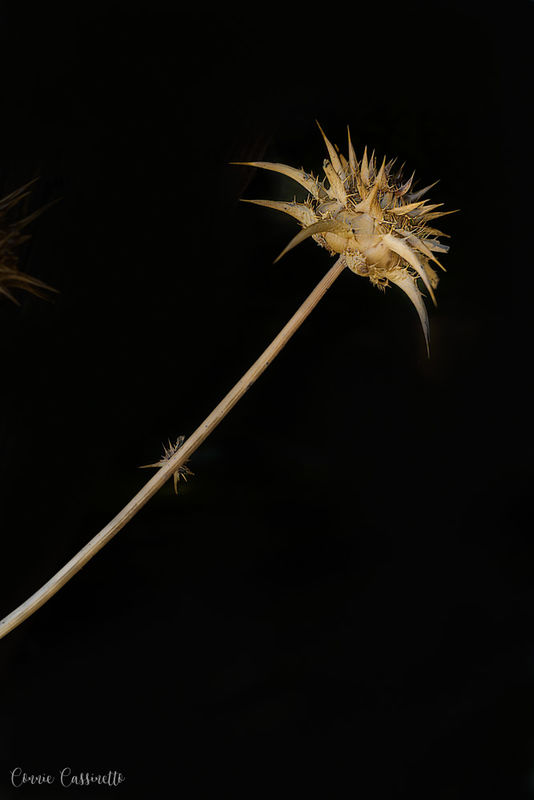
Here's the look you might like, but it was done with off camera flash, high speed sync, and in this case back lighting the arrangement with no masking involved in editing. At 1/1600 shutter speed pretty much all of the ambient light was killed, and I used a small homemade tinfoil reflector to bounce a little front light on the subject, as around the rim of the vase. Although you may not yet be equipt to do this, but maybe an idea for the future
Here are the details: 1/1600, f/4, ISO200, bare flash 1/64 power, 24 inches from, and behind subject. Small foil reflector front left
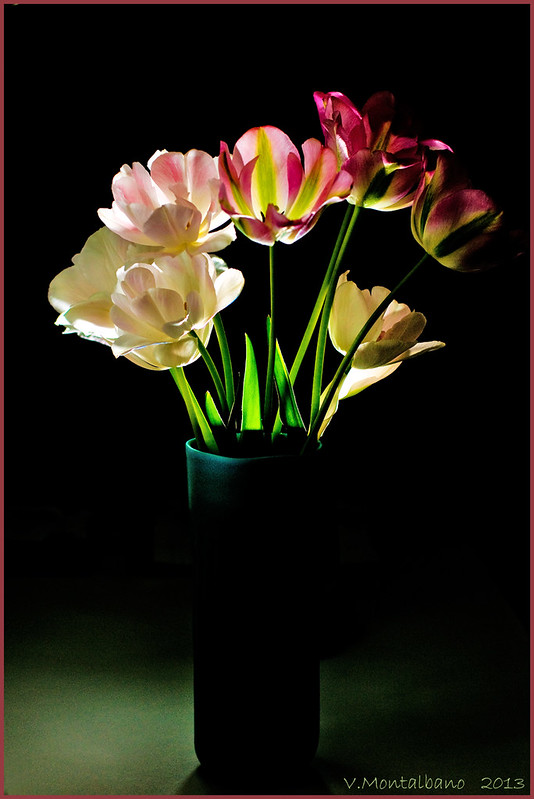 Back Light w/small silver reflector by Vince Montalbano (autofocus), on Flickr
Here are the details: 1/1600, f/4, ISO200, bare flash 1/64 power, 24 inches from, and behind subject. Small foil reflector front left
Back Light w/small silver reflector by Vince Montalbano (autofocus), on FlickrFeb 16, 2019 10:48:47 #

autofocus wrote:
Of course you can do that in editing, but the op is a novice shooter, and possibly does not yet have the skills to do layers and masks. It seems he/she wants the look achieved by mostly SOOC
And this would constitute an excellent learning opportunity where he can learn at least one reliable way to attain his goal of an "all black" background. In my opinion, it is far harder and frustrating to try and do it with just lighting and no post processing. In fact, it is almost impossible.
This is how you do in in Photoshop:
https://helpx.adobe.com/photoshop/how-to/remove-and-replace-background.html
And this is how you do it in On1 using a quick mask tool:
https://photojoseph.com/tips/2016/1/20/on1s-quick-mask-refine-brush#.XGgqTqJKjmE
Masking and layering is a pretty important skill, and the only way to get a perfectly black background. I agree, to someone who has never done this before, it does seem to be a big deal and extremely complicated, but the reality couldn't be further from the truth. Most decent editing programs have this functionality. Some can do it with files opened as layers, others can do it entirely with just fill layers - in either case, the process is similar - create a mask, delete the part you don't need, making the remaining image a subject with a clear area around it, and underlay a black fill layer (or black image file) to produce the desired background.
I think the OP is seeking something that needs to be learned, and I think the question is how "other" photographers do it, and has looked at some bad or misleading information, probably posted by people who have no clue how to do this (such as using F16 and exposure adjustments to darken a background - which clearly doesn't work). He specifically asked "Is there a straightforward approach to crisply isolating a static subject, outdoors, with a black or quite dark background (including indoor vs. outdoor) and I think he seems open to learning.
I shot this image with just ambient lighting - and it took me about 2 minutes to quickly mask the image and add the background using On1's QuickMask and Mask refinement tools.
Feb 16, 2019 11:11:08 #
Gene51 wrote:
And this would constitute an excellent learning op... (show quote)
I do a ton of masking in my work Gene, you'll see that if you take the time to take a peek at some at my flickr photos, the link is below. And, yes, it's not hard to do, but fine detail work can be tedious, especially when you do it without masking s/w, and do it the old fashioned way by hand selecting the objects which is the way I still do it. And I'm sure you'll agree that very fine details are extremely difficult, like fly away hairs in portrait work, and fur on some animal shots. Years ago I purchased Topaz which had a masking program included, but I was never totally happy with it, and do not use it.
You know a very simple solution is use of a basic dark background behind the subject...a dark sheet, or dark construction paper works great. In our studio work we will use thunder gray background paper, and that works great, and no special editing is needed.
Feb 16, 2019 11:50:49 #
gvarner
Loc: Central Oregon Coast
A TTL flash, camera set for High Speed Sync, Manual Mode, ISO at 400, aperture at F4, shutter at 1/250 or higher to limit the amount of ambient light.
Check out this video
https://youtu.be/vEnAhkL0i38
Check out this video
https://youtu.be/vEnAhkL0i38
Feb 16, 2019 12:42:02 #
dione961 wrote:
I'm working on background control. Many pics post... (show quote)
That look is very easily achieved, using flash! A flash exposure is always a combination of two exposures, the flash exposure and the ambient light exposure. You adjust the flash exposure with your aperture and you adjust the ambient exposure with your shutter speed, the faster the shutter speed, the darker the ambient, logically!
Feb 16, 2019 15:47:31 #
Gene51 wrote:
I did a macro workshop at a local photo club. Ther... (show quote)
Hi Gene, always great to read your posts - thanks for your time! I've saved everything you've posted for down the road a bit as I have no proper lighting gear & next to zero editing skills.
I spent some weeks practising with black card on indoors objects but my results are much like your 1st images in terms of background quality - not super black, textured, & generally not a good contrast for the subject, so I can see that PP would help there. However I've only just bought PSE & have never used editing SW before, so it's as much a learning curve as the camera (some of you may remember that 3 months ago I hadn't even heard of the exposure triangle, nor had a clue how to use anything other than Auto)!
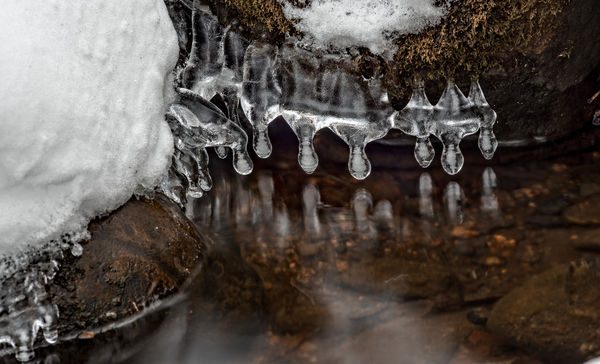
I'm shooting outdoors right now as there are many incredible ice formations around, many soft snow-covered shapes and many wonderful scenes where light plays differently on water, ice, snow, wet rocks and plants, generally and especially at different times of day. I've also been using a LumeCube to light little subjects outdoors in many different ways - loads of fun. But the comments about the background being lit preventing a true dark background result makes perfect sense (I guess I'll grow some "sense" of my own over time!!). I need to find outdoor subjects that are nicely lit but backed by dark shadow. Shouldn't be that hard in Alaska! Thanks again for your great tips - much appreciated.
Feb 16, 2019 16:01:23 #
amfoto1
Loc: San Jose, Calif. USA
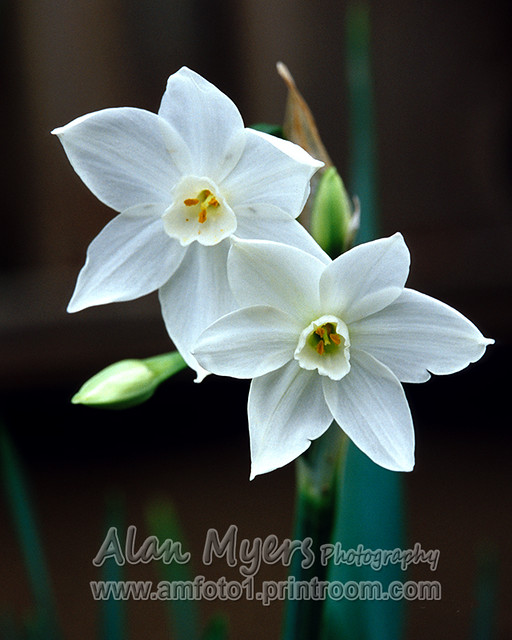
If you notice all the above responses the background is darkened by shadow or in other ways, while the subject is more brightly lit. There are various ways to do that.
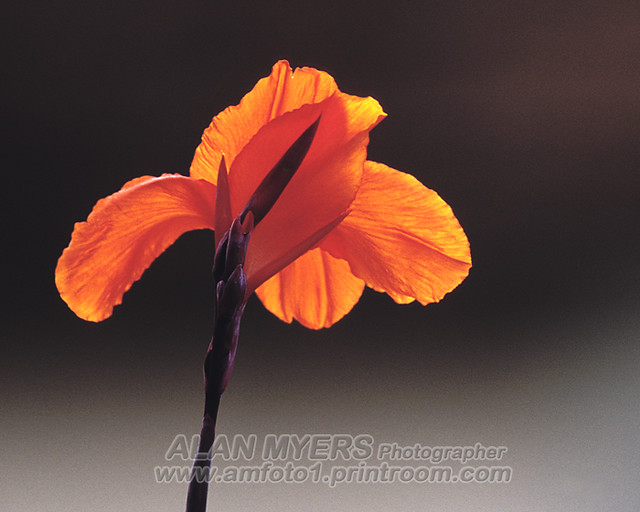
In this first case, the subject was strongly backlit by the sun and the background behind it was in heavy shade. I used a very long telephoto lens (500mm) to make the background, about 15 or 20 feet away, blur down completely (it was an old weathered fence and wall).
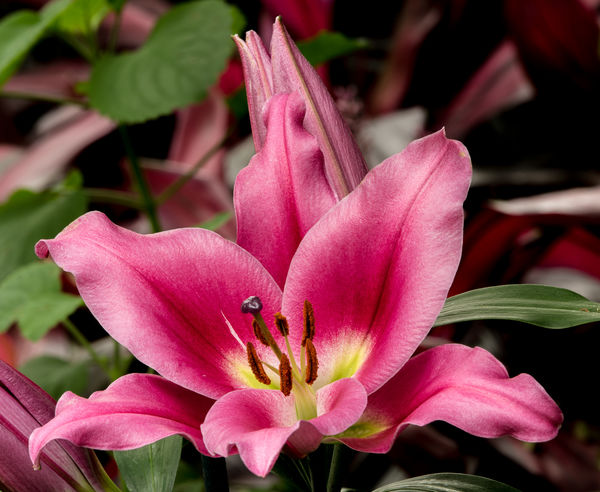
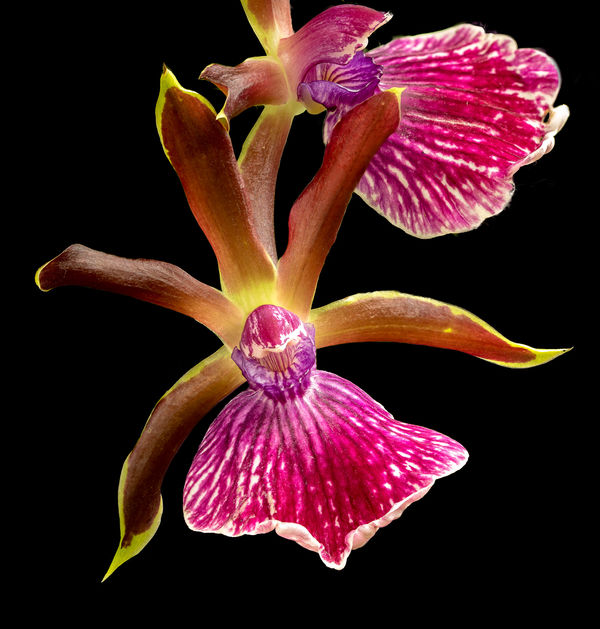
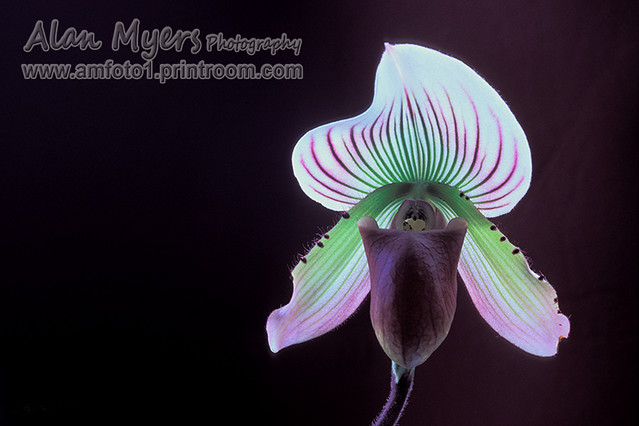
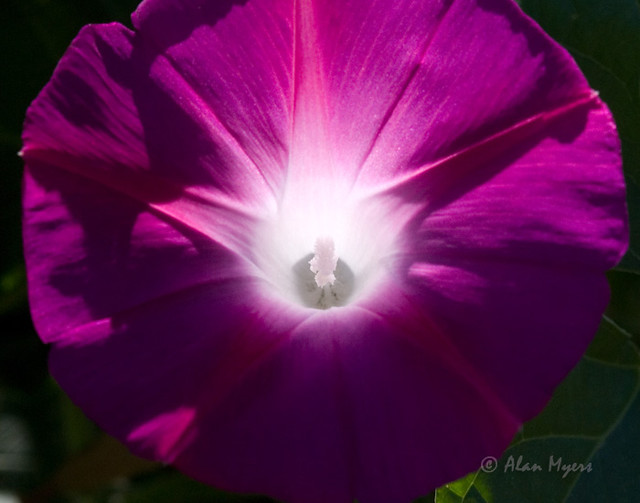
This orchid was a different challenge. I shot it indoors with a 100mm macro lens by available window light ("North light", which is ideal), and didn't have much room behind it. So I hung a dark purplish piece of velvet behind the flower.
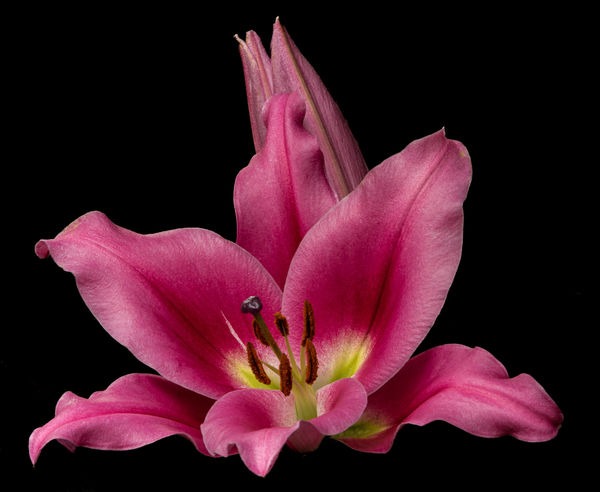
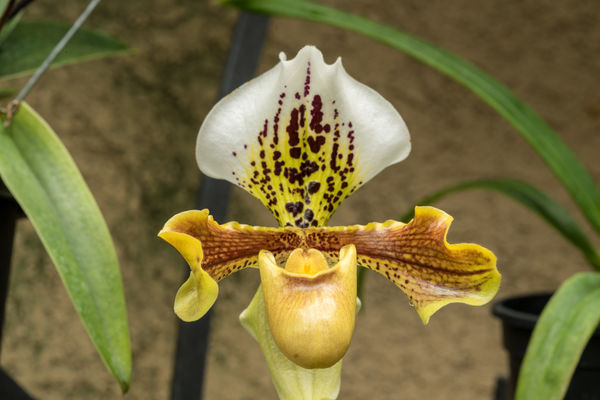
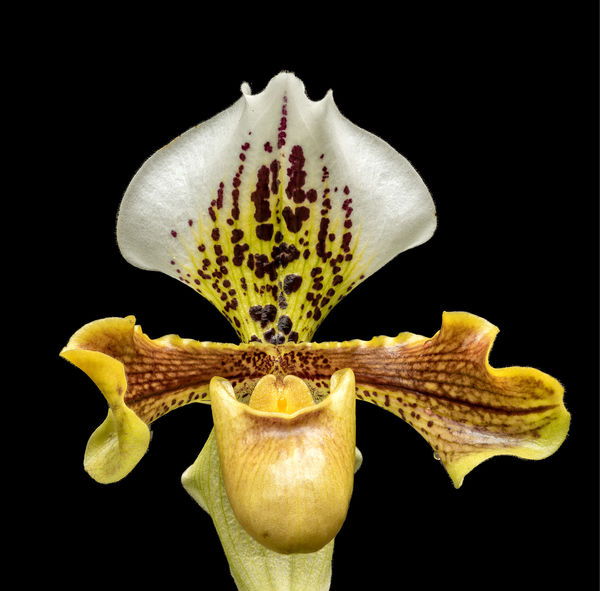
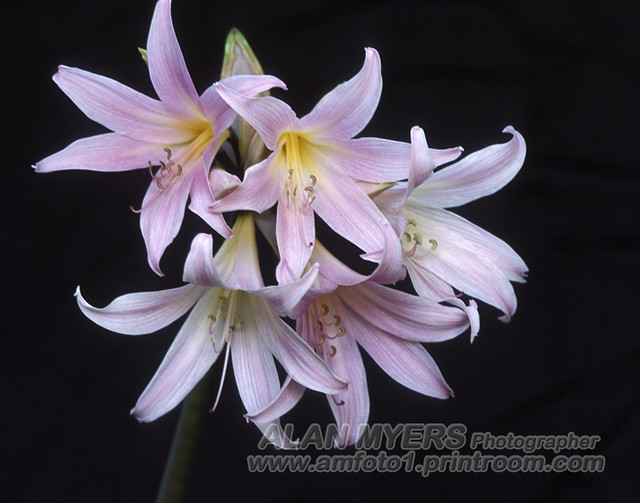
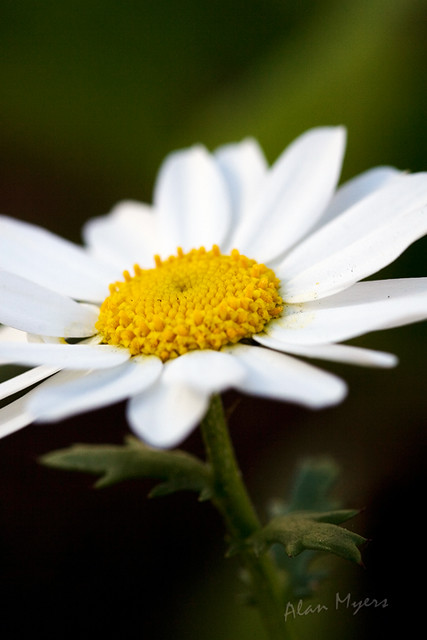
Here's another example where I hung a piece of black velvet behind the subject (to cover a gray stucco wall). In this case, I used just a little fill flash... hardly noticeable in the image.
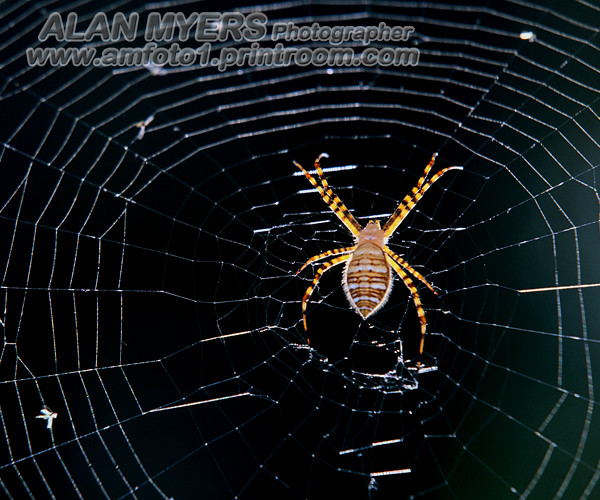
For this shot of a garden spider, the natural background of distant trees in shade worked great. The subject and its web were backlit by the sun. I had to add stronger fill flash to brighten them up for the image.
All the above were done using a tripod.
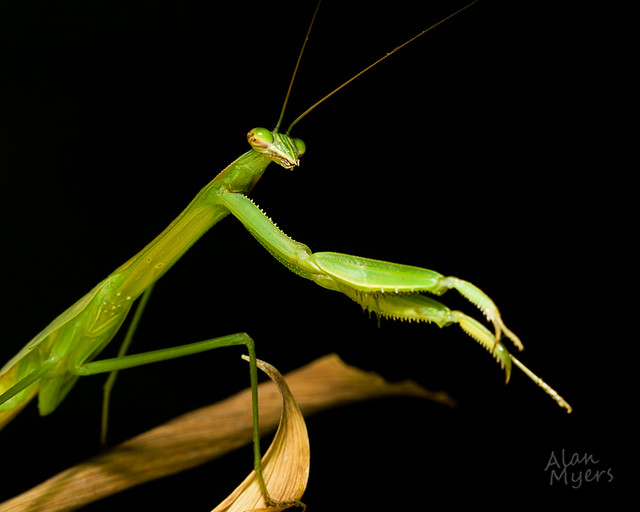
This shot of a preying mantis wasn't done with a tripod. Instead I rested the camera and a 100mm macro lens on an upside down, 5 gallon paint bucket. Here I used a large, powerful flash with strong diffusion on it, held near the subject, as the primary light source. "Full flash", instead of fill flash. With my cameras, this is accomplished by using AE flash, but taking the cameras out of any auto exposure mode... using strictly manual exposure mode (no Auto ISO!) and being sure that the shutter speed, ISO and aperture make for a strongly underexposed background, while the flash insures the subject is well exposed.
I also just look for situations where subjects are nicely lit, against darker backgrounds. All these were simply shot hand held in various locations where things just worked out well...

All the above examples are macro or close-up shots... but much the same can be done with larger subjects, too.
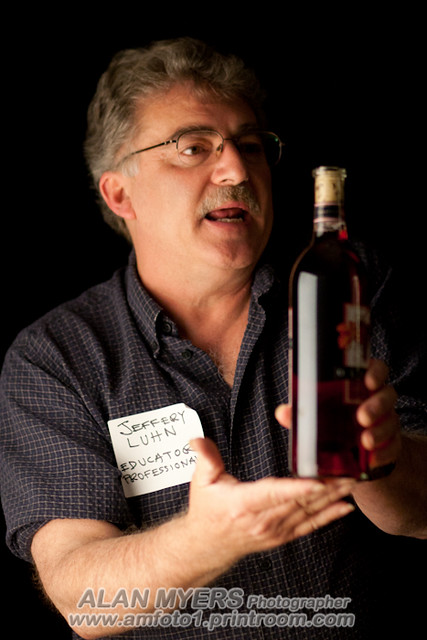
Here's a portrait of a friend teaching a photography class, shot in his studio using only a single light source off to one side...
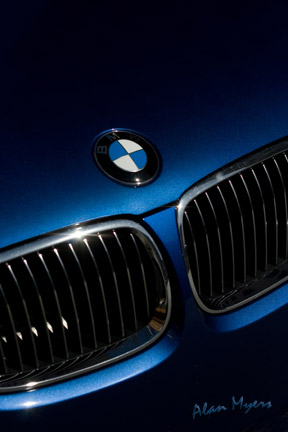
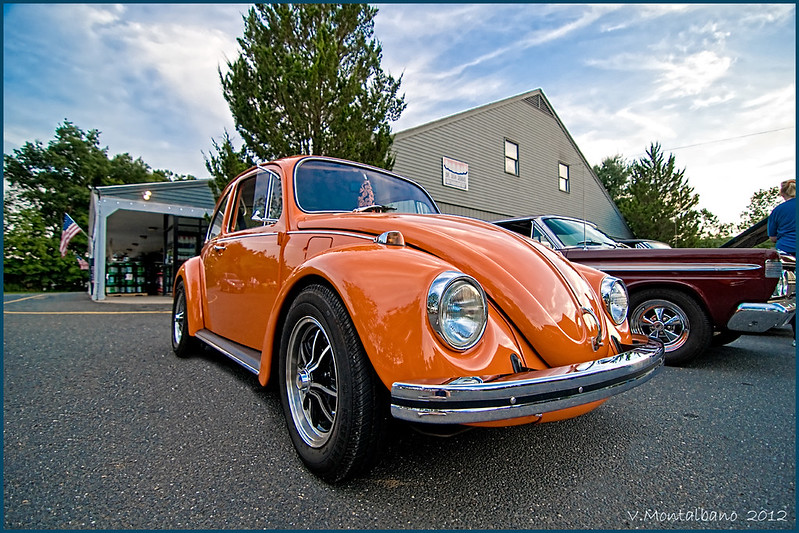
I simply under-exposed this image of a car's grill and hood... setting my exposure for the highlights:
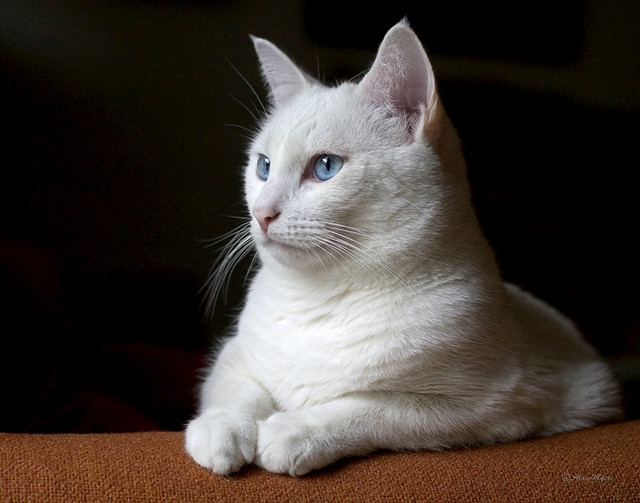
A friend's cat simply posed well lit near a window, so the white wall much less well lit and some distance behind her went nearly black. I had to do a little retouching of the background in Photoshop... but not much.
Yes, it's possible to select a subject and "drop out" a background in Photoshop. It's just a lot of work and, in my opinion, often doesn't look "quite right"... seems unnatural or something. I'm a big fan of Photoshop, but in this case I prefer to "get it right" or close to it, in the camera when I take the shot.
A Circular Polarizing filter can help in some situations. A Neutral Density may be needed in others.
In this first case, the subject was strongly backlit by the sun and the background behind it was in heavy shade. I used a very long telephoto lens (500mm) to make the background, about 15 or 20 feet away, blur down completely (it was an old weathered fence and wall).
This orchid was a different challenge. I shot it indoors with a 100mm macro lens by available window light ("North light", which is ideal), and didn't have much room behind it. So I hung a dark purplish piece of velvet behind the flower.
Here's another example where I hung a piece of black velvet behind the subject (to cover a gray stucco wall). In this case, I used just a little fill flash... hardly noticeable in the image.
For this shot of a garden spider, the natural background of distant trees in shade worked great. The subject and its web were backlit by the sun. I had to add stronger fill flash to brighten them up for the image.
All the above were done using a tripod.
This shot of a preying mantis wasn't done with a tripod. Instead I rested the camera and a 100mm macro lens on an upside down, 5 gallon paint bucket. Here I used a large, powerful flash with strong diffusion on it, held near the subject, as the primary light source. "Full flash", instead of fill flash. With my cameras, this is accomplished by using AE flash, but taking the cameras out of any auto exposure mode... using strictly manual exposure mode (no Auto ISO!) and being sure that the shutter speed, ISO and aperture make for a strongly underexposed background, while the flash insures the subject is well exposed.
I also just look for situations where subjects are nicely lit, against darker backgrounds. All these were simply shot hand held in various locations where things just worked out well...
All the above examples are macro or close-up shots... but much the same can be done with larger subjects, too.
Here's a portrait of a friend teaching a photography class, shot in his studio using only a single light source off to one side...
I simply under-exposed this image of a car's grill and hood... setting my exposure for the highlights:
A friend's cat simply posed well lit near a window, so the white wall much less well lit and some distance behind her went nearly black. I had to do a little retouching of the background in Photoshop... but not much.
Yes, it's possible to select a subject and "drop out" a background in Photoshop. It's just a lot of work and, in my opinion, often doesn't look "quite right"... seems unnatural or something. I'm a big fan of Photoshop, but in this case I prefer to "get it right" or close to it, in the camera when I take the shot.
A Circular Polarizing filter can help in some situations. A Neutral Density may be needed in others.
Feb 16, 2019 16:12:28 #
[quote=autofocus]Here's the look you might like, but it was done with off camera flash, high speed sync, and in this case back lighting the arrangement with no masking involved in editing. At 1/1600 shutter speed pretty much all of the ambient light was killed, and I used a small homemade tinfoil reflector to bounce a little front light on the subject, as around the rim of the vase. Although you may not yet be equipt to do this, but maybe an idea for the future. Here are the details: 1/1600, f/4, ISO200, bare flash 1/64 power, 24 inches from, and behind subject. Small foil reflector front left
Hi Vince, STUNNING image - the luminance is incredible. I've saved the details from this post as well. You're correct about my desire to learn the camera first (see my reply to Gene on the relevance of that!). It seems to make sense to first build a thorough grounding in using the camera to create the looks I want and I am starting to get shots I like using Manual and then I figured I'd know what I wanted to do in editing and why. Right now I'm aiming for nicely composed, in focus where I want, with sharp and vibrant subjects. Sometimes I get some of these & now & then I'll get a shot that's getting there!
I really need to get a handle on DoF though to control the composition (and also the story). I understand the aperture component of DoF but Linda mentioned there are focal length & shutter speed aspects & I wasn't aware of that & don't know the roles they each play so I'll go do some more research.
If you know of some text articles I should study that cover focal length & shutter speed as well as aperture for DoF control I'd really value the advice. Thanks again for your time; it's much appreciated. Best Regards, Dione.
Feb 16, 2019 16:34:50 #
amfoto1 wrote:
If you notice all the above responses the backgrou... (show quote)
Hi Alan, thanks so much for your post and the time to put it together - very generous! These images really help actually: they show many ways to achieve the effect & are inspiring (the Cat is truly beautiful) and I have some ways I can try some of these ideas.
If you have time to check my reply to Vince, I don't yet understand the role played by shutter speed & focal length in DoF (except to say that I've found if I get in close to the subject, physically & with zoom, I can blur out backgrounds more easily, though not yet to black).
Can you explain how CPL's and ND filters can be used in this context? I have CPL's but I've not used them much in Alaska as there's already been little light up here & they take away a couple of stops. With the light returning I can try them - I wonder what effect they'd have on ice as I have found that a UV filter can seem to give a less 'flat' looking result to ice (or I may be improving a little perhaps - not sure). I've read a lot about ND's & ND grads but don't have any. Regards, Dione, Alaska.
Feb 16, 2019 16:47:57 #
[quote=dione961]
Dione, the shutter really plays no role in DOF, so let's eliminate that. There are four variables that influence DOF.
1) you know, the aperture, the wider the opening the more shallow the DOF will be. So, f/2.8 will produce thinner DOF than say F/11
2) how close you are to the target subject, whether actually physically close, or zoomed close with a telephoto/long lens also influences DOF. Put you finger in front of your face and stare at, it will be sharp, and everything beyond it will be soft, the camera's lens works the same way.
3) Wide angle lenses inherently have deeper DOF, and longer/telephoto lenses have more shallow DOF, so lens choice is also a factor
4) lastly, the size of the sensor also will effect DOF
autofocus wrote:
Here's the look you might like, but it was done wi... (show quote)
Dione, the shutter really plays no role in DOF, so let's eliminate that. There are four variables that influence DOF.
1) you know, the aperture, the wider the opening the more shallow the DOF will be. So, f/2.8 will produce thinner DOF than say F/11
2) how close you are to the target subject, whether actually physically close, or zoomed close with a telephoto/long lens also influences DOF. Put you finger in front of your face and stare at, it will be sharp, and everything beyond it will be soft, the camera's lens works the same way.
3) Wide angle lenses inherently have deeper DOF, and longer/telephoto lenses have more shallow DOF, so lens choice is also a factor
4) lastly, the size of the sensor also will effect DOF
Feb 16, 2019 16:59:09 #
CPL's and ND filters will have no real bearing on DOF, or accomplishing your goal of dark backgrounds. CPL's basically cut glare and reflections on shiny surfaces and do some magic to blue skies. ND's come in various strengths/stops and simply are meant to reduce light from entering the sensor. They're good when you are dealing with tricky exposures of too much light, often used to darken skies, and when people want that milky look to running water. Also good for studio work when using artificial light sources which won't permit the use of wide apertures. So by killing some of the light they permit the user more flexibility on shutter and aperture choices...hope this helps
Feb 16, 2019 17:01:40 #
dione961 wrote:
I'm working on background control. Many pics post... (show quote)
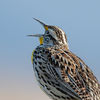
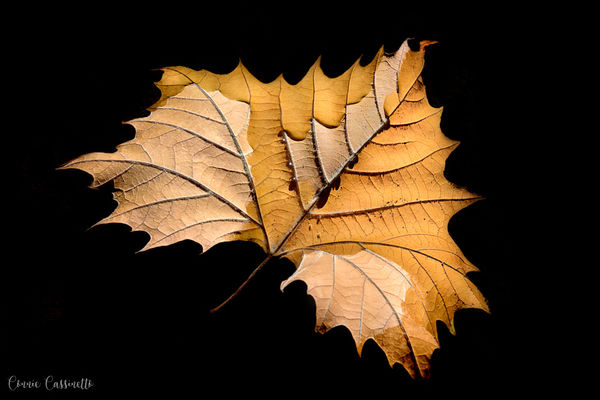
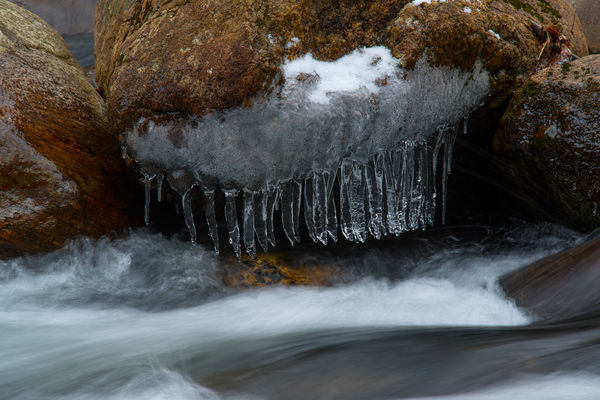
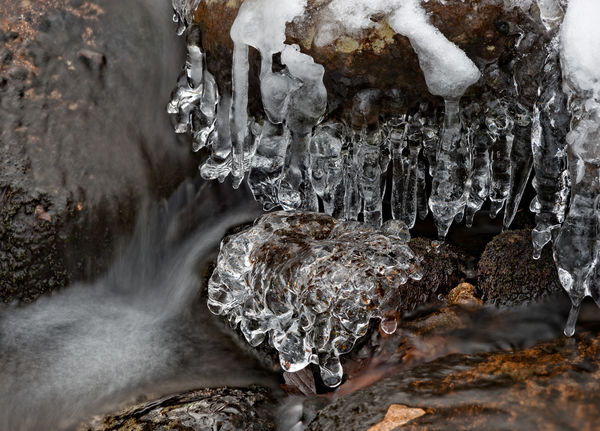
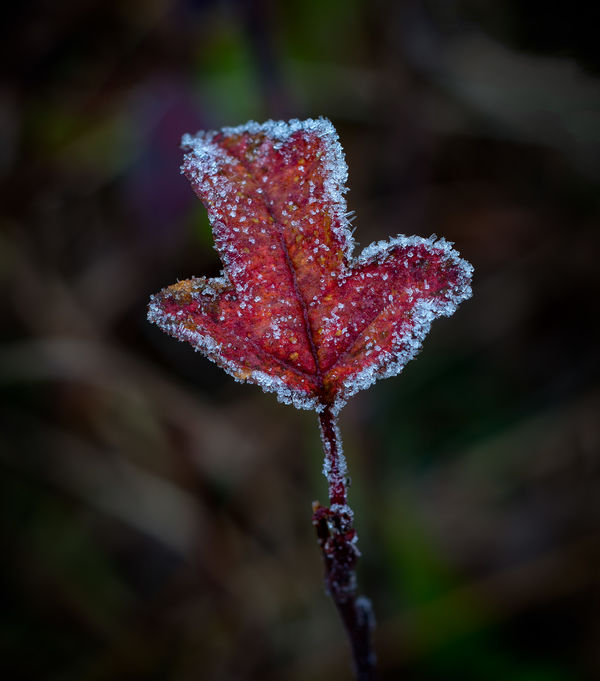
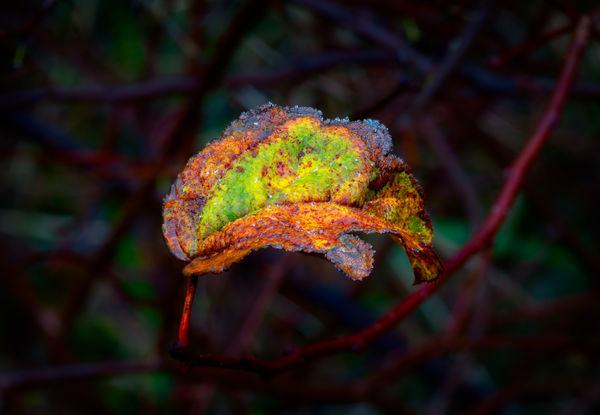
I'm going to have to say that, in my opinion, there is no "straightforward" approach to getting a natural black background. I've done this several times, sometimes just lucky and other times figuring out that it would work. The first time I ever got this was when I shot into the sun on the subject, a white pelican, and set my focus and exposure on the subject, a lovely black background was the result. Most recently I took a shot of a leaf in the Merced River, the river was dark, and I knew that I could use post processing to push the background where I wanted it to go and then clean up any problems in PS. I think it's more about simply getting to know your gear and your environment and then learning how to make things happen. I've attached my first shot with this and one of my most recent shots, all three were shot outside, no flash, no added background. Play around with shooting outside and toward the sun as well as using shadows. It's something that, over time, becomes intuitive once you've done it enough.

Feb 16, 2019 17:08:38 #
here is an example of an 11mm wide angle lens shot at f/2.8 and you can see even at that aperture the background is not blurred that much. Once again, lens choice plays a part in DOF
 Pumpkin Bug by Vince Montalbano (autofocus), on Flickr
Pumpkin Bug by Vince Montalbano (autofocus), on FlickrFeb 16, 2019 17:19:44 #
autofocus wrote:
I do a ton of masking in my work Gene, you'll see ... (show quote)
I've used a black velvet cloth attached to a piece of cardboard for a dark background. But time and time again, the masking approach nails it with the least amount of fuss. Both Photoshop and On1 provide tools to retain difficult details, like slightly out of focus wisps of hair, fur and other difficult situations. I agree, Topaz's solution was hard to work with and the results were seldom worth the effort.
I use both methods - hand selecting and manipulating the selection, and with masks - which, of course, begins with making a reasonably clean selection. I don't think we disagree at all. But I stop at assuming that masking is beyond the capability of the OP, and would rather encourage her to take a look at the process and possibly try it out. Both software titles I provided links to have 30 day free trials, so she can certainly check either out to see if this will do what she needs. I applaud her curiosity and openness to learning new stuff.
Feb 16, 2019 17:41:02 #
dione961 wrote:
Hi Gene, always great to read your posts - thanks ... (show quote)
Thanks!
Not having editing skills is quite temporary. You can do this with PSE - but the tools in PS or On1 may be more robust/easier to implement. I can't say for sure because I haven't used PSE since PSE 10.
The masking method I suggest should work for what you are trying to do. Editing software is how many photographers do the black background thing. And it works equally well for indoor and outdoor subjects. As far as ice is concerned I like a dark but not completely black background - the context is often what makes such images successful.
If you want to reply, then register here. Registration is free and your account is created instantly, so you can post right away.