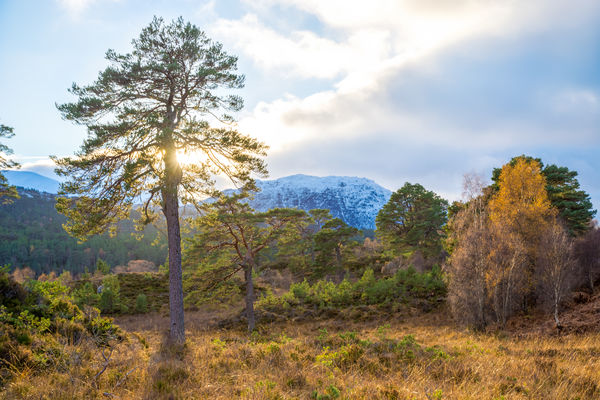
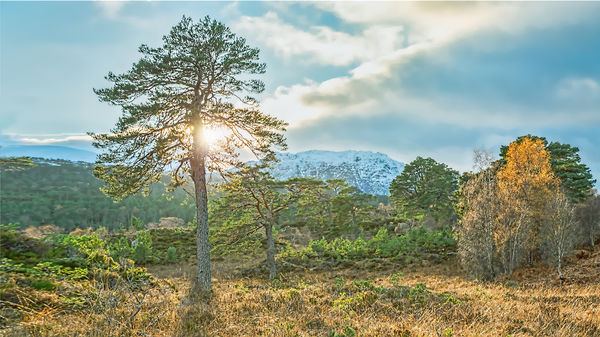
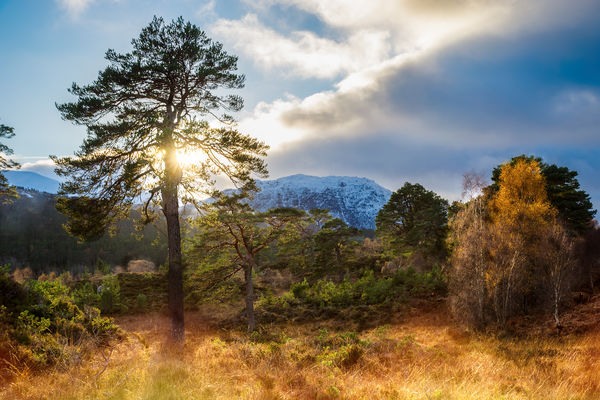
Glen Affric Shot for PP Practice
Feb 3, 2019 11:39:51 #
Thanks for giving us this opportunity to see what we can make of your photograph. This was a hard one for me to get my head around 
I was trying to figure out what you might like out of it since your intent was a HDR from the get go. Should it look like HDR or did you shot HDR to get the brights and darks balanced? I did 3 different versions and finally decided the most natural one was working best and the most believable. Looked to me like the sun is setting, indicated by the long shadows, so I decided to try and keep the foreground from opening up. In other words keeping the grass full and having shadows.
I was trying to figure out what you might like out of it since your intent was a HDR from the get go. Should it look like HDR or did you shot HDR to get the brights and darks balanced? I did 3 different versions and finally decided the most natural one was working best and the most believable. Looked to me like the sun is setting, indicated by the long shadows, so I decided to try and keep the foreground from opening up. In other words keeping the grass full and having shadows.
Feb 3, 2019 12:19:20 #

Jim-Pops wrote:
Thanks for giving us this opportunity to see what ... (show quote)
Thanks for joining in, Jim-Pops. My purpose for doing HDR (exposure bracketing) is to avoid blown highlights and to give me relatively noise-free and data-rich files that can take a lot of PP pushing and pulling. As I remember it, it was late afternoon in the winter, so it was the equivalent of an evening shot. Your editing is both appropriate and effective.
Feb 3, 2019 12:24:51 #
Feb 3, 2019 13:12:05 #
R.G. wrote:
Thanks for joining in, Les. I don't think the merge tool applies any processing apart from the merge, ...
If I understand correctly, you exposure bracketed your images and then merged them using some sort of HDR processing. If that is the case, a weakness of all HDR processing is the potential for light halos. Luminosity mask blending is more time intensive but avoids that issue.
Feb 3, 2019 13:23:59 #

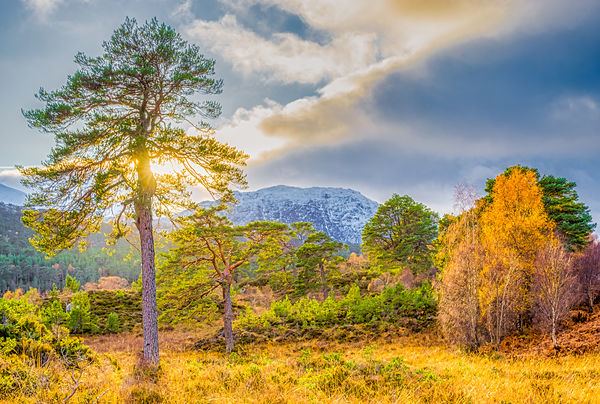
Opened the tiff in PS CS5 Raw and made some slider adjustments.
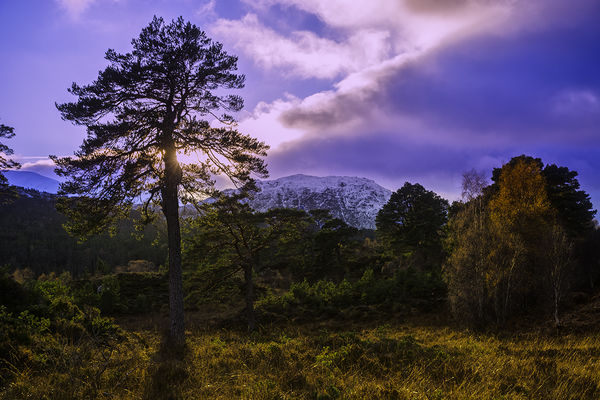
Made an adjustment Using Viveza within the Nik Collection.
Using a selection of the mountain I made a Hue adjustment to lighten the bluish color.
Added a Perfect Effect’s Sun Glow preset.
I was tempted to lighten the backlighted trees but resisted.
The sun rays on the tree stand out more when viewing the download.
Feb 3, 2019 13:30:40 #
lesdmd wrote:
....If I understand correctly, you exposure bracketed your images and then merged them using some sort of HDR processing. If that is the case, a weakness of all HDR processing is the potential for light halos. Luminosity mask blending is more time intensive but avoids that issue.
You're probably right. I assumed that the merge tool in Lr just merged the shots, but the results are prone to diffuse haloing. I was blaming in-camera processing (even raw files get some).
Feb 3, 2019 13:37:01 #
rborud
Loc: Minnesota
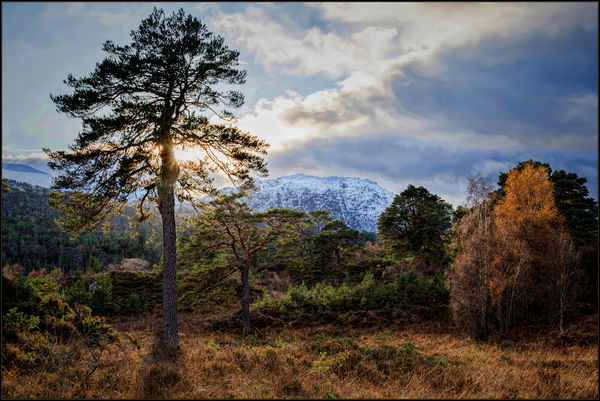
Hello R.G. Here is my go at you image. I went at it with my usual look of the Hudson Valley school of painters. Not copying them but only going in their direction. I hope I do justice to your wonderful image.
One thing I might add is, I cannot see how you could lose it, it is too good. Thanks for looking. RBorud
One thing I might add is, I cannot see how you could lose it, it is too good. Thanks for looking. RBorud
Feb 3, 2019 13:39:34 #
SoHillGuy wrote:
....I was tempted to lighten the backlighted trees but resisted....
Thanks for contributing, Gaylord. The colouring creates a whole new mood. And you're right about the trees. Lightening them would have taken away from the back-lit look.
Feb 3, 2019 13:43:30 #
rborud wrote:
...I went at it with my usual look of the Hudson Valley school of painters. Not copying them but only going in their direction. I hope I do justice to your wonderful image. I cannot see how you could lose it, it is too good. RBorud
Thanks, RB, and thanks for joining in. I didn't realise there was a Hudson Valley look, and I thought it was just photographers that liked that area. Whatever the reason, the autumn colours have come out looking very nice indeed.
Feb 3, 2019 14:58:18 #

I took a cut at this. The most significant change was the first edit step. For that, I did a little manipulation of the image via transpose and content aware scale to get to a full 16x9 landscape size with the sunbeam at upper left rule-of-thirds position. From there, I used camera raw filter for basic corrections. I also was looking for more color and ended up adding a "flat and green" preset as part of the camera raw processing. Next, I used Topaz Adjust with a "photo pop" preset and Topaz Detail with a "Cloud Detail" preset. I finished with NIK Color EFEX Pro Polarizer filter effect (sky only) and just a touch of added lens flare over the sun.
Feb 3, 2019 15:06:12 #
rfcoakley wrote:
I took a cut at this. The most significant change ... (show quote)
Thanks for contributing, rfc, and thanks for the explanation of your steps. I was wondering what the wider view would look like. Come to think of it I was wondering what a brighter look would be like as well. Now I know
 .
.Feb 3, 2019 17:14:35 #
Here is my attempt at editing your image RG. I did a few basic edits in Lightroom, then moved it to Luminar 2018. I used a number of filters in Luminar including the AI Enhance, AI Sky Enhance, Micro Contrast, Image Radiance and a few other filters.
Best to view the download.
Best to view the download.
Feb 4, 2019 00:34:46 #
R.G here is my attempt - first some adjustments in Lightroom and then into On1 for effects, dodging and various filters and a light leal. Wanted to bring out the morning gold on the trees and grass. Back into lightroom for exposure tweaks before exporting. Details are in the download.
Feb 4, 2019 08:33:51 #
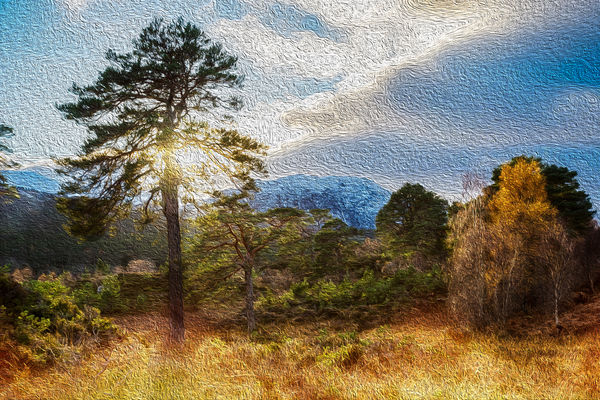
I enjoyed the challenge of this image. Used a PS "oil paint" filter for this rendition of previous post.
Feb 4, 2019 08:35:05 #

PAToGraphy wrote:
Ooooh, my kinda playful pp!I enjoyed the challenge of this image. Used a PS "oil paint" filter for this rendition of previous post.
If you want to reply, then register here. Registration is free and your account is created instantly, so you can post right away.