What's Good for Selection?
Jan 24, 2019 09:43:22 #
JessM wrote:
I've tried several progs for selection; the first ... (show quote)
I would try (as Linda from Maine suggests) PS Elements. At this point, it probably does everything you use CS6 for and has the newer selection features from the newer PS versions. Cheap enough and you can do all the photographic things that PS does.
Jan 24, 2019 11:06:15 #
JessM wrote:
I've tried several progs for selection; the first ... (show quote)
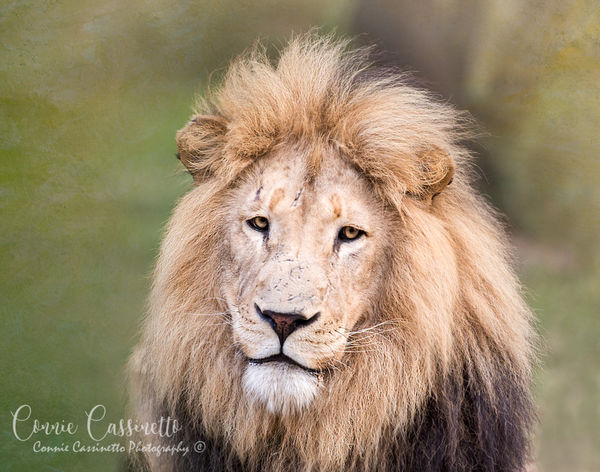
You have PS but don't use it? It's a really good program for doing what you describe, but it does take a bit to learn it. I just did a couple of animal shots from Africa, trying to figure out how to blend the background and the animal when I've added a new background. The blending works great once you get the hang of it. Also, I'll go along the edges and use the clone or "band aid" tool to clean up the edges as needed. I input the background as a layer, take down the opacity, mark the subject with the magnetic lasso tool (in this case), set the opacity where I actually want it to be, then click on select and mask. (I did use a mask but, really, I'm not sure I needed to do that and I have to experiment more with that as I was actually, as I recall, working on the layer itself.) In select and mask I invert the layer, slide the levers around for radius, smooth and feather, and then output to a new layer. The new layer pops in on the top of the stack and you can delete the old layer. I'm still figuring all this out and others who know more may also provide information, but so far it appears to be working fairly well. What I wanted to do in this case was to soften the harsh dark areas in the background. Here is an example:
ORIGINAL IMAGE - JPEG
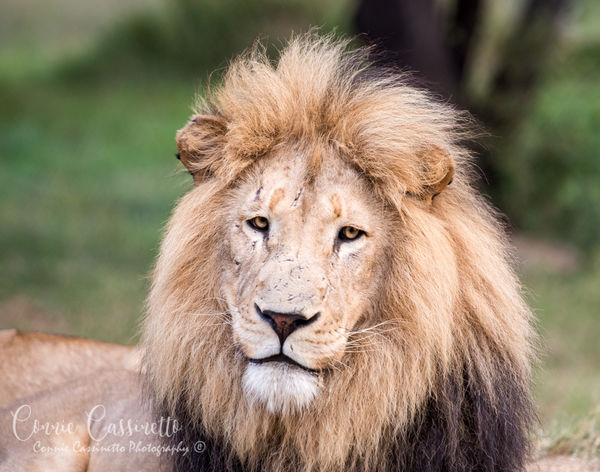
IMAGE WITH SOFTER BACKGROUND
Jan 24, 2019 13:03:06 #

rmalarz wrote:
Jess, first off, I agree with you on the examples ... (show quote)
Impressive that is a difficult background to replace!
I did not know of this tool I will check it out. Thanks Bob!
And what a beautiful cat!
Jan 24, 2019 16:24:12 #
amfoto1
Loc: San Jose, Calif. USA
I use PS CS6, which provides any number of different methods of selection.
I'll often create a new layer that's a copy of the original and then use a mask on that. Often I don't even bother selecting anything, but just "paint away" what I want to remove and allow the base layer to show through using various size brushes and "black" paint. Nice thing about using a mask is that it's just as easy to undo anything you wish by "painting it back" using "white" paint.
When I can, I speed things up using the various selection tools.... magic wand, lasso tools, color selection... along with modify, expand, feather, refine, inverse, etc.
I'll also sometimes use eraser, clone, healing, color replacement tools, etc.
There are any number of ways to blend things, as needed.
I use these to replace backgrounds, apply blur or sharpening effects, do selective color adjustments, apply selective noise reduction, yada, yada.
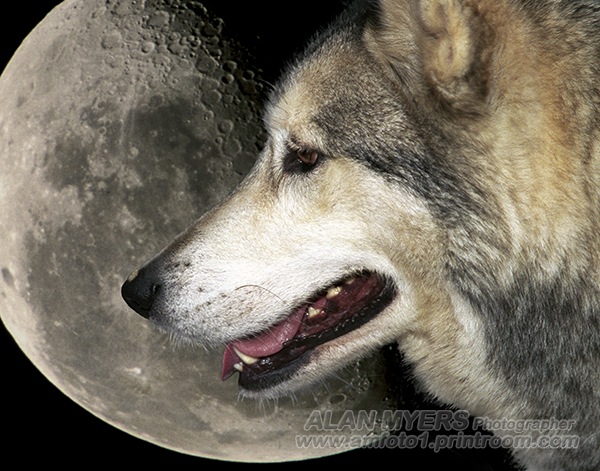
Below is a composite of two images that I did years ago using PS. I've printed this as large as 11x14" without any problem. The wolf profile was shot with flash, making for a predominantly black background which was fairly easy to select...
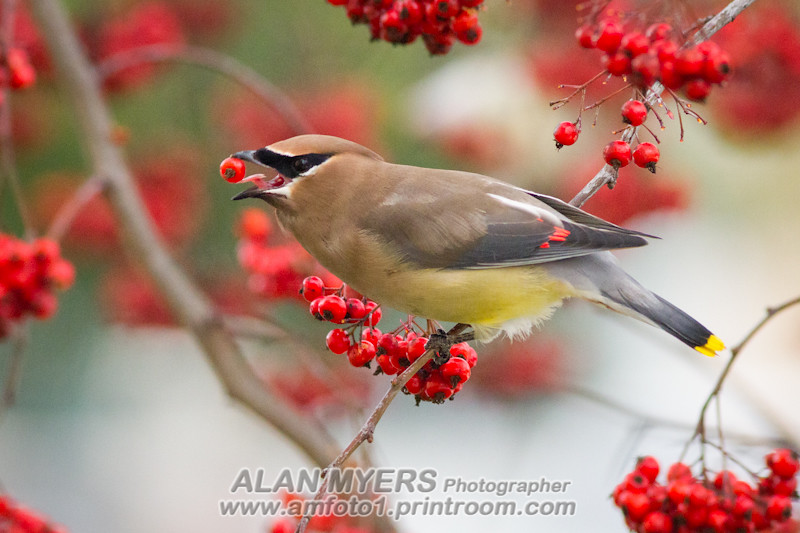
For the waxwing portrait below, I instead used layers to add some blur to the background, while sharpening the bird against it. This was done with layers and masks, as described above. I used a partial (10 or 15%) brush to "paint back" some of the branches a little to better represent depth of field, rather than have too abrupt transition from sharp to blur...
Below is one of the better examples I've got online showing the use of layers and masks (in this case without having to do any selections, if I recall correctly). Here the subject was in deep shade, against a really bright, sunlit background... an impossible dynamic range for most any digital camera.... and of course a filter wouldn't work. Making the image was further complicated by the moving subject. It was impossible to make two separate exposures. Instead I "double processed" the image in Lightroom.... adjusting both exposure and color rendition once for the primary subject... then making a virtual copy and adjusting both exposure and color in that to recover some detail in the background. Next I opened both in Photoshop, copied the "background" version and laid it over the "subject" version, created a mask on that layer and painted away everywhere I wanted to show the bottom, subject layer. It's a lot easier than it sounds.
Left is the version I adjusted for the shaded subject and indoor light color. Center is the version I set to recover some of the background, adjusted for exposure and sunlight. Right is the composite of the two into a single image.
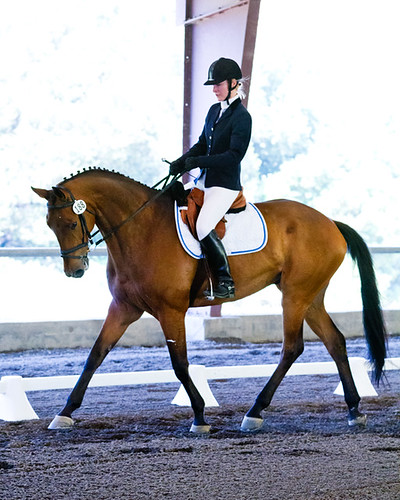
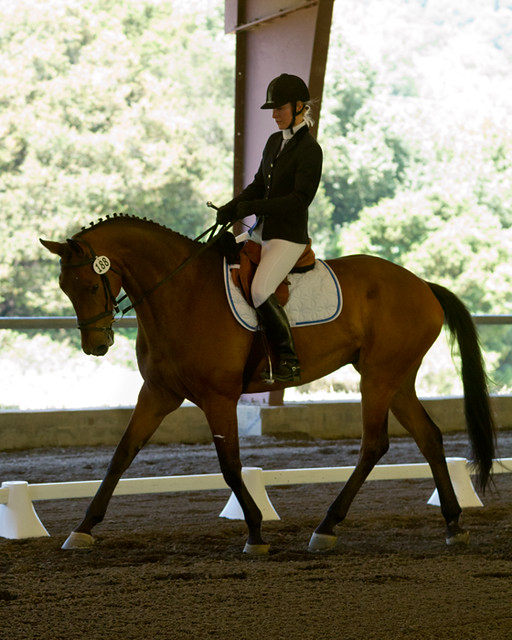

Again, I didn't need to do any selections for this image... I simply overlaid the background version as a layer on the version for the subject, put a mask on the top layer and "painted away" portions of it with a "black" brush to reveal the bottom layer. It's pretty easy to do blending while doing this, too. I change the size and softness of the brush as I go. I don't recall if I needed to do so on this image, but often I just paint away an area where I only want to apply partial correction, to make sort of a gradient, then set a weak brush (10 or 15%) used to "paint it back". Multiple strokes with that brush can be used to create a gradient. Until the layers are flattened, any part of thethe mask can be "undone" in part or 100% simply by painting with white. It's much easier than using selections and making adjustments on a single layer.
I use the same technique to adjust skies in scenic shots, do selective sharpening and blurring, and make other types of selective adjustments. Once you learn to do it, it's pretty easy and fast.
I'll often create a new layer that's a copy of the original and then use a mask on that. Often I don't even bother selecting anything, but just "paint away" what I want to remove and allow the base layer to show through using various size brushes and "black" paint. Nice thing about using a mask is that it's just as easy to undo anything you wish by "painting it back" using "white" paint.
When I can, I speed things up using the various selection tools.... magic wand, lasso tools, color selection... along with modify, expand, feather, refine, inverse, etc.
I'll also sometimes use eraser, clone, healing, color replacement tools, etc.
There are any number of ways to blend things, as needed.
I use these to replace backgrounds, apply blur or sharpening effects, do selective color adjustments, apply selective noise reduction, yada, yada.
Below is a composite of two images that I did years ago using PS. I've printed this as large as 11x14" without any problem. The wolf profile was shot with flash, making for a predominantly black background which was fairly easy to select...
For the waxwing portrait below, I instead used layers to add some blur to the background, while sharpening the bird against it. This was done with layers and masks, as described above. I used a partial (10 or 15%) brush to "paint back" some of the branches a little to better represent depth of field, rather than have too abrupt transition from sharp to blur...
Below is one of the better examples I've got online showing the use of layers and masks (in this case without having to do any selections, if I recall correctly). Here the subject was in deep shade, against a really bright, sunlit background... an impossible dynamic range for most any digital camera.... and of course a filter wouldn't work. Making the image was further complicated by the moving subject. It was impossible to make two separate exposures. Instead I "double processed" the image in Lightroom.... adjusting both exposure and color rendition once for the primary subject... then making a virtual copy and adjusting both exposure and color in that to recover some detail in the background. Next I opened both in Photoshop, copied the "background" version and laid it over the "subject" version, created a mask on that layer and painted away everywhere I wanted to show the bottom, subject layer. It's a lot easier than it sounds.
Left is the version I adjusted for the shaded subject and indoor light color. Center is the version I set to recover some of the background, adjusted for exposure and sunlight. Right is the composite of the two into a single image.
Again, I didn't need to do any selections for this image... I simply overlaid the background version as a layer on the version for the subject, put a mask on the top layer and "painted away" portions of it with a "black" brush to reveal the bottom layer. It's pretty easy to do blending while doing this, too. I change the size and softness of the brush as I go. I don't recall if I needed to do so on this image, but often I just paint away an area where I only want to apply partial correction, to make sort of a gradient, then set a weak brush (10 or 15%) used to "paint it back". Multiple strokes with that brush can be used to create a gradient. Until the layers are flattened, any part of thethe mask can be "undone" in part or 100% simply by painting with white. It's much easier than using selections and making adjustments on a single layer.
I use the same technique to adjust skies in scenic shots, do selective sharpening and blurring, and make other types of selective adjustments. Once you learn to do it, it's pretty easy and fast.
If you want to reply, then register here. Registration is free and your account is created instantly, so you can post right away.