Night Photos - A Tutorial
Jan 21, 2019 10:24:48 #
Thanks Bob for the tutorial on how to take night photos. We have a 50's diner here with lots of neon and I can't wait until it warms up just a bit to give your tips a try. We woke up to 9F temp this a.m. It looks like you are looking forward to a"Brutal" 65F in Beautiful Tempe today. Enjoy, JimmyT Sends.

rmalarz wrote:
In a previous post, https://www.uglyhedgehog.com/t... (show quote)
Jan 21, 2019 10:35:04 #

Jimmy, just so you don't get too misled on things here. Some of my desert storm/cloud photographs are taken late afternoon in 115F temperatures. I'm not looking for sympathy, just good photographs.
--Bob
--Bob
Jimmy T wrote:
Thanks Bob for the tutorial on how to take night p... (show quote)
Jan 21, 2019 10:49:54 #
Jan 21, 2019 11:05:16 #

Jan 21, 2019 11:17:54 #
You're welcome, Dennis. My pleasure.
--Bob
--Bob
dennis2146 wrote:
A great explanation Bob. Thanks for taking the time to explain.
Dennis
Dennis
Jan 21, 2019 11:21:16 #
You're welcome, Bill.
--Bob
--Bob
yssirk123 wrote:
Good explanation - thanks Bob!
Jan 21, 2019 11:37:44 #

Am I missing something here? I went through gyrations like that in shooting film and using a hand-held Lunasix meter (which I still have) but now with my Panasonic Lumix FZ1000 digital camera all I need to do is look at the monitor screen and turn the exposure plus/minus dial until I get everything looking the way I want it. (within 5 stops plus and 5 stops minus, in thirds of a stop). And if a camera doesn't have such a "live" view, you can "shoot and review" till the cows come home and it costs you nothing, and still probably saves time as opposed to fussing with metering.
Jan 21, 2019 11:44:47 #

Certainly exposed well but I would offer the suggestion to shoot during the "Blue" hour when there is some color to the sky.
rmalarz wrote:
In a previous post, https://www.uglyhedgehog.com/t... (show quote)
Jan 21, 2019 12:57:22 #
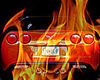
Or you can do as I did. Know your camera's capabilities. Meter the highlights, make the necessary adjustments to place the values where desired, and take the photograph. I shot, one photo. One and done, so to speak. No quess work involved.
--Bob
--Bob
Lemon Drop Kid wrote:
Am I missing something here? I went through gyrati... (show quote)
Jan 21, 2019 12:59:30 #
That wasn't our intent with these. I went with a couple of friends and we discussed the best time to go for what we wanted. Agreed, that would have produced a different photo and might be a plan for a future adventure such as this one.
--Bob
--Bob
Fotoartist wrote:
Certainly exposed well but I would offer the suggestion to shoot during the "Blue" hour when there is some color to the sky.
Jan 21, 2019 12:59:53 #
Redmond
Loc: Oregon
thank you for the explanation, when the weather gets warmer, going to give it a try
Jan 21, 2019 15:21:17 #
You're welcome, Redmond.
--Bob
--Bob
Redmond wrote:
thank you for the explanation, when the weather gets warmer, going to give it a try
Jan 21, 2019 15:42:42 #

rmalarz wrote:
In a previous post, https://www.uglyhedgehog.com/t... (show quote)
Thank you Bob for posting that and for sharing your knowledge. It's simple and it makes a lot of sense. Were this originally digital pics or scanned film pics? I ask because even thought the bright lights were in Zone iX they do not appear to be completely blown out in a way that I am used to seeing on digital images. Would you modify the 4 stop setting for shooting with film vs shooting with digital?
Jan 21, 2019 16:19:42 #
Hi, JD750. First off, you're welcome. These were both taken with a digital camera. The bright lights were the points on which I metered and adjust the settings to place such that they would not be blown out. This increase in exposure for the bright lights also raised the darker areas of the scene, which were then darkened to an appropriate level in processing.
Had this been done with black and white film, I've have metered the darkest areas of the scene and placed them in Zone IV, perhaps III. Then the brightness of the lights would have determined my developing time. How many stops of adjustment for film? I don't know off hand.
--Bob
Had this been done with black and white film, I've have metered the darkest areas of the scene and placed them in Zone IV, perhaps III. Then the brightness of the lights would have determined my developing time. How many stops of adjustment for film? I don't know off hand.
--Bob
JD750 wrote:
Thank you Bob for posting that and for sharing your knowledge. It's simple and it makes a lot of sense. Were this originally digital pics or scanned film pics? I ask because even thought the bright lights were in Zone iX they do not appear to be completely blown out in a way that I am used to seeing on digital images. Would you modify the 4 stop setting for shooting with film vs shooting with digital?
Jan 21, 2019 16:22:06 #
If you want to reply, then register here. Registration is free and your account is created instantly, so you can post right away.