Reducing noise
Jan 20, 2019 07:46:53 #
“Down sample the original file to smaller pixel dimensions” is something advised by an esteemed pro. photographer to help reduce noise.
Can one if you explain this or point me to a resource that explains it.
Can one if you explain this or point me to a resource that explains it.
Jan 20, 2019 08:10:48 #
Consider a 24MP image file, such as an image created by a Nikon D7200 that measures 6000 × 4000 pixels. If viewed full-screen, the image is viewed at the dimensions of your monitor, typically something less than the full resolution of the file, such as 1920x1080. Although a monitor at 1920x1080 pixels is considered "high definition", such a monitor is not capable of showing 1-pixel from the image at 1-pixel on the monitor. The monitor would need to be several feet wide to present all 6000-pixels on the long side.
But, if the full-resolution (24MP) image file is available, you can view a crop of the details at 100% (that is: 1 to 1 detail of the file to the monitor), again at the dimensions of your monitor. When the image is viewed 1 to 1 at 100%, the details of the image can be inspected, including the accuracy of focus and any digital noise. This is considered 'pixel peeking'; you're no longer viewing the image, rather only the fine details.
The link below gives examples for multiple software packages to provide a lower resolution image, one that fills the typical high-def monitor without providing additional pixels for inspecting the file in more detail. When the image is viewed full screen, the noise at the pixel level is less evident. Images reduced in size to not even fill the monitor (say an 600x400 image on a monitor sized 1920x1080) will be even more difficult to see the pixel-level details such as noise or poor focus.
https://www.uglyhedgehog.com/t-512745-1.html
Jan 20, 2019 08:29:00 #
The interpolation involved in changing the resolution has a reducing effect on any very small details including noise. The trouble is that the fine details that you want will also be affected.
The best option will always be to do your sharpening and noise reduction together while viewing at 1:1 or 100%. If this means you see only a small portion of the image, choose an area that's representative of the whole image, in the sense that it contains smooth areas (where the noise shows up most) and also fine detail so that you can optimise the retention of the fine detail by finding the optimum balance between sharpening and denoise. Sharpening enhances the fine detail whereas denoise obscures it. Or alternatively there may be an area that has a fine texture that you want to preserve.
Whenever you reduce resolution you're losing data, so you should do it only if you're sure you've done your final edit on the image and you'll never want a larger version.
Jan 20, 2019 12:20:37 #
R.G. wrote:
The interpolation involved in changing the resolut... (show quote)
What R.G. said with one caveat. Never reduce your final image but a copy of it.
Jan 20, 2019 13:15:38 #
For digital images, noise is mostly the random distribution of electrons in the sensor. The number of electrons in a pixel depends on the amount of light hitting it, so low light conditions have fewer electrons per pixel for a given exposure. The noise is approximated by the square root of the number of electrons in a pixel. When there are few electrons (dark areas of the photo) the square root of the number of electrons in the pixel is a larger fraction of the total number of electrons than it would be where there are a lot of electrons (bright areas of the photo).
When you downsample a photo, you reduce the number of pixels in the photo. Assuming you do this by adding pixels together instead of throwing pixels out, the signal in each pixel is increased, thereby reducing the effect of noise. If you take a 2000x3000 pixel image and reduce it to 1000x1500 pixels by adding pixels together in groups of 4, the effective noise will be reduced by a factor of 2 (square root of 4).
Of course with fewer pixels you lose resolution, as noted by others.
Jan 21, 2019 17:43:57 #
OK, DirtFarmer, some interesting input. However, for those of us not accustomed to thinking in these terms, how does one go about taking a 2000x3000 pixel image and reducing it to 1000x1500 pixels "by adding pixels together in groups of 4?" Is the process used by a particular tool in Photoshop (without calling it that)? Or is it a set of procedures one must follow?
Jan 21, 2019 18:14:18 #
Hammer wrote:
“Down sample the original file to smaller pixel dimensions” is something advised by an esteemed pro. photographer to help reduce noise.
Can one if you explain this or point me to a resource that explains it.
Can one if you explain this or point me to a resource that explains it.
Here are the numbers and theory:
https://photographylife.com/why-downsampling-an-image-reduces-noise
And here is a practical illustration:
https://nikonrumors.com/2012/04/10/nikon-d800-vs-d3s-and-d7000-comparison-by-cary-jordan.aspx/
Jan 21, 2019 18:19:11 #
There are several ways to do it and I don't know how every editing/viewing program does it.
If we label the pixels by letter (row) and number (column), I consider that adding pixels together in groups of 4 would be something like this:
A1+A2+B1+B2 gives you the downsampled corner pixel
A3+A4+B3+B4 gives you the next pixel in the same row
C1+C2+D1+D2 gives you the next pixel in the same column
C3+C4+D3+D4 gives you the next pixel on the diagonal
Continue something like this through out the whole image. You have then reduced the number of pixels by a factor of 4. Adding the pixels together adds the noise also, but since the noise is random it only increases by a factor of 2, whereas the signal has increased by a factor of 4. Thus the signal to noise has been halved.
Some programs will use an average instead of a sum. The only difference is that the final number is divided by 4 (in this example), but since everything is divided by a constant number (4) the ratio of the signal to noise does not change. So adding is basically the same as averaging.
If I wanted to do this in an editing program (Lighroom, Photoshop, IrfanView, FastStone, etc....) I would import the image into the program, then export it with the dimensions (in pixels) divided by 2. If you start with a 2000x3000 pixel image you wind up with a 1000x1500 pixel image.
Assuming that you reduce the size of both the height and width by the same factor (to avoid distorting the image) the noise reduction is just the factor you used to reduce the image. You're not limited to a factor of 2.
Jan 22, 2019 05:27:20 #
Jan 22, 2019 05:30:17 #
Hi,
Thank you for your help and casting some light in my direction . Getting there !
Thank you for your help and casting some light in my direction . Getting there !
Jan 22, 2019 05:31:17 #
Jan 22, 2019 07:12:42 #
Hammer wrote:
I will tick with that , thanks
Try using <Quote Reply> to target your responses to specific earlier posts.
Jan 22, 2019 07:59:34 #
CHG_CANON wrote:
Try using <Quote Reply> to target your responses to specific earlier posts.
Thanks , not awake !!!
Jan 22, 2019 09:38:09 #
I will do my own experiments, but think others may have good answers to this question: If I reduce the pixel dimensions, thereby eliminating some noise (and detail of course), what happens in terms of noise if I then enlarge the pixel dimensions of the previously reduced image?
Jan 22, 2019 09:50:03 #
artBob wrote:
I will do my own experiments, but think others may have good answers to this question: If I reduce the pixel dimensions, thereby eliminating some noise (and detail of course), what happens in terms of noise if I then enlarge the pixel dimensions of the previously reduced image?
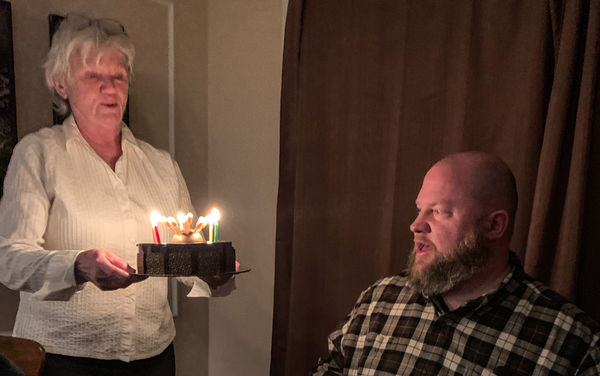
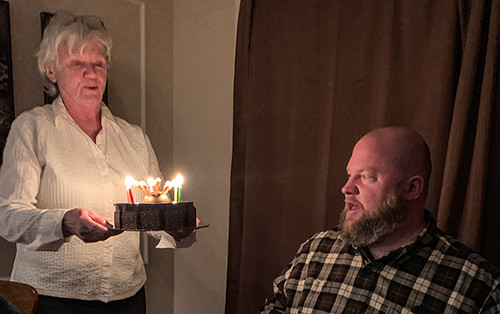
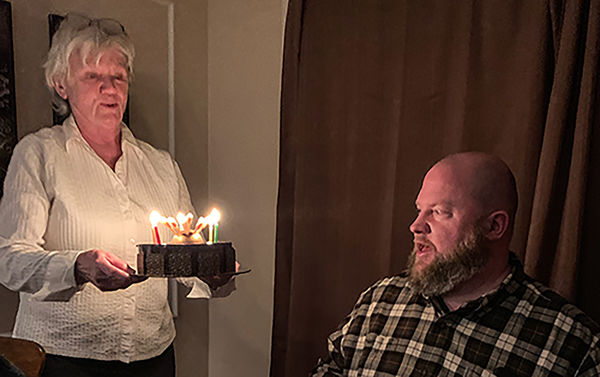
Well, isn't this interesting. My experiment doing this:
#1: original (jpeg, a "snapshot")
#2: Reduced
#3: Enlarged back to original pixel dimensions
If you want to reply, then register here. Registration is free and your account is created instantly, so you can post right away.


