Exposure Strategy
Jan 12, 2019 06:32:39 #

Seems there are 4 tactics when it comes to exposure
Expose for the shadows
Expose for the highlights
Expose for the midtones (auto)
Expose for the midtones (manual)
Expose for the shadows was great for film because of the reverse of the negative but digital is closer to slide film where you want to avoid blowing the highlights which is way more noticeable than blocked up shadow detail.
Exposing for the highlights will give the strongest signal to noise ratio but it will give over exposed jpegs so needs raw processing and if the highlight is say zone 8 in one photo and zone 9 in another each photo requires individual processing to get the best result. That can be a lot of work, it may arguably produce the best result in the end but for Pro's maybe good enough and a quick turn around is more economical.
Expose for the midtones (automatic)
This is the default where the camera evaluates the scene for each and every photograph to obtain mid grey.
The trouble is due to reflectance metering the evaluation is likely to be different shot to shot. Individual shots will look fine but beside others, you might notice the tonal variation between each photo.
This is also where an EVF can be useful, if the camera is setting the midtone value high enough that highlights are blown you should see that before taking the photo. If you are shooting raw then there will be some highlight recovery data available but you have no way of knowing if it was slightly overexposed or highly overexposed and not recoverable.
If you know your camera you might spot meter the highlights and see if they are too bright to recover. Live view might help, if you have detail in the highlights but your midtones are too low you might risk a stop more exposure (if that's what your camera gives you) and recover the highlights from RAW.
Expose for the midtones (manual).
In consistent lighting you can set an exposure based on midtones, since the camera isn't evaluating the tones every shot, then there should be a sense of belonging to the series which gives a professional feel to the series and makes post processing easy and can be repeated for the series.
You can either meter a midtone or use an incident meter to measure the light. Again there is risk of blowing highlights or under recording the shadows. Again you can evaluate the conditions, against the capability of your camera to recover highlight detail.
It's not uncommon for landscape photographers to routinely bracket in order to ensure they have the detail they require. It's harder with moving subjects to do this but if the subject isn't crossing the horizon you might combine the top half of one shot with the lower half of another...
You also might use fill flash or a reflector to even up the light...
It's really up to the photographer to decide which way to proceed but although it may be boring evaluating what level of highlight recovery is available in your camera will be useful to know. If you are just shooting jpeg the answer is zero. In which case D range and bracketing are going to be useful to use.
I figure my next task is to figure how much highlight recovery I have.
What do you think, do you have a preference?
Jan 12, 2019 07:33:21 #

I simplify exposure by consulting the histogram of it after a capture. I understand that electronically, a better signal-to-noise ratio results from an exposure biased to the rightmost part of the histogram display. So I try for more exposure values going into that histogram part. I will take more than one exposure depending on the histogram display. That's about the size of it for exposure.
blackest wrote:
Seems there are 4 tactics when it comes to exposur... (show quote)
Jan 12, 2019 07:34:35 #

For landscapes, bracketing. Even if there is significant movement within the frame I can set the camera to single shot shutter release and step through the bracketing sequence manually. This allows you to use anti-ghosting to eliminate the movement, because the moving object will produce vividly different images in each shot.
This doesn't work well for small movements like vegetation moving in the wind, because the images are too similar to each other and the anti-ghosting can't differentiate when the differences are at the same level as motion blur.
Many times the movement doesn't produce effects that are enough to spoil the merge. That's usually the case with waves on open water and turbulence on flowing water.
Jan 12, 2019 08:12:28 #

Prior to using any camera I own, I test the camera to see precisely where it fails on the upper end. Using the histogram isn't the optimal method, as the histogram is generated by the in-camera jpg. This jpg is generated by software within the camera. Once I'm assured of the camera's capabilities, I use spot metering in manual mode and place the highlights in The Zone I wish. I'll follow this up with another post in a while illustrating this.
--Bob
--Bob
blackest wrote:
Seems there are 4 tactics when it comes to exposur... (show quote)
Jan 12, 2019 08:44:19 #
There is a good deal of discussion regarding ETTR/EBTR (Expose To The Right/Expose Beyond The Right). To be successful in this technique requires dilligent testing on the part of the photographer to determine the camera's limits regarding additional exposure. There are a good many who express hesitancy in adding exposure for fear of blowing highlights. If one tests their equipment, that fear is removed. In most threads regarding ETTR and EBTR there is a lot of words posted but little in the way of actual examples. So, in the words of Robert Mapplethorp, "Look at the pictures".
Here's several of two subjects, one taken about 2 years ago and one taken very recently. Note the ETTR technique was used in each of these. The restaurant photograph was taken with a relatively new camera, for me. It's one of the first "field test" photos putting the test results settings, determined a week ago, to a field test. Up until now a Macbeth color chart was all that camera has seen.
Again, there's a lot of hesitation on some people's parts regarding blowing highlights. If one tests their equipment this becomes a moot point. All of these were done in manual mode, spot metering on the brightest part of the scene, then exposure added to place that part in the appropriate Zone. In digital imaging, The Zone System is somewhat 180 degrees different than the film Zone System. Digital requires the whites to be placed and the blacks to be handled in processing. Black and white film requires the blacks to be placed and the processing is adjusted depending on where the highlight values are desired.
Knowing your equipment through planned and controlled testing will remove the fear of blowing highlights.
Each has the ACR screenshot showing the "overexposed" areas, as considered by Adobe. Then, an SOOC version of the image, followed by the processed photograph. In the case of the bird, I included an intermediate step because I did lot of burning to darken the surrounding area and dodging the reflection. I don't want that clouding the discussion.
I use these exposure techniques for 99.9% of the photos I take.
--Bob
blackest wrote:
Seems there are 4 tactics when it comes to exposur... (show quote)
Spot metered on the brightest part of the car in the center of the photo
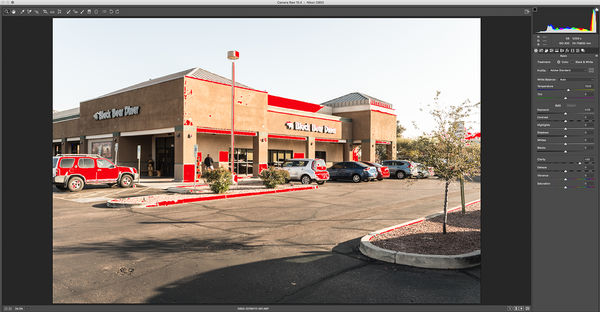
(Download)
SOOC image as opened in Photoshop without adjustments
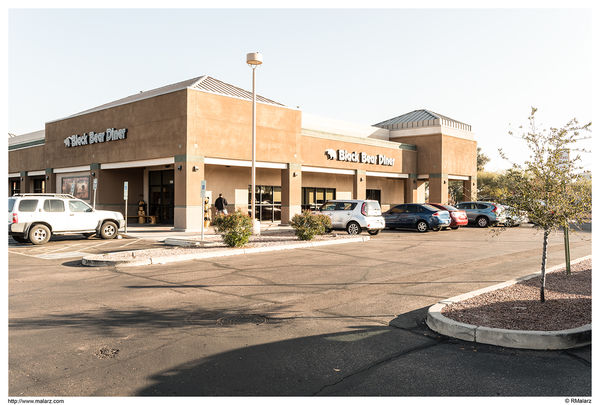
(Download)
As opened in Photoshop after adjustments in ACR
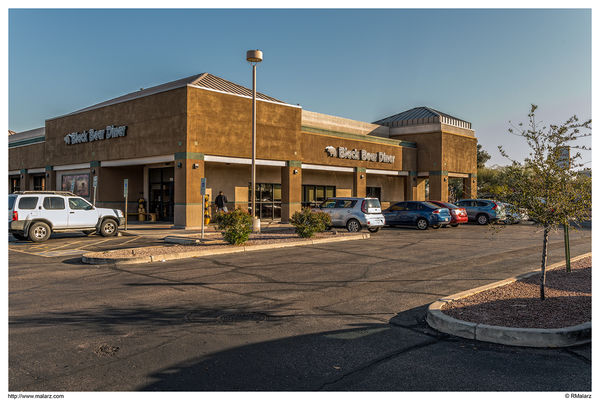
(Download)
Spot metered on the brightest part of the bird
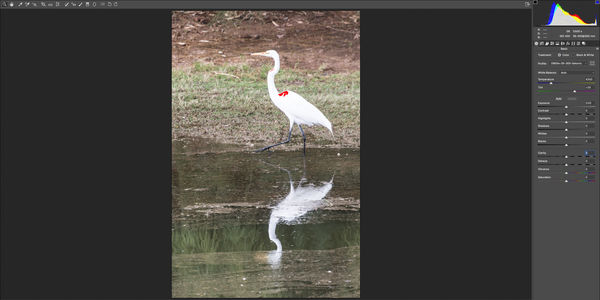
(Download)
SOOC image as opened in Photoshop without adjustments
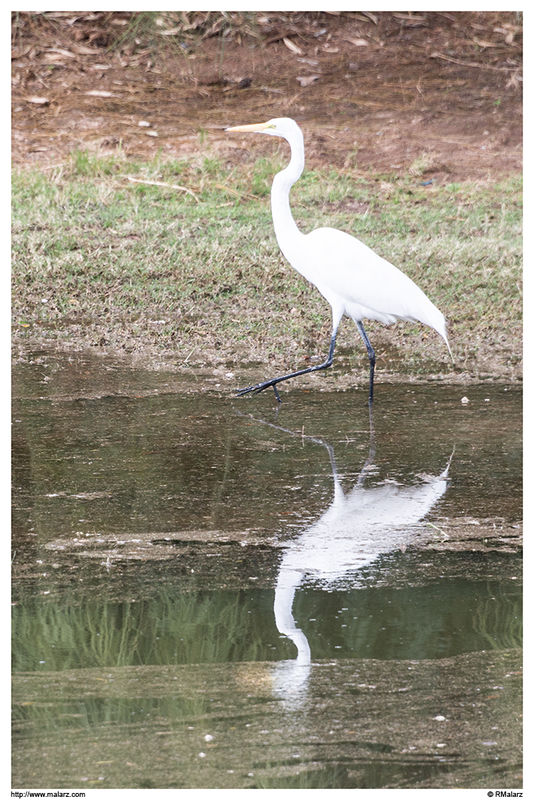
(Download)
As opened in Photoshop after adjustments in ACR
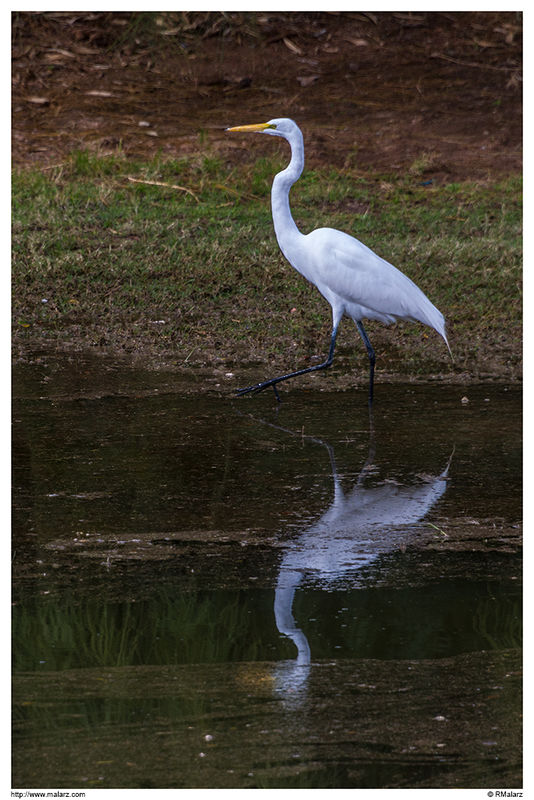
(Download)
Final burned to feature the bird
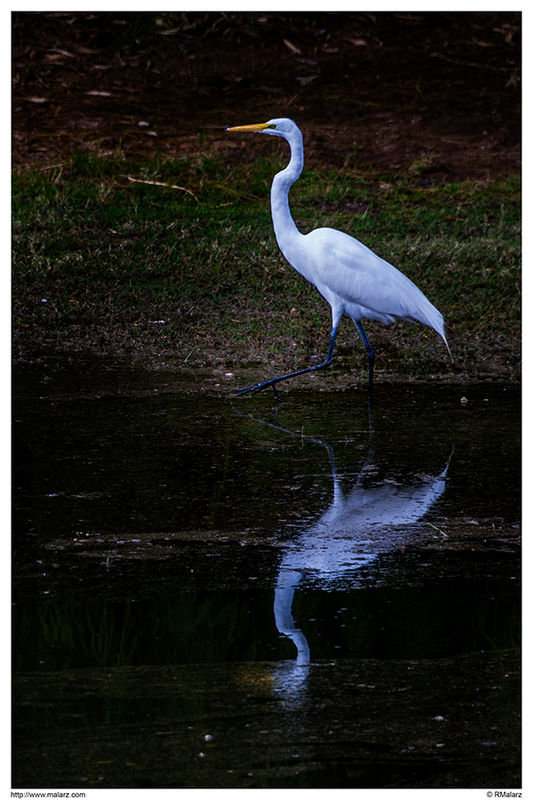
(Download)
Jan 12, 2019 10:24:18 #

rmalarz wrote:
There is a good deal of discussion regarding ETTR/... (show quote)
Excellent examples, Bob. Have you ever posted a specific process on how to make the initial exposure test? I’m afraid my process has been quite unscientific.
Andy
Jan 12, 2019 11:02:11 #
I can agree: "Using the histogram isn't the optimal method (for attaining ETTR exposure)."
Yet I find I can get close enough using a simplified exposure method involving the Histogram.
Later in the photo-editing process, I can adjust settings including exposure for good results.
Frankly, while in the field, I concern myself more with gaining the best composition aiming to flatter an interesting subject.
Combined with a close exposure, these two aspects (composition and subject) typically allow me to generate a worthy photograph.
rmalarz wrote:
Prior to using any camera I own, I test the camera to see precisely where it fails on the upper end. Using the histogram isn't the optimal method, as the histogram is generated by the in-camera jpg. This jpg is generated by software within the camera. Once I'm assured of the camera's capabilities, I use spot metering in manual mode and place the highlights in The Zone I wish. I'll follow this up with another post in a while illustrating this.
--Bob
--Bob
Jan 12, 2019 12:04:02 #
anotherview wrote:
I can agree: "Using the histogram isn't the o... (show quote)
To be exceptional, requires several factors without good composition and subject you don't have anything, without a Good exposure you don't have much either.
Perhaps you would like to start a thread about how you get the best composition and flatter an interesting subject. I'm sure it will be fascinating.
Jan 12, 2019 12:33:05 #

Nowdays I use a live histogram in the EVF and dial in some exposure compensation, if needed, before pressing the shutter button.
If the scenes is very contrasty I will I just press a buton on the camera to turn HDR on. The next time you press the shutter release and will rattle off a number of shots (controlled by menu settings) in very quick sucession, and save them as raw files.
If the scenes is very contrasty I will I just press a buton on the camera to turn HDR on. The next time you press the shutter release and will rattle off a number of shots (controlled by menu settings) in very quick sucession, and save them as raw files.
Jan 12, 2019 23:30:26 #
You have put my approach in fewer words.
As to a thread for teaching my approach, I have considered it. But I have reason to believe not much interest exists in what I have to say about doing photography.
Okay, though, I will reply to your suggestion. I keep it simple.
First, study composition. Even a subpar exposure and a so-so subject will gain some attention owing to effective composition. This attention happens because a good composition achieves visual balance, always attractive to the eye.
I go so far as to insist that composition done well can make the most improvement in one's photography. Applying the principles of composition disciplines the photographer to see subjects in relation to their surroundings.
A subpar exposure one can fix in photo-editing software. But get exposure close or exact in camera, of course, as preferred.
In a way, picking an interesting subject may prove the most difficult in the pursuit of photography. Note that paid photographers will travel hundreds and thousands of miles to find and photograph that interesting subject.
Imagination comes into play here because the photographer may then see even a hackneyed subject in a new light.
Getting off the sofa, away from the television, and out of the house will go a long way toward finding an interesting subject.
Everything in photography flows from composition and exposure along with the importance of subject.
blackest wrote:
To be exceptional, requires several factors without good composition and subject you don't have anything, without a Good exposure you don't have much either.
Perhaps you would like to start a thread about how you get the best composition and flatter an interesting subject. I'm sure it will be fascinating.
Perhaps you would like to start a thread about how you get the best composition and flatter an interesting subject. I'm sure it will be fascinating.
Jan 13, 2019 07:00:24 #
anotherview wrote:
You have put my approach in fewer words. br br As... (show quote)
A subpar exposure may be fixable in post or not depending on the situation, bracketing can work if the scene is stationary or limited. With a single frame you can be forced to make choices. It can be necessary to underexpose in order to preserve highlights and try to recover the shadows in post, too far underexposed and the noise in the shadows will be boosted and you may be forced to raise the black point to compensate.
What the ETTR proponents say is that you can lose detail in the captured highlight of the jpeg and still be able to recover highlights from the raw capture. How much is camera dependant.
Modern cameras record less noise, so it may be too much work for too little gain.
Jan 13, 2019 07:36:55 #
blackest wrote:
...Modern cameras record less noise, so it may be too much work for too little gain.
If highlight weighted metering (HWM) proves to be a reliable and consistent way to protect highlights (or if it can be made that way), I think we could safely assume that ETTR/EBTR as it is implemented now would not be widely used because the nearest we can come to making it reliable and consistent is to tell the user to become familiar with his/her camera's limits (which are not predictable and have to be quantified by the user and each camera has to be assessed individually).
If we also see the day when cameras contribute negligible amounts of noise to images, we will be living in a golden age where we are free to concentrate on the things that matter most, such as content and composition. Ideally we would also see a time when sensors are so sensitive and noise-free that you are never forced into using an inconveniently slow shutter speed (except where long exposures are concerned, obviously), so subject movement and camera shake will not be the issues that they are now.
In the meantime, back to the real world, where we still have cameras that add noise to images. If any of ETTR's detractors would like to buy me a D850 or A7iii I can promise that I'd never give ETTR or EBTR another thought
 .
.Jan 13, 2019 11:08:26 #
Your comment gets at it for my understanding of exposure in the field.
blackest wrote:
A subpar exposure may be fixable in post or not de... (show quote)
Jan 13, 2019 12:45:09 #
Hi Bob,
I understand the zone concept, but I have no clue as to how to actually use it.
[spot metering on the brightest part of the scene, then exposure added to place that part in the appropriate Zone.]
So the meter would interpret this as middle grey, and you would then add 3 or 4 stops of EC to place it in zone 8 or 9?
Jan 13, 2019 14:25:38 #
Some may see my simple formula as leaving out color. I should've mentioned color as having two major approaches under exposure: Color and monotone (AKA black-and-white). Experienced photographers note that exposure should tailor itself to either approach. Hence, I include color under exposure in my formula.
anotherview wrote:
You have put my approach in fewer words. br br As... (show quote)
If you want to reply, then register here. Registration is free and your account is created instantly, so you can post right away.