IR Challenge
Oct 12, 2011 11:18:43 #

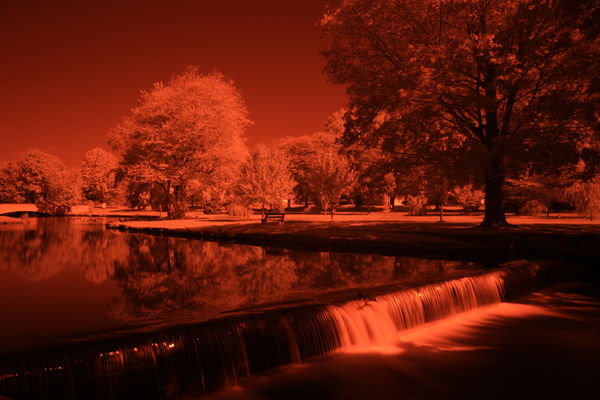
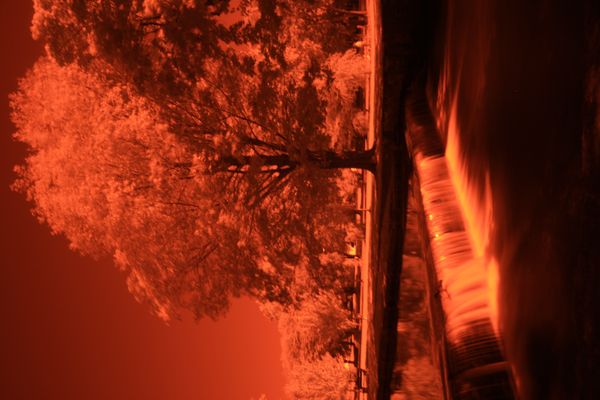
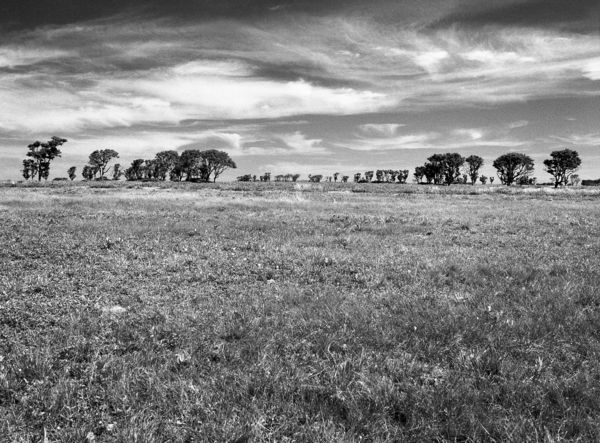
I have been interested in IR photography for a while but find most of the tutorials a little difficult to understand. The 2 photos enclosed are shot with a tripod @ f8 100 ISO 1st photo @ 10 sec and 2nd photo @ 20sec using a 720nm IR filter. I think the photography part is right but the processing I'm almost helpless. I use PS Element 8 regular version and the tutorials keep talking about a channel mixer. I believe this is only available with Element Premier.With all the talent out there can someone or all of you process these 2 photos so I can see if what I have done to date is acceptable to this point. Thanks for any help you can give.
10 sec f8 100 ISO WB Auto
20 sec f8 100ISO WB Auto
Oct 12, 2011 11:41:09 #
waltwilkitis wrote:
I have been interested in IR photography for a whi... (show quote)
I of course have no idea of what look you are trying for. Attached are two options of many. The first enhance > Covert to blk & wht > infared effect. You have a three color channel mixture here. The second than also uses the filter > solarize. Both were sharpened and light level adjusted. This was done with Elements 8.


Oct 12, 2011 12:10:13 #
Thanks for your quick reply. I do like the first convert ot b/w etc.It is just that in all the tutorials I have seen they talk about IR processing to maintain a blue sky and much more glow and pop. Perhaps I am looking for something that just isn't.
Oct 13, 2011 02:12:14 #

See if you can set the camera color balance to Custom, based on an AWB image. But it might not work- might be out of range.
Also I opened channels in PS and individual red and green channels look good by themselves
Also I opened channels in PS and individual red and green channels look good by themselves
Oct 13, 2011 07:24:05 #
photocat
Loc: Atlanta, Ga
Walt,
try this
make a copy from the orginal. Go to Image> adjustments > channel mixer.
Select the red out put channel and change the red value to 0% the green 0% and the blue to 100%, then go to the blue channel and change the values of red to 100%, green to 0% and blue to 0%.
Why not download a trial version of a program that does provide channel mixing and test it out before you decide if it is worth the upgrade.
Oct 13, 2011 11:06:17 #

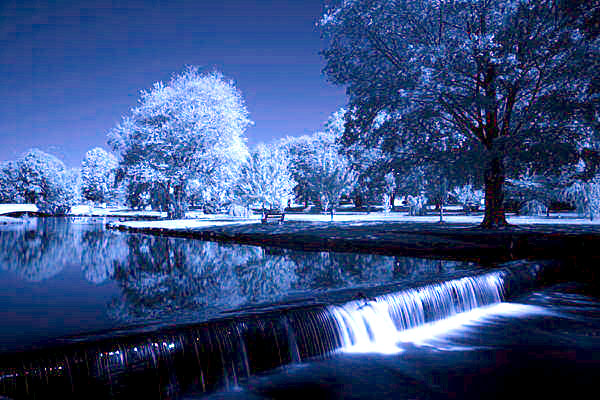
I did a quick (5 minute) edit in Photoshop.
Auto levels
Channel mixer (red channel: red 0, blue 100; blue channel: red 100, blue 0)
Shadow/highlight adjustment
Hue/saturation adjustment.
Auto levels
Channel mixer (red channel: red 0, blue 100; blue channel: red 100, blue 0)
Shadow/highlight adjustment
Hue/saturation adjustment.
Oct 13, 2011 12:14:02 #
For those like me who use PhotoShop Elements, and want a channel mixer. Here is a free one it works with PSE 9, and Windows 7, so it should work with any other version.
It seems even better than the one in PS, and its easy to install. Just unzip and copy the 8bf file, open the PSE program files click plugins and copy the file there; done!.
When the page open look to the right, its "channelmixer le" that is free. It might be a little confusing, as there is also a pay version on the page. I really don't see any advantage to the pay version, but of course I really didn't read the pitch to see any. The free one works 100% for my uses, so I don't need the pay version.
Link to ChannelMixer LE
http://www.simpelfilter.de/en/imaging/colormixer.html
Oct 13, 2011 12:26:04 #
You need to set a custom white balance for your camera, if that's possible. These images do not respond like they should to channel mixing, something is not exactly on cue.
I set the WB on my G12 with a piece of printer paper, but you can also use the grass some say that's better, but I haven't tried it. You do this with the filter on the camera.
The finished result should not come out blue, like the above effort. But for some reason they do. They should look like the gray scale conversion, but that's not the right way to do it. And doesn't look like they really should.
Oct 13, 2011 12:33:38 #
I took this on Ilford SFX200 IR film, but with a red filter rather than a true IR one.
Shot in a Mamiya 645 with 55mm lens.
Shot in a Mamiya 645 with 55mm lens.
Oct 13, 2011 12:41:09 #
Gregory
Loc: Clinton, Iowa
waltwilkitis wrote:
Thanks for your quick reply. I do like the first convert ot b/w etc.It is just that in all the tutorials I have seen they talk about IR processing to maintain a blue sky and much more glow and pop. Perhaps I am looking for something that just isn't.
Check here http://www.lifepixel.com/
Oct 13, 2011 12:58:59 #
steve40 is on the right track. Set the white balance on your camera by using a nice green such as grass to balance against. My first IR shots turned out to be the same radical red and then a friend gave me this info. You'll get lots of wonderful stray colors set against a black and white background. Camera RAW is the perfect vehicle to either downplay these colors, emphasize them or change them.
Oct 13, 2011 13:45:02 #
I don't know what camera waltwilkitis is using, there is no exif data imbeded in his images. But it seems his camera as is unconverted, is terribly insensitive to IR. With the settings he is using, I would get terribly overexposed images.
But as I stated before, when trying to do a conversion something is wrong. The images should not be "blue", but should appear as true IR. But in the end this camera may not be able to do decent IR, in its unconverted state.
But as I stated before, when trying to do a conversion something is wrong. The images should not be "blue", but should appear as true IR. But in the end this camera may not be able to do decent IR, in its unconverted state.
Oct 13, 2011 14:02:35 #

you might try this---
1. Open the photo you want to convert into an infrared image with Photoshop
2. Next, Click Ctrl+J to duplicate the photograph.
3. Click Layer > New Adjust Layer > Selective Color and apply the following settings
- Colors = Cyans
- Cyan = 0%
- Magneta = 0%
- Yellow = 0%
- Black = +100%
- Method = Absolute
- Colors = Blues
- Cyan = 0%
- Magneta = 0%
- Yellow = 0%
- Black = +100%
- Method = Absolute
- Colors = Whites
- Cyan = 0%
- Magneta = 0%
- Yellow = 0%
- Black = -100%
- Method = Absolute
- Colors = Blacks
- Cyan = 0%
- Magneta = 0%
- Yellow = 0%
- Black = +100%
- Method = Absolute
4. Click Layer > New Adjust Layer > Channel Mixer and apply the following settings
- Output Channel = Red
- Red = +100%
- Green = +200%
- Blue = -200%
Constant = -10%
Check the box Monochrome
5. Now on the Layer Palette, click Lighten and set the Opacity to 100% to bring some of the blue color back.
Oct 13, 2011 14:03:39 #
Oct 13, 2011 14:21:26 #
The link to the channel mixer plugin for elements, I posted above works like a charm.
Red Channel = 0
Blue output = 100% - lock both
Green Channel as is.
Blue Channel = 0
Red output = 100% - lock both
A little tweaking of the constant levels in all there colors, can produce some interesting effects. But the above settings, will give you the basic IR conversion.
Red Channel = 0
Blue output = 100% - lock both
Green Channel as is.
Blue Channel = 0
Red output = 100% - lock both
A little tweaking of the constant levels in all there colors, can produce some interesting effects. But the above settings, will give you the basic IR conversion.
If you want to reply, then register here. Registration is free and your account is created instantly, so you can post right away.