Basic, easy to understand masking
Dec 5, 2018 12:12:49 #
ygelman wrote:
...There is much more possible, but you gotta read.
And practice
Dec 5, 2018 14:35:31 #

OneShotOne18 wrote:
Perhaps I'm making this harder than it really is. When masking is done I read that it has a lot to do with transparency and filters. I can watch how to videos all day and just do not understand why anyone would white or black out a photo.Bottom line, what is the purpose? Is there a simpler solution until " I get it"? I apologize for having to drag y'all down to such low depth of my lack of knowledge.
I'm at work and don't have my 'tweaked' version of this image to share, but I can describe what masking was used in the tweak and how it helped.
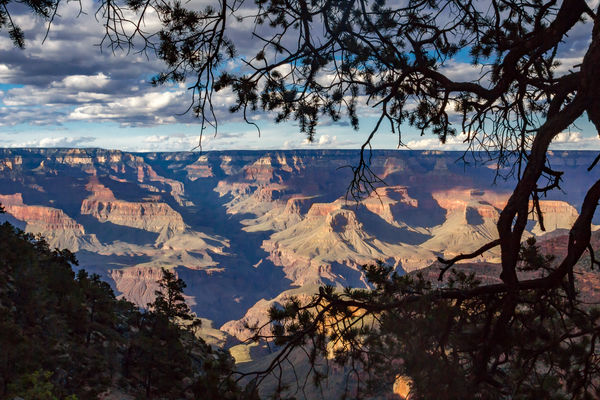
From memory, the image was shot at ISO 800 on a Canon T2i, which has definite noise at 800. (I had never intended to be out for sunset, so I had no tripod, etc, but a student for whom I was responsible was struggling to get out of the canyon for about 7 hours.... another story.) The resulting image SOOC was WAY underexposed in the shadows and any attempts to pull detail in lightroom gave a serious black-on-gray checkerboard look.
The initial 'fix' as seen here was to intentionally allowing a loss of detail in the canyon by globally applying noise reduction. The reduction still leaves substantial noise in the dark shadows, and removes detail in the canyon walls, but this image was the 'split the difference' of two unwanted effects at tolerable levels instead of having one or the other at intolerable levels.
The far superior fix is masking, and selection tweaking. The method was to save two images that were placed into layers in Photoshop. One image had NO noise reduction (or very little) and the other had a lot of noise reduction, enough that the cliff faces looked cloudy. (You can also use Photoshop to reduce noise in layers that are copied from the original, but since I had to go back to the original RAW file to undo the original edits, I just saved 2 copies ahead of time.) Then, using color select options in Photoshop, I selected just the shadows throughout the image that had not been noise corrected. Then, I created a layer mask that hid the selected shadows. With this layer 'on top' and the noisy shadows 'hidden,' the image revealed the noise corrected shadows from the layer below while retaining the details in the canyon walls, and the crisp details along the edges of the trees and in the clouds. Again, this better version is not available to post at this time.
Dec 5, 2018 16:05:45 #
amfoto1
Loc: San Jose, Calif. USA
OneShotOne18 wrote:
Perhaps I'm making this harder than it really is. When masking is done I read that it has a lot to do with transparency and filters. I can watch how to videos all day and just do not understand why anyone would white or black out a photo.Bottom line, what is the purpose? Is there a simpler solution until " I get it"? I apologize for having to drag y'all down to such low depth of my lack of knowledge.
Let me show you an example where I used layers & masks....
This image was shot under extreme lighting conditions. The subject was under a roof and shaded. The background is sunlit outdoors. No camera made can handle such an extreme range. And there's no neutral density filter that can be used to balance things, due to all the unique shapes involved. So what I did was double process the image. One version I adjusted for the primary/shaded subject (left), the other image I tweaked exposure and color balance to recover some of the background. (I was working from a RAW file, which has more latitude for adjustment than a JPEG.) I made these two different versions in Lightroom (using "virtual copy").
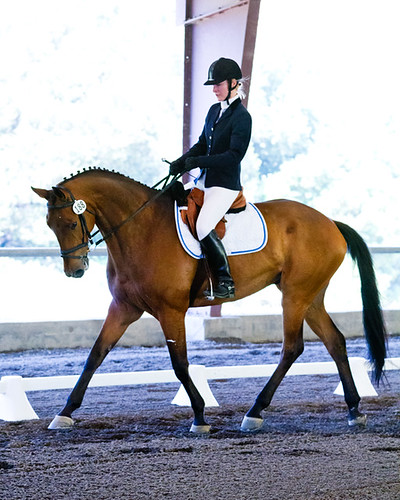

Then I opened both, made a copy of the background version and laid that on the primary subject version as a new layer.
Next I created a "mask" on the background version and used a black brush to "remove" portions of the image to reveal the bottom layer. Doing this effectively deletes the "incorrect" portions of each version, leaving only the "correct" areas from each which will make a single image (after the layers are flattened). This is the result:

Once I completed the mask for the above, I felt the background was a little too strong, so before I flattened the image I adjusted the background layer "transparency" to reduce it a little bit in the final composite.
The reason for using masks is because you actually aren't "erasing" part of the image with the black brush. In a sense you're just "hiding" it to reveal whatever is behind. With a mask, if you make a mistake you can simply switch to a white brush and "paint it back". You also can use a soft edged brush for better blending too.
And you can set a white brush to a low percentage like 10% and create a gradation effect with multiple strokes that recover only a portion of what was removed. Each stroke across an area re-reveals the effect a little more. For example, in the above image I could have made yet another adjustment layer and mask to selectively remove the bluish cast on the ground under the subject with a gradation. (In this case, it wasn't necessary.)
It's possible to get similar results with an eraser. But if you use an eraser instead of a mask and make a mistake, what's been erased is gone so you have to start all over with a new layer.
Above was done with a single image, because the subject was moving. If it were a stationary subject such as a scenic image, the multiple images with different adjustments can be made in-camera, for even better results that "double processing" like I had to do for the above.
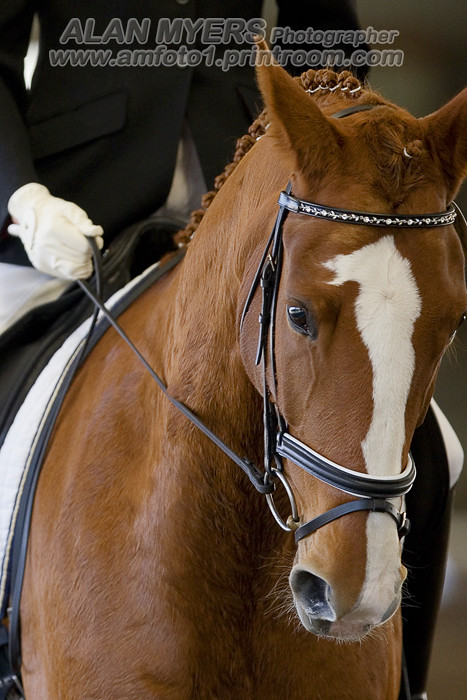
Layers and masks can be used for many things. Besides the above where I selectively adjusted exposure and color balance, it's also an accurate way to apply a variety of effects selectively to an image. For example, I use it at times to blur down a background while sharpening the primary subject... or even to apply sharpening only to the subject while not increasing the sharpness of a background.... or even at times to apply different amounts and/or types of sharpening to different portions of a subject. I had to deal with very shallow depth of field in the following image, so did sharpening differently for portions of the horse's face and somewhat less on it's neck and shoulders, and none on the rider's gloved hand and background.
I've also used layers & masks to apply a "photo filter" to only part of an image. I've also used it to desaturate much of an image, converting it to black and white, while keeping part of it in color. There are many other possibilities, so I'd encourage you to learn to use layers & masks.
Dec 5, 2018 16:34:20 #
I've used PhotoShop for 20 years now and never really understood masking and layers, nor could I ever select parts of photos worth a darn. Besides my ineptitude with mouse and pen tablet, it is the silly graphic Poster making "Art" vocabulary that makes it hard for me. Makes sense to some, but never makes sense to me. Lightroom provides some of the features and is easier to use and understand.
It is like singing. Those who can, think it is so easy everyone can do it. The rest of us know better. Adobe has a congenital case of Mcintosh disease. They think their way is so great it is easy, so easy, in fact, they make up a whole different vocabulary just for the cool smart folks, like them. It is a major wonder that Lightroom came from them and is only very hard to learn instead of PhotoShop impossible. Amazingly, after all that, it IS the best game in town.
C
Dec 5, 2018 17:19:05 #
[quote=amfoto1]Let me show you an example where I used layers & masks....
Exemplary response. This is the type of response that can help beginners and advanced users. Good job, amfoto.
Happy trails

Exemplary response. This is the type of response that can help beginners and advanced users. Good job, amfoto.
Happy trails
Dec 5, 2018 17:23:58 #
Photocraig wrote:
. . .
It is like singing. Those who can, think it is so easy everyone can do it. . . . .
It is like singing. Those who can, think it is so easy everyone can do it. . . . .
It's clear that you've not talked with great singers. If you had, you would have learned that a great deal of effort is required; practice, practice, practice.
Maybe those who can warble naturally make it seem like it's "easy" but that's all they can do. And doing that is like fiddleing with apps on a smart phone. Looks good on a small screen, but basically flawed. (I know, I know, they're getting better but nothing like doing it right with a real tool.) End of pleasant Rant.

Dec 5, 2018 21:40:02 #
kenArchi
Loc: Seal Beach, CA
Ok, I don't see a mask tool in my elements.
Am I doing this layers thing correctly?
I erase the part in the top layer what I want to come through from the bottom layer.
That's not masking isn't it?
Am I doing this layers thing correctly?
I erase the part in the top layer what I want to come through from the bottom layer.
That's not masking isn't it?
Dec 6, 2018 02:54:21 #
Heather Iles
Loc: UK, Somerset
Photocraig wrote:
I've used PhotoShop for 20 years now and never rea... (show quote)
You are not the only one that has struggled with Photoshop with its Layers and Masks and gave up. I too have found Lightroom easier to learn but am looking for a replacement as I don't need a subscription-based program, but at the same time, I want a program that is as good as Lightroom. Anyone with any suggestions?
Dec 6, 2018 08:42:00 #
kenArchi wrote:
Ok, I don't see a mask tool in my elements.
Am I doing this layers thing correctly?
I erase the part in the top layer what I want to come through from the bottom layer.
That's not masking isn't it?
Am I doing this layers thing correctly?
I erase the part in the top layer what I want to come through from the bottom layer.
That's not masking isn't it?
No, that's not masking. I don't know which Elements you're using, but, after you select a visible layer, there should be a way to create a mask for that layer.
Then, just to practice using it, duplicate the top layer and try this: First, change the blend mode of the new top layer to make it a bit wierd, for instance Multiply. Then click on the mask. Next click on the gradient tool. And now click and drag the cursor over the image. You should see a change.
Keep playing: change the blend mode, or change the choice of gradient shape, or reverse the gradient. You'll get the hang of it. But keep playing.
Then read up on how to make adjustments to your layers; each adjustment gives you a new layer with a mask. And play some more.
Dec 6, 2018 08:47:57 #

kenArchi wrote:
Here's an article with screenprint of where the "create mask" button is located:Ok, I don't see a mask tool in my elements.
Am I doing this layers thing correctly?
I erase the part in the top layer what I want to come through from the bottom layer.
That's not masking isn't it?
Am I doing this layers thing correctly?
I erase the part in the top layer what I want to come through from the bottom layer.
That's not masking isn't it?
http://www.informit.com/articles/article.aspx?p=2298391&seqNum=4
I will send you more info via pm.
If you want to reply, then register here. Registration is free and your account is created instantly, so you can post right away.