Flat color from Canon Pro 100 printer
Nov 29, 2018 08:43:16 #
mizzee
Loc: Boston,Ma
I'm trying to print a little 4x6 image for Christmas cards on my Canon Pixma. Easy, right?! The images come out dingey and flat. No amount of saturation works. My laptop has been calibrated. I've downloaded the manual to my iPad, but it's nowhere to be found. I started a conversation with Canon, but was told to come back during normal business hours. Because I'm impatient, I'm hoping folks can help!
I don't use the printer very much at all, which I suspect is a large part of my problem. How does one clean the heads? I don't think it's an ink issue. The reds in particular are flat. I have a MacBook Pro and use Lightroom. Thanking you all in advance.
I don't use the printer very much at all, which I suspect is a large part of my problem. How does one clean the heads? I don't think it's an ink issue. The reds in particular are flat. I have a MacBook Pro and use Lightroom. Thanking you all in advance.
Nov 29, 2018 09:18:34 #
itsnoelb
Loc: Edgewater, FL. Originally: FLINT. MI.
mizzee wrote:
I'm trying to print a little 4x6 image for Christm... (show quote)
Paper selection correct? Quality setting to best? Just....sounds like a simple setting. Try printing same photo from a different source?
Nov 29, 2018 09:22:10 #
Nov 29, 2018 09:27:17 #

Picture Taker wrote:
Printed on the back of the paper?
That was my thought. I've done that!
Nov 29, 2018 09:27:28 #
I have this same printer and have had the same problems. Try changing from letting your app (photo shop elements?) control the color to letting the PRINTER choose. If that doesn't work, adjust your color to compensate the "blah". i did this one on mine by increasing the saturation and saving the settings when the results were how i wanted. Sort of Q &D but works for we who don't use the printer often! Aside from that you can research online for a variety of answers which may make your head spin, or you can experiment with installing the canon software over, or come up with your own. But if you find a solution, WRITE IT DOWN - especially if you're a senior like i am!
Nov 29, 2018 09:30:37 #
Nov 29, 2018 10:11:08 #

mizzee wrote:
I'm trying to print a little 4x6 image for Christm... (show quote)
Okay... You may be onto something. The printer MAY need a head cleaning. You MAY be out of one or more inks, or the inks may be old. You MAY be using a paper which is not made for photographic reproduction, or you MAY not have an ICC profile for that paper. HOWEVER, your problem could be with your color management workflow… This MAY be a shot in the dark, but it's worth covering for the masses who read this site:
Questions to ask yourself about COLOR MANAGEMENT, perhaps the biggest challenge for most photographers:
#1 Am I using a decent DESKTOP monitor that has been properly calibrated with a colorimeter and software from DataColor or X-Rite? Monitor calibration is the first step in preparing a computer system for What You See Is What You Get (WYSIWYG) digital printing. Without precise calibration, you're just chasing your tail.
#2 Is my ICC color management path set up correctly? Here are two examples, one for JPEG capture at the camera, the other for raw capture and post-processing.
JPEG workflow:
After setting correct exposure, White Balance the camera for the light source in use. Custom or Preset or Manual white balance in reference to a proper target is recommended.
Set the ICC Profile in your camera menus. 98% of us should be using sRGB to avoid downstream problems. Adobe RGB is for the few pros who really understand what to do with it.
On the computer, you must have installed FOUR TYPES of profiles in the operating system: input/output profiles (sRGB and Adobe RGB), Monitor profiles (custom; see #1, above!), working space/connection space profiles (ProPhoto RGB and similar wide-gamut color profiles), and printer profiles (one for EACH combination of printer model, ink brand, and paper you will use)
When you open an image, it is converted from its profile to the working space profile you have chosen in your software preferences. Using a wide gamut profile will allow adjustment of the image without discarding any colors in the original file.
When viewing and adjusting the image, it is converted from the working space profile to your monitor profile. ONLY with a properly calibrated monitor, will you see what is ACTUALLY IN YOUR FILE.
When you save a file as TIFF, JPEG, .PNG, etc., you can choose the output profile:
>Leave the file in the working space if you are sending it to another application for additional processing. An example would be output from Lightroom to be opened in Photoshop later.
>Convert the file to sRGB for the Internet, most photo labs, and most commercial graphic arts printers (engravers and lithographers).
>Convert the file to Adobe RGB ONLY for labs or service bureaus or commercial printers who specifically ask for Adobe RGB.
When you PRINT a file, using a printer on your network or directly connected to your computer, you must choose the correct profile for the exact printer/paper/ink combination in use. MOST photo paper manufacturers will supply custom profiles for each of their PHOTO papers for a decent range of photo printers. The Canon Pro 100 is one such printer, as it is very popular. If you do not have a custom profile for the paper you wish to use, check the paper vendor's or manufacturer's web site for downloads. They should provide instructions for installing it on both Windows and Macintosh computers.
Applications such as Lightroom and Photoshop (and even Canon DPP and similar software that comes from other camera manufacturers) allow you to see a very very close simulation of what your printer will print. The key is to use "soft proofing." Soft proofing uses the PRINTER profile as a filter between your working space profile and your monitor profile. The result is that you can do final adjustments on an image that account reasonably well for differences in color gamut. Soft printing setup varies, according to the software. See the documentation or HELP file that comes with it. It's a really easy and important step.
Raw file workflow:
[Optional, but helpful] White balance the camera for the light source in use. Custom or Preset or Manual white balance in reference to a proper target is recommended. MOST raw processing software will open the raw file and make a conversion to a real image (bitmap) in reference to the EXIF data. So the white balance you set at the camera should be the white balance you see when you open the file. Of course, you can set ANY white balance you like in raw processing software, but often it is most helpful to start with something that is a decent reproduction of reality...
Set the ICC Profile in your camera menus. 98% of us should be using sRGB to avoid downstream problems. Adobe RGB is for the few pros who really understand what to do with it. The ICC profile setting in the camera menu ONLY AFFECTS THE PREVIEW IMAGE embedded in the raw file, and the EXIF table associated with it. So you can set any profile you want for output, during post-production.
On the computer, you must have installed FOUR TYPES of profiles in the operating system: input/output profiles (sRGB and Adobe RGB), Monitor profiles (custom; see #1, above!), working space/connection space profiles (ProPhoto RGB and similar wide-gamut color profiles), and printer profiles (one for EACH combination of printer model, ink brand, and paper you will use). For raw file conversions, you must also have your operating system up to date, and your Adobe Camera Raw up to date, at least to the point where your camera was first supported with a raw profile.
>Camera manufacturers do not share their raw conversion profiles. Adobe, Apple, Microsoft, and others have to create their own profiles for each new camera sold. So if your software is older than your camera, your camera probably isn't supported.
When you open a raw file, it is developed to a bitmap image that is then converted from its specific camera model profile to the working space profile you have chosen in your software preferences. Using a wide gamut working space profile will allow adjustment of the image without discarding any colors in the original file. When working from raw files, this allows you to use ALL the data the sensor captured, so you can get just the look you want.
When viewing and adjusting the bitmap of the converted raw data, it is converted from the working space profile to your monitor profile. ONLY with a properly calibrated monitor, will you see what is ACTUALLY IN YOUR FILE. Software such as Lightroom continuously saves a fresh, small JPEG proxy image of the file that is used only for viewing on the monitor during editing.
When you save a converted raw file as TIFF, JPEG, .PNG, etc., you can choose the output profile:
>Leave the file in the working space if you are sending it to another application for additional processing. An example would be 16-bit TIFF or PSD output from Lightroom to be opened in Photoshop on another computer.
>Convert the file to 8-bits and sRGB for the Internet, most photo labs, and most commercial printers.
>Convert the file to Adobe RGB ONLY for labs or service bureaus or commercial printers who ask for Adobe RGB.
When you PRINT a file, using a printer on your network or directly connected to your computer, you must choose the correct profile for the exact printer/paper/ink combination in use. MOST photo paper manufacturers will supply custom profiles for each of their papers for a decent range of photo printers. The Canon Pro 100 is one such printer, as it is very popular. If you do not have a custom profile for the paper you wish to use, check the paper vendor's or manufacturer's web site for downloads. They should provide instructions for installing it on Windows and Macintosh computers.
Applications such as Lightroom and Photoshop (and even Canon DPP and similar software that comes from other camera manufacturers) allow you to see a very very close simulation of what your printer will print. The key is to use "soft proofing." Soft proofing uses the PRINTER profile as a filter between your working space profile and your monitor profile. The result is that you can do final adjustments on an image that account reasonably well for differences in color gamut. Soft printing setup varies, according to the software. See the documentation or HELP file that comes with it. It's a really easy and important step.
Soft proofing is particularly important for seeing colors that are "out of gamut" on the particular device or in the particular profile for output that you want to use. Out of gamut colors are simply colors that are not reproducible by a certain device, or cannot be "contained" in a certain color space. You can adjust saturation, brightness, etc. to pull them back in gamut, all the while evaluating the look on the monitor until you like the compromise. This is most important when processing raw data into images, because the raw data from your camera probably contains colors that cannot be displayed by monitors or on printing papers!
Again, I may be shooting in the dark with this, regarding your specific problem, but other readers may very well benefit from it if you don't need it.
Nov 29, 2018 10:15:14 #

burkphoto wrote:
Okay... You may be onto something. The printer MAY... (show quote)
I am getting the feeling the the OP's issue is more along your:
#2 Is my ICC color management path set up correctly?
Nov 29, 2018 11:42:50 #
The Canon Pro-100 comes with it's own printing software. It is Canon's attempt at making perfect prints without technical challenges like ICC profiles. It works. It is on the disc that came with the printer or can be downloaded from Canon.
Nov 29, 2018 12:13:31 #
Picture Taker wrote:
Printed on the back of the paper?
AzPicLady wrote:
I've done that also. I always use Canon paper and inks. I appreciate it when they mark the back of the paper with "Canon" but they don't do it on all the papers. At least not on all the papers I have used. On some papers it's difficult to tell the front from the back.That was my thought. I've done that!
Nov 29, 2018 12:29:19 #
Yes, i agree! In my original answer i forgot to include that when i set the printer prefs to the correct paper, the next time i printed the same image, the printer changed the prefs back to the original incorrect setting for that paper. The result was a smear of brown. Its a pain but it pays to check. Eventually after a few times of saving the settings, they stayed the same. However i still check just to be sure! The best printer i've had so far! Hope this helps!
Nov 29, 2018 13:42:50 #
bsprague wrote:
The Canon Pro-100 comes with it's own printing software. It is Canon's attempt at making perfect prints without technical challenges like ICC profiles. It works. It is on the disc that came with the printer or can be downloaded from Canon.
Nearly all printers come with driver software that manages ICC profiles for that company's own papers, their own ink, and that specific printer. Installing the printer driver also installs the OEM paper profiles where they belong. Then, so long as you use the OEM papers that are compatible with that printer, AND use OEM ink, AND set the correct driver configuration for the specific paper loaded, your printer should do a very good job with well-prepared files. When using third party papers, follow the instructions for installing profiles and configuring Lightroom, Photoshop, or whatever other software you're using if it manages color.
Of course, when using Adobe products, you have a choice — You can let the printer manage colors as I just described, or you can let the software manage colors. What you DO NOT want to do is configure the software AND the printer to BOTH manage colors at the same time!
It is worth checking all the settings everywhere, to be sure they make sense.
Nov 29, 2018 21:18:34 #
Nov 30, 2018 06:14:14 #

mizzee wrote:
I'm trying to print a little 4x6 image for Christm... (show quote)
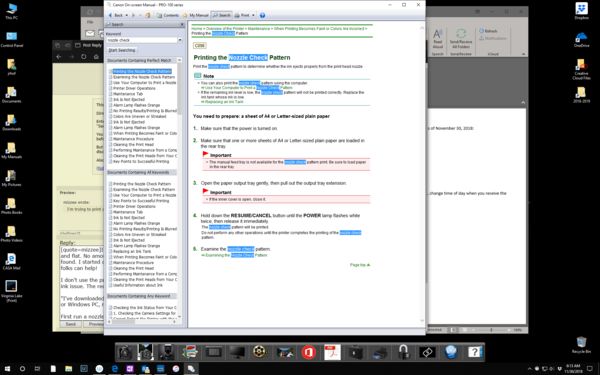
"I've downloaded the manual to my iPad, but it's nowhere to be found." The Pixma Pro-100 is an OnScreen manual that works on a Mac or Windows PC, not an iPad.
First run a nozzle check on the head:
Nov 30, 2018 07:37:56 #
tcthome
Loc: NJ
bsprague wrote:
The Canon Pro-100 comes with it's own printing software. It is Canon's attempt at making perfect prints without technical challenges like ICC profiles. It works. It is on the disc that came with the printer or can be downloaded from Canon.
Also comes with icc profiles for Canon papers, wich would be best to use (with a Canon printer) if just starting out with printing.
If you want to reply, then register here. Registration is free and your account is created instantly, so you can post right away.