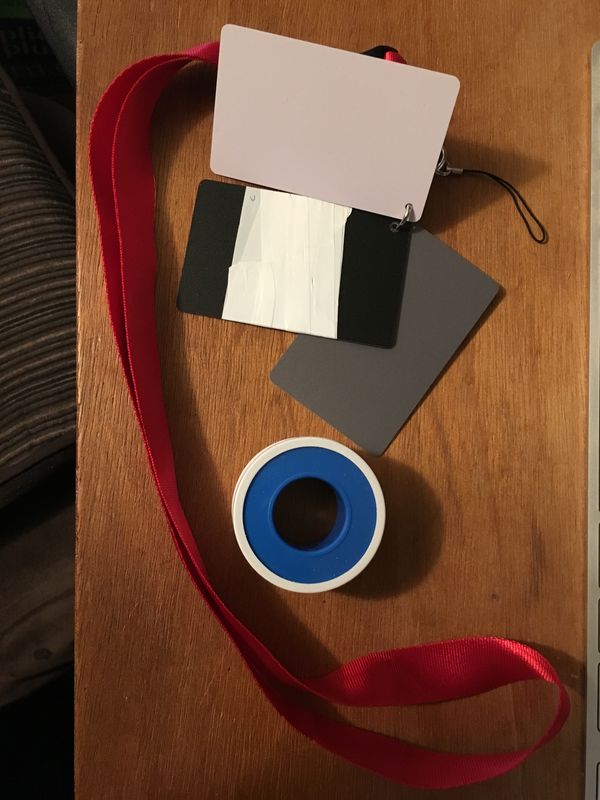
I made a calibrated exposure card for my camera
Nov 10, 2018 15:23:18 #
a6k
Loc: Detroit & Sanibel
The good folks at LibRaw/RawDigger/FastRawViewer published a very good article that shows that plumber's Teflon joint seal tape is a nearly perfect white card material. They were emphasizing color balance but there is more value to be had. They showed that the reflectivity of that material is slightly more than 96% as well as being an almost perfectly balanced white. I'm avoiding links so you'll have to search it.
So here's what I did (picture) with my $1.50 white card pocket set. It could be done with any convenient object, larger or smaller. Notice how much better a white target the tape is than the white card (the white card is at an angle). My Mac's Digital Color Meter says the tape is L*=>.94 on this iPhone JPG. The second shot is from CaptureOne with the only correction being that I used the white balance "dropper" on the tape. BTW, CaptureOne also reported just the tiniest overexposure warnings in a few specks on the tape. I call that "perfect". The tape is also very diffuse which helps with consistent results. And as the authors point out, it's cheap, easy to keep in your kit and can be re-done when it's lost, dirty or whatever.
Here is what I am going to do next.
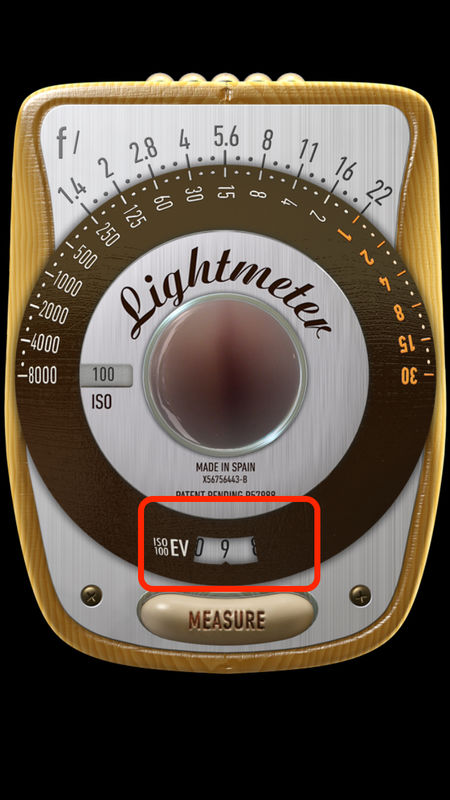
1. Wait for a perfect day and time for a "Sunny 16" exposure.
2. Set my ISO for 100 and (spot) meter the 96% card.
3. Count the stops and partial stops between the 96% card and EV 14.7.
4. Subject to optional, later verification of the accuracy of my camera vs. EV 14.7, I now have a card that's calibrated to my camera.
Here's an easy, possible example. My camera says the 96% card is EV 17.7. The difference is 3.0 stops. That 3.0 difference will be constant for reasonable, useable light levels.
This can be done with other ISO values.
It can also be used with some bracketed verification shots to see if the camera is accurate at EV 14.7. If the camera is a bit off the mark, I can simply remember a different correction value and compensate however it is convenient. The verification shots would be somewhat subjective but then, that's OK for a one-person camera. Camera error can originate from aperture, shutter speed or ISO and perhaps some more exotic sources.
FWIW, those example numbers would mean the camera's metering system is set for 12.0% reflectivity. A different camera would likely produce a different correction. This is just extra information and it has no practical use here - except that it's helpful to understand why an 18% card is not the best target for a 12% camera.
This simple, practical technique avoids math and any discussion of Dynamic Range, ETTR, middle gray and so on. It's just a way of using the camera as it was intended to be used and for JPG images.
So here's what I did (picture) with my $1.50 white card pocket set. It could be done with any convenient object, larger or smaller. Notice how much better a white target the tape is than the white card (the white card is at an angle). My Mac's Digital Color Meter says the tape is L*=>.94 on this iPhone JPG. The second shot is from CaptureOne with the only correction being that I used the white balance "dropper" on the tape. BTW, CaptureOne also reported just the tiniest overexposure warnings in a few specks on the tape. I call that "perfect". The tape is also very diffuse which helps with consistent results. And as the authors point out, it's cheap, easy to keep in your kit and can be re-done when it's lost, dirty or whatever.
Here is what I am going to do next.
1. Wait for a perfect day and time for a "Sunny 16" exposure.
2. Set my ISO for 100 and (spot) meter the 96% card.
3. Count the stops and partial stops between the 96% card and EV 14.7.
4. Subject to optional, later verification of the accuracy of my camera vs. EV 14.7, I now have a card that's calibrated to my camera.
Here's an easy, possible example. My camera says the 96% card is EV 17.7. The difference is 3.0 stops. That 3.0 difference will be constant for reasonable, useable light levels.
This can be done with other ISO values.
It can also be used with some bracketed verification shots to see if the camera is accurate at EV 14.7. If the camera is a bit off the mark, I can simply remember a different correction value and compensate however it is convenient. The verification shots would be somewhat subjective but then, that's OK for a one-person camera. Camera error can originate from aperture, shutter speed or ISO and perhaps some more exotic sources.
FWIW, those example numbers would mean the camera's metering system is set for 12.0% reflectivity. A different camera would likely produce a different correction. This is just extra information and it has no practical use here - except that it's helpful to understand why an 18% card is not the best target for a 12% camera.
This simple, practical technique avoids math and any discussion of Dynamic Range, ETTR, middle gray and so on. It's just a way of using the camera as it was intended to be used and for JPG images.
Original iPhone shot on Auto WB, mixed light
(Download)
Same shot after CaptureOne white balance correction

(Download)
Nov 10, 2018 16:24:05 #

This is interesting to me, but I'm feeling slow on the uptake.
I get that you're using the teflon tape as pure white. I get that, for metering purposes, you need to know how many stops are between pure white and some nominal value. Presumably that nominal value is EV 14.7. I don't know what EV 14.7 means or why it would be the base value or how to find it.
Can you point me to some resource that would explain this?
Nov 10, 2018 16:53:31 #
a6k
Loc: Detroit & Sanibel
htbrown wrote:
This is interesting to me, but I'm feeling slow on the uptake.
I get that you're using the teflon tape as pure white. I get that, for metering purposes, you need to know how many stops are between pure white and some nominal value. Presumably that nominal value is EV 14.7. I don't know what EV 14.7 means or why it would be the base value or how to find it.
Can you point me to some resource that would explain this?
I get that you're using the teflon tape as pure white. I get that, for metering purposes, you need to know how many stops are between pure white and some nominal value. Presumably that nominal value is EV 14.7. I don't know what EV 14.7 means or why it would be the base value or how to find it.
Can you point me to some resource that would explain this?
I'm sorry. I assumed that readers would already know this. The Sunny 16 rule is more a standard than a rule and it's based on the known and, for now, unchanging brightness of the sun. The rule says that correct exposure on a clear day in the mid latitudes within a couple of hours of solar noon will be F 16.0 with a shutter speed being the reciprocal of the ISO. In other words, the rule says that F 16.0 at 1/100 second is the correct exposure for ISO 100 under those conditions. You will find a lot on this subject if you search either the internet and/or this forum.
EV is Exposure Value. An EV is a combination of aperture and shutter speed but not only a single one. So a given EV can be achieved with many different combinations. Most light meters, even the two on my iPhone show EV as well as possible combinations.
The value of 14.7 is the value of the EV for the Sunny 16 rule. That's why I used it. It's a known standard that doesn't require expensive lab quality instruments. It's free from Mother Nature. It is the one and only value that you can set manually and know that if your camera is accurate then it's the correct setting for the specified, easily detected conditions. That, then, gives you the ability to meter the white card to get the difference between white and whatever you camera is "expecting".
Many people erroneously use EV 15.0 but 14.7 is correct. EV 15.0 is for a shutter speed of 1/125, F 16.0, ISO 100. That shutter speed is convenient, especially on older, mechanical cameras because of this common sequence: 1/30, 1/60. 1/125, 1/250, 1/500. These are usually thought of as whole stops but there is nothing magic about them. In fact, F 8.0 at 1/400 is EV 14.7 and if your camera has 1/3 stop intervals then it will do this.
Why 1/400? Do this: count aperture stops like this: 16.0, 11.0, 8.0 (8 is half of 16). Now count the same number of stops in shutter speed: 1/100, 1/200, 1/400. See? Not 500. As it happens, there is 1/3 of a stop between 1/400 and 1/500 so F 8.0 at 1/400 is F 14.6667, rounded to 14.7.
Nov 10, 2018 17:09:34 #
htbrown wrote:
This is interesting to me, but I'm feeling slow on the uptake.
I get that you're using the teflon tape as pure white. I get that, for metering purposes, you need to know how many stops are between pure white and some nominal value. Presumably that nominal value is EV 14.7. I don't know what EV 14.7 means or why it would be the base value or how to find it.
Can you point me to some resource that would explain this?
I get that you're using the teflon tape as pure white. I get that, for metering purposes, you need to know how many stops are between pure white and some nominal value. Presumably that nominal value is EV 14.7. I don't know what EV 14.7 means or why it would be the base value or how to find it.
Can you point me to some resource that would explain this?
EV 14.7 is the average "sunny day" (by most accounts).
That's a good enough benchmark for some purposes, not good enough for others.
The actual EV of a sunny day depends very much on the angle of the sun. You can
measure this with a vertical rod a foot or two long, and trigonometry.
I once wrote a computer program to predict EV on perfectly clear days based on
latitude, longitude, date, time of day, and amount of haze and particulates in the air
(a subject of great interest to astronomers). Also, as the sun gets lower, the atmosphere
bends the light, so the apparent angle of the sun is not the same as its true,
astronomical angle.
Anyway, it turns out that sunny ain's always that sunny. On a perfectly clear day
at noon, EV can vary hugely. All you can count on is that, on a perfectly clear day,
the incident light will be uniform and won't vary over a short period of time
(a few minutes).
The best benchmark for luminosity is a new, factory calibrated lightmeter from a good
manufacturer such as Sekonic, Gossen, Nikon, Canon, Pentax, etc. But its EV readings
will have to be adjusted using its K-factor to arrive at true EV.
Here are the light meter "families". Any two luminance meters in the same family--
if properly calibrated--should give the same reading:
Gossen
Sekonic, Nikon, Canon
Pentax and Minolta
More info: http://dpanswers.com/content/tech_kfactor.php
It would be really nice if an inexpensive reference luminosity source were available
for calibrating light meters. But no such luck. So you have to calibrate one
using another of the same family, a uniform gray or white card, and a constant light
source. Calibration should check more than one EV point, or at least calibrate in the
center of the "usual" range for photography (whatever that is). Light meters are
often non-linear: when you calibrate one end of the scale correctly, the other end
goes off. (Sigh.)
A constant (over the short term) light source could be the sun on a perfectly clear
day (of unknown EV) or an enlarger with a voltage stabilizer (also unknown EV).
(Yeah, I know: increasingly uncommon and pricey.) This is one case were a "hot"
light (incandescent with a condenser lens) is better than a "cold" one (fluorescent tube
with diffuser).
For calibrating a light meter, we don't care too much about color temperature, but we
do care about continuous-spectrum--especially if calibrating a digital camera. Even a
light source with a color-rendering index (CRI) close to 100 may not be good enough
if you're unlucky. The only safe bet is a continous-spectrum source such as the sun,
a tungsten bulb, or a halogen-tungsten bulb.
An all-white computer screen can serve as a regulated light board, but just like the sun or an
enlarger, the luminance is unknown. And not all monitor power supplies are equally
well regulated. I run a computer on off a generator sometimes, and when the water pump
clicks on, some monitors get dimmer, and some don't. The good ones are pretty good.
But it's not full-spectrum light: it's LED light, with phosphors giving just three narrow bands
of red, green and blue (or thereabouts). If those don't happen to match the bands your camera
is sensitive to, you're sunk.
I wouldn't use the sun to calibrate any light meter--certainly not a camera--and not even
with my computer program to predict the acutal EV. It's not accurate enough--too
many atmospheric unknowns.
The sun on a perfectly clear day with no trees or buildings around is a good source of
uniform, constant (for a few minutes), continuous-spectrum light. That's all--nothing
else is guaranteed.
Nov 10, 2018 17:55:03 #
a6k
Loc: Detroit & Sanibel
I admire your level of detail! It reminds me of some of the programs I wrote for fun many years ago. But you skipped over the part where I specified within a period near solar noon. When I take test readings I always to it within one hour of solar noon. If I'm careful about the sky it usually is quite consistent. The "gotcha" is, of course, that it's consistent for only one location.
I think and agree that atmospheric conditions are a significant variable and I was being very brief in saying "a clear day" but that's key. In the area where I am, it's best to wait until a major high pressure moves in and brings with it clear, dry northern air. The humidity in the air affects both the intensity and the color.
While I can't argue that my method achieves the perfection that you describe, it is considerably more correct than, for instance, an 18% card which is, sadly, what many use today. We are left with an unknown calibration from the factory, an unknown set of minor (hopefully) tolerances in the device and just a bit of variation from the sun.
In a longer version of my post (which will never be published because even I can't read it comfortably) I set up a process for validating the 14.7 at the same time as measuring the distance between it and 96%. Simply described it would be to shoot a scene in which the humans/animals/objects were known and to bracket up and down from 14.7 by at least a full stop in as small a set of increments as possible, possibly re-doing with half as well as thirds because some cameras have that choice as a user setting. The hidden advantage of this approach would be that even if the actual strength of the sunlight were weaker that day, the full process would still come up with the proper correction factor from 96%.
Thanks for helping out and reassuring me that I'm not the only obsessive ex-programmer out there.
Nov 10, 2018 18:07:51 #
I'm still scratching my head. I now know what EV 14.7 is, and I thank you.
How do you know the difference between the teflon tape and EV 14.7 is three stops? In Zone System parlance, you're putting it on Zone 8, as far as I can tell. How do you know it's not Zone 9?
Why is an 18% gray card (Zone 5) the wrong way to go?
How do you know the difference between the teflon tape and EV 14.7 is three stops? In Zone System parlance, you're putting it on Zone 8, as far as I can tell. How do you know it's not Zone 9?
Why is an 18% gray card (Zone 5) the wrong way to go?
Nov 10, 2018 19:02:50 #
a6k
Loc: Detroit & Sanibel
htbrown wrote:
I'm still scratching my head. I now know what EV 14.7 is, and I thank you.
How do you know the difference between the teflon tape and EV 14.7 is three stops? In Zone System parlance, you're putting it on Zone 8, as far as I can tell. How do you know it's not Zone 9?
Why is an 18% gray card (Zone 5) the wrong way to go?
How do you know the difference between the teflon tape and EV 14.7 is three stops? In Zone System parlance, you're putting it on Zone 8, as far as I can tell. How do you know it's not Zone 9?
Why is an 18% gray card (Zone 5) the wrong way to go?
First, the three stops was just an example of a possible outcome, made simple for illustrative purposes. The actual result will very likely be between 3.1 and 2.3. I acknowledge that the Zone system is of great interest, yours and mine. But I deliberately tried to avoid it here because all I am trying to do is to get to a predictable standard for good JPG's.
Now for the legendary 18% card, Zone V, etc. I will try to avoid TMI but may fail.
An 18% card, if it's a good one, reflects 18% of the light falling on it. But let's say your meter is assuming the world is 12.5% reflective. The talk on the internet says that most are this or similar. That will result in a half stop underexposure. This is a mild version of the problem with a scene on snow or beach sand. There is more light than "average". The camera thinks the world is 12.5% and you just used 18%. Your camera will be wrong by 1/2 stop, all other issues ignored. I chose 12.5% in this case because it comes out almost exactly 1/2 stop from 18%. It's just an example.
The camera records in linear values and we later convert using gamma curves. RawDigger is the only program I know of that can show you the original linear values. In it you will discover that a 12.5% value is 3.0 stops below maximum and an 18% value is about 2.47 stops below maximum 1.00/.125=8 log(2) of 8.0 is 3.0. That's the same thing as saying 2x2x2=8.
As for "what is middle gray?" the answer is difficult. Here is what I think I have learned. the CIELAB (L*A*B*) system uses 50.0 as middle gray. That equates to just under 119, 119, 119 in sRGB. http://colorizer.org. There are other systems, too. They are about the final result after gamma has been applied.
But it's not valid to interchange exposure with outcome. The Zone system is a system of outcomes. In other words, you decide to put a given part of the image in Zone V as part of the visualization of the final product. You need to be able to predict the density of the negative that will result from a given exposure and you need to be able to predict what density in the negative will give you zone 5 on a print. In digital, the density issue is reversed but the problem remains that exposure is not the same as result. There are may issues involved in this and one of the most important is gamma. That's a whole other topic.
I'm not an expert on the Zone system but as I understand it, the centers of the zones are one stop apart and thus the zones are one stop wide. So let's start with 100% which will be the top of zone 10. So the top of zone 5 will be 5 stops below 100% and the middle should be 5.5 stops below 100%. A stop is either twice or half the light away from the adjacent stop in linear terms.
Let's arbitrarily use 10,000 as the starting point, the top of zone 10. 10,000 (top of z10), 5,000 (top of z9), 2,500 (top of z8), 1,250(top of z7), 625 (top of z6), 312.5(top of z5), around 160 for zone 5 midpoint (not exact). 160/10,000 would be .016. The actual answer is .022. We are off by about an order of magnitude. Or reverse it. If 18% is zone 5 then 36% is zone 6 and 72% is zone 7 and 144% is zone 8. Oops. Gamma must be involved. This just demonstrates that the RawDigger math is correct.
I'm sorry to run on like this and I'm probably over-simplifying and even introducing errors of understanding. You questions are good ones. I hope this helps.
Nov 10, 2018 19:12:05 #
a6k wrote:
I admire your level of detail! It reminds me of so... (show quote)
You're welcome!
But you skipped over the part where I said that solar intensity depends--very much--on latitude and
time of year. If you don't believe me, go look at a any solar energy calculator for solar panels.
You can minimize that by always orienting your white card at the same angle to the sun (e.g, a right angle).
But there's nothing you can do about the fact that at lower angles, sunlight travels through more atmosphere.
If you live on the equator, it might not matter as much as it does in the temperate zone.
And you can never be sure that some of the light falling on your car isn't reflected off your shirt or some
other nearby object (or from the sky). So basically, the sun is not a good standard here on earth.
The best calibration standard for luminance is a new, factory-calibrated meter from Sekonic, Gossen, Nikon,
Canon, Pentax, etc. You won't find a better standard outside of a lab. I'm not happy about that, but it's the truth.
When you do camera calibration in the lab (e..g., to find your "personal film speed" in the old days),
the best way was in a dark room, with all the light coming from the light box. Flare messes everything up.--
light outside the frame does affect your camera's meter. The more groups your lens has, the worse
it gets. Zooms are horrible. Outdoors, the best you can do is use a lens hood (that does help--but doesn't
eliminate all flare).
I started with the same idea you have---and I ended up borrowing a new Sekonic light meter to calibrate
my Sekonic light meters. Then -- with K factor correction -- my other brands of light meter.
Fortunately, light meters don't have the same problems with flare as camera lenses do, so I was able to use
a white wall outside and the sun as a uniform and (for a minute or two) constant (but unknown EV) target.
Simply put: the sun makes a lousy calibration light source -- unless you are in outer space.
Nov 10, 2018 20:43:36 #
As a science guy, I'm fascinated by this. According to the article Bipod referred to (http://dpanswers.com/content/tech_kfactor.php), there seem to be two opinions on the 12.5%. The guy who wrote that article suggests the 12.5% is not true. His final conclusion seems to say that using an 18% gray card may be off, but the difference may be too small to sweat. If the value of 12.5% is correct then would using a 12.5% card work (assuming one existed)?
In the real world, we care most about the outcomes (the photographs). If I understand what you're saying, you're calibrating the white tape to the Sunny 16 exposure, which may or may not be a highly variable thing. Is that correct? If I understand what you're saying correctly, by picking the perfect Sunny 16 day, you have a (nearly) constant base with which to compare the white. In the realm of digital cameras, where we are encouraged to expose to the right, I can see the virtue of calibrating to a (nearly) pure white.
It's true that the zone system nominally goes to Zone 10, but it rarely ever did in practice. Zone 9 and 10 were achievable in thick-emulsion films as are used in view cameras, and depend on reciprocity failure at bright exposures to work.* For thin-emulsion films like are used in 35mm cameras, pure white might be achieved at Zone 8 or a little above. This suggests your math working upward from Zone 5 is correct.
*Thick-emulsion films are also more amenable to modifying the dynamic range through exposure and development variation (such as pushing development to get an effectively higher ASA). A zone system adept, armed with a meter reading from the shadows and the highlights, can pick an exposure and development for that frame to accommodate the dynamic range. Within limits, of course.
Nov 10, 2018 21:37:32 #
a6k
Loc: Detroit & Sanibel
Bipod said..
You're welcome!
But you skipped over the part where I said that solar intensity depends--very much--on latitude and
time of year. If you don't believe me, go look at a any solar energy calculator for solar panels.
I do believe you and I've done some work on that and heat radiation. But assuming good technique, how much variation at solar noon? You didn't say. Quantification would be helpful.
You can minimize that by always orienting your white card at the same angle to the sun (e.g, a right angle).
But there's nothing you can do about the fact that at lower angles, sunlight travels through more atmosphere.
If you live on the equator, it might not matter as much as it does in the temperate zone.
The angle of solar noon will be plus or minus less than 25 degrees in most parts of the US, won't it? What's the actual difference, then, in intensity? My trig is rusty but I think the answer is the cosine of 25 which is less than 10%. I think (if my math is OK) that's about a 1/7th stop.
And you can never be sure that some of the light falling on your car isn't reflected off your shirt or some
other nearby object (or from the sky). So basically, the sun is not a good standard here on earth.
Disagree but you make a good point that it would take a bit of care.
The best calibration standard for luminance is a new, factory-calibrated meter from Sekonic, Gossen, Nikon,
Canon, Pentax, etc. You won't find a better standard outside of a lab. I'm not happy about that, but it's the truth.
OK, but what are the rest of us to do? This is my best shot (with bracketed verification) for easy, cheap and practical.
BTW, I'm working on a way to meter the sky. Stay tuned.
As I was writing this I remembered a key point. My whole post is not about calibrating the camera, only about matching a known card to the camera. The whole 14.7 concept was to simplify. My super-simple method has the potential flaws that you point out with regard to camera calibration. We may disagree on how significant those flaws are. I think most of them are removed with best-shot bracketing at the same time. Then you are comparing equivalent exposures and accurately observing the net difference. I suspect that should be done anyhow to compensate for camera error (aperture, time, sensitivity)
Nov 10, 2018 21:59:47 #
a6k
Loc: Detroit & Sanibel
htbrown wrote:
As a science guy, I'm fascinated by this. Accordi... (show quote)
OK, I'm impressed with this response, too. I'm really happy when I get such good dialog. I beg off on film, though since A] it no longer matters (at least to me) and I stopped at "base plus fog" and "shoulder" with Tri-X. But with digital, getting to "blown" is all too easy. You sound like a really good candidate for RawDigger and maybe for FastRawViewer. You can download a trial copy of either, I think. You'll thank me. If you have a Mac you may want to take a look at Raw Photo Processor 64 (RPP) as well. I'm going on more than a year and I admit that I don't understand at least half of it.
When I look at some controlled test exposures from my two Sony's I can easily observe exactly how far it is in linear or exponential terms between the maximum that the camera can actually do and the exposure that the meter produced. I have dozens of them. The two cameras are modestly different on this. Interestingly, they are both, in theory, 14 bit sensors. That means that the theoretical value for maximum should be 2^14=16384 for each channel. But in practice, neither can go that high and one, the smaller sensor, does not go as high as the other. The people who created RawDigger have some links to some excellent articles on this - on their sites.). This is a bit different than my proposed real-life test method but I'd be very surprised if the difference were even human-observable. If I ever see the sun again I may find out.
But keep in mind that I was trying for good JPG's and only because "selmslie" asserted that if you have the best JPG then you probably have the best starting point for raw. I am still a devotee of Expose to the Max Safely (ETTMS) but that's no good for JPG or for video so there is value in having a known calibration for a white card such as I propose. The 96% is known. The distance back to the camera's metering system is what I'm trying to nail down.
To answer the first question, if your card is accurately 12.5% and your camera is accurately 12.5% then you have what you need IMHO. However, to know that the card is what it claims to be it has to be held just right, be clean and fresh, etc. More difficulty arises with the camera. I have not seen any camera that documents the calibration and I would not trust it anyhow due to manufacturing tolerances. I was just at a camera dealer last week and they told me that about 1/3 of their sales of new cameras (Nikon, Canon, Sony, etc.) come back for repair. That tells me a lot.
To try to answer the question about 18% vs 12.0 or 12.5%, 18% vs 96% is 2.42 stops. 12.5% is 2.94 stops. 12.0% is 3.0 stops. That's from 96%, not 100%. It's pure math. The judgement call is whether the difference between 2.42 and 3.0 matters or not. It matters much less in raw and maybe a lot in video unless you are comfortable with post-processing video. I'm not. BTW, in raw, my cameras both exceed 3 stops enough that I need to be aware of it and compensate accordingly. But Sony eliminates some of that in JPG, even for the same, simultaneous exposure. Tricky.
The third question mixes issues at least for me. I'm only trying to get JPG's right so no ETTR involved. And the pure white is nice for getting the WB right in post but makes little difference in calculating exposure for JPG's. At least that's my take on it. The 96% and the pure white just happen to be for the same material and very convenient, thus, for dual purposes. If there were a perfect gray tape it would still be useful for exposure calculations.
To concede a point from my other expert critic, a good incident meter would solve this problem if it could be known that it was accurate. There is no practical difference between "14.7" and incident light except for the calculated difference. I used to have a perfect piece of foam from a filter container that I could hold over the lens of my film SLR for an incident reading. There are some of those on the market for hefty prices. If X amount of light is falling on the subject an incident light meter can measure it. If 96% of that is reflected back then a reflected meter can read it. But you still need to know what the camera does.
Nov 10, 2018 22:32:46 #
htbrown wrote:
As a science guy, I'm fascinated by this. According to the article Bipod referred to (http://dpanswers.com/content/tech_kfactor.php), there seem to be two opinions on the 12.5%. The guy who wrote that article suggests the 12.5% is not true. His final conclusion seems to say that using an 18% gray card may be off, but the difference may be too small to sweat. If the value of 12.5% is correct then would using a 12.5% card work (assuming one existed)?
Well, we got light meters being calibrated to (at least) three different standards.
They can't all match the 18% gray card. But in fact, none of them do. Yes, that's odd.
Re-capping: gray card reflectivity becomes important when we use one to translate
luminance readings (regular light meter) to illuminance values (such as a
incident light meter would have taken were it placed where the card is).
It's also important when someone thinks (wrongly) that the 18% gray card
represents the shade of gray his meter aims for (i.e., will render a uniformly
lit, uniform white wall).
How much exposure error is "acceptable" is question about tolearnces: how good
is "good enough"? The author of this otherwise helpful article has one standard,
Ansel Adams had another. I know who got the better exposures.

But as you know, systematic error is not a good thing. Calibration isn't the only thing
tending to bias light meter readings. Sure, the user can always compensate for a
known, costant error--if he remembers to
Quote:
In the real world, we care most about the outcomes (the photographs).
In the real world, we care most about the outcomes (the photographs).
Now you don't sound like a science guy at all. You sound like a photographer!
Science is about "the real world". The practical, down to earth, "every schoolboy
knows" human world is dependent on language and culture and changes constantly.
In Central in South America, "blanco" is pinkish; in North America, "white" is
bluish. So we define color temperture in terms of degrees Kelvin of a black-body
radiator -- not what this group or that group of people think.
But you know, they can't all be right: Gossen, Sekonic/Nikon/Canon/etc
and Pentax/Minolta. Objectively, there has to be a fact of the matter: one family
of light meters would win any objective test of "good photos".
But how do you design an objective test of "good photos"? Can't be done.
That's why neither the Celsius nor Farenheit scale is based on "comfortable
room temperature". The triple-point of water is much better.
Anything that can be measured by a meter is an objective physical phenomenon.
So why have a subjective standard? And why have three different ones?
Just askin'.
Quote:
If I understand what you're saying, you're calibrating the white tape to the Sunny 16 exposure,
which may or may not be a highly variable thing.
If I understand what you're saying, you're calibrating the white tape to the Sunny 16 exposure,
which may or may not be a highly variable thing.
Uh, on that variable point: see astronomical data, solar power data, weather data.
Plus there is this phenomenon called "day" and "night". I've noticed that the latter is
quite a bit darker.
Quote:
Is that correct? If I understand what you're saying correctly, by picking the perfect Sunny 16 day,
you have a (nearly) constant base with which to compare the white.
Is that correct? If I understand what you're saying correctly, by picking the perfect Sunny 16 day,
you have a (nearly) constant base with which to compare the white.
The OP will have to respond to this.
Quote:
In the realm of digital cameras,
where we are encouraged to expose to the right, I can see the virtue of calibrating to a (nearly) pure white.
In the realm of digital cameras,
where we are encouraged to expose to the right, I can see the virtue of calibrating to a (nearly) pure white.
The question is translating luminance readings to equivalent illumiance readings. That's like
expressing the force of gravity as where a 1 kilo mass weighs 1 kilo, or as acceleration of a falling
object in meter per second squared. It does not depend on what Nikon or Canon are shipping.
What you do with the reading once you get it is up to you. There is a lot more to exposure
than "exposing to the right".
Quote:
It's true that the zone system nominally goes to Zone 10, but it rarely ever did in practice.
Zone 9 and 10 were achievable in thick-emulsion films as are used in view cameras, and depend on
reciprocity failure at bright exposures to work.* For thin-emulsion films like are used in 35mm cameras,
pure white might be achieved at Zone 8 or a little above. This suggests your math working upward from Zone 5 is correct.
Suggest you track down a copy of Beyond the Zone System by Phil Davis. Really, it's
all sensiometry.
Ansel Adams and Fred Archer started with 10 zones (I - X), but Adams ended up with 11 (0 - X).
So that's 11 zones covering 10 stops of contrast. Nobody is sure why he settled on this.
It may because there were 10 markings on the Weston light meters. But my theory is that it
was becauise 10 stops is about all the eye can see at one time.
B&W negative film has far more than 10 stops of contrast (dynamic range): 11 to 17 is typical
of modern films It goes way, way, way blacker than anything you can possible print on paper.
I don't know if this is what you meant.
As you point out in your footnote, thick emulsion films are favored by sheet film users
(not just Zone System) is that they are better for expanding or contracting contast via
minus or plus development time. But think emulsion films do this too--just not a much.
What really screw up Zone System adherents was roll film. So in that respect, digital
is much better.
Adams was careful to talk about "Zones" only in relation to prints, and "Values" in relation to
negatives. We can use "Zones" for both--but only we are very careful Zone V = 18% gray is a
reasonable value for prints that are to be reproduced as lithos. But it's not the definiton your
camera's meter uses. The differnce depends on the meter, but can be half-a-stop or more.
That's quite a bit.
These days it would make more sense to define Zone V as "Comp 0" --short for exposure
compensation-- and allow an infinite number of stop above and below:
. . . Zone III, Zone IV, Zone V, Zone VI, Zone VII . . .
. . . Comp -2 , Comp -1, Comp 0, Comp 1, Comp 2, . .
This gets rid of the "how many Zones are there?" more-or-less arbitrary decision.
But really, the Zone System is relevant to gray cards only when people
define Zone V as 18% gray. If you are going to use "Zone" to refer to
negatives as well, it makes exposure simpler if you define it as whatever
middle gray your meter favors.
But whether or not one uses the Zone System, the camera exposure maps
("places") each tone in the scene on a particular value in the image file or
negative. You may or may not like the result. Exposure is always a compromise,
beacause you only get ONE.
All photographers care about how skin tone is represented, most care if
their highlights are blown or their shadows are unrecoverably dark.
That still happens with digital sensors, just at different levels.
If we define "density" as a value (or sum of RGB values) in the image file,
then digital sensors have a Diffie-Helman curve, just lie film does. It's
different. Well, different films were different.
A sensor -- whether its chemical or electronic-- is a sensor: light in,
value out. Sensiometry as a science is as relevent as ever. How
could it not be?
Did electornic sensor make optical engineering irrelevant? Did they
make physics irrelevant?
The main reason to try to get exposure right is that lightening and darking
(whether done via dodging and burning or PhotoShop) can look unnatural.
Natural light is a complex thing. Lighten the shadows under a tree too much,
and it looks like there is somebody under there with a flashlight. Some people
won't won't notice phony lighting in a print -- but beleive me, some will.
You are moving light around -- if you know enough about light to do that,
and not have it look unnatural, then you can make a lot more money as a painter
than as a phtographer:
http://boydgavin.com/wp-content/uploads/2016/07/Trucks-and-Mud-3.jpg
https://natsoulas.com/wp-content/uploads/2014/12/6.-Cafe-Table.jpg
So it's better to try to get optimal exposure that gets as close as possible to
your intentions ("visualization"), rather than to just snap away and try to
"fix it in PhotoSlop".
There are no shortcuts to good exposure. "Exposure to the right" is helpful
hint--but that's all. You still gotta worry about placements, becaues if you
do too much retouching, it always shows.
There are two ways to sell a zillion cameras:
1. Build one that makes great photography easy and totally automatic; or
2. Say that you've done 1.
Nov 11, 2018 04:05:01 #
Pablo8
Loc: Nottingham UK.
Sorry to butt-in, on this 'Tennis-Match' between a6k and Bipod, but I wonder if either of them ever just go out and take photographs, for the sheer pleasure of doing so?
Nov 11, 2018 06:50:04 #
Wow! A lot of work and a lot of discussion! I rely on the meter in my camera. So far, so good.
Nov 11, 2018 06:50:25 #
Pablo8 wrote:
Sorry to butt-in, on this 'Tennis-Match' between a6k and Bipod, but I wonder if either of them ever just go out and take photographs, for the sheer pleasure of doing so?

If you want to reply, then register here. Registration is free and your account is created instantly, so you can post right away.