The Golden Hour Lesson II
Nov 4, 2018 17:09:58 #
kenievans
Loc: Dallas
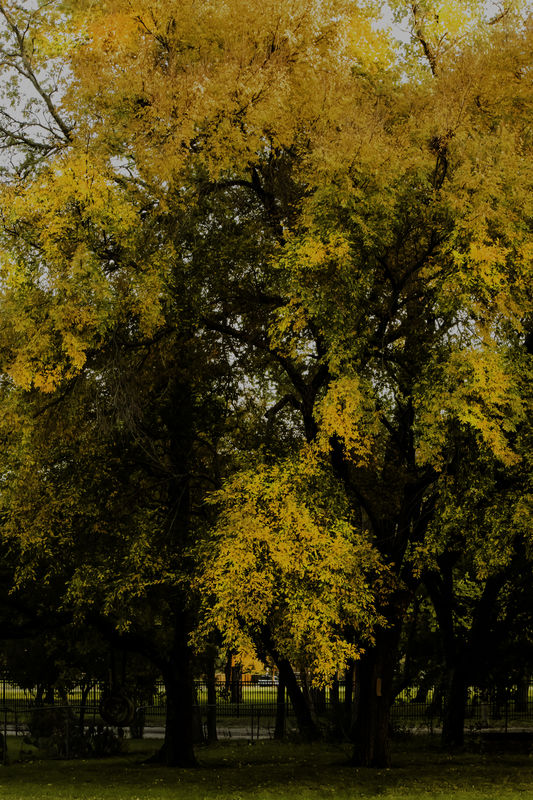
This is my attempt to shoot my lovely tree in the golden hour. I just can't seem to get it there. The sun was almost below the tree line to the West and reflecting a beautiful gold color that just bathed everything liquid gold. The skies to the East were starting to turn dark blue. I took the shot facing almost directly South. I would appreciate any suggestion or reworks and I would be happy to send you the original if you would like. Thanks for your assistance.
Nov 4, 2018 17:29:09 #

Your file is not the correct color space, so was quite a shock to download and see the gorgeous color after the drab thumbnail 
A quick tweak to highlights is below. Any better, or too yellow?
A quick tweak to highlights is below. Any better, or too yellow?

Nov 4, 2018 17:38:05 #
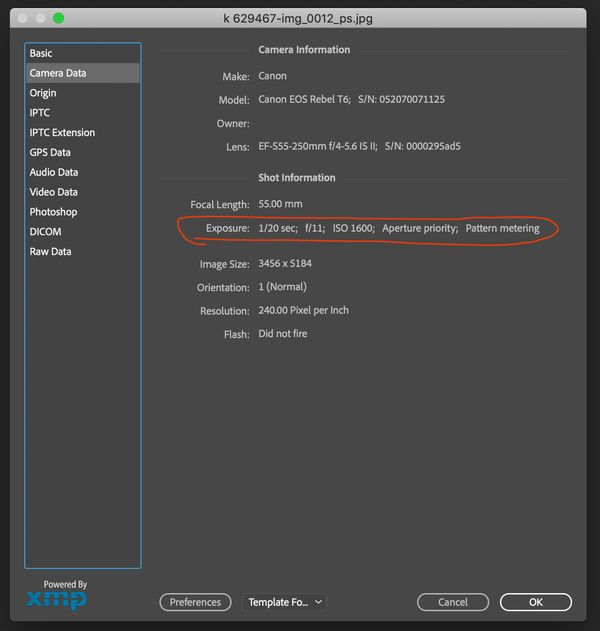
Is this hand-held, Keni? 1/20 second...
I never tested with my T3i, but I'm wondering if you could get away with under-exposing by 1 or 2 stops and then raise exposure in pp. It might be interesting to try one of each next time you have a photo op where ISO is going to exceed 800.
I never tested with my T3i, but I'm wondering if you could get away with under-exposing by 1 or 2 stops and then raise exposure in pp. It might be interesting to try one of each next time you have a photo op where ISO is going to exceed 800.
Nov 4, 2018 17:42:36 #
kenievans
Loc: Dallas
Linda From Maine wrote:
Your file is not the correct color space, so was quite a shock to download and see the gorgeous color after the drab thumbnail
A quick tweak to highlights is below. Any better, or too yellow?
A quick tweak to highlights is below. Any better, or too yellow?
Now how come my original thumbnail was so drab and yours wasn’t?
 it looks like you had the same outcome I had when I tried fiddling with the highlights. It loses the gold and becomes more yellow. I have only ever seen that color a few times in my life and I so wanted to capture it. What you did is a beautiful yellow though. Maybe I am remembering better than it was.
Nov 4, 2018 17:48:58 #
kenievans
Loc: Dallas
Yes it was handheld but I was bracing against the side of the house. It was very low light. I might could have backed off the appeture to lower the ISO or up the shutter speed. I just grabbed the camera with whatever lens was on there and started shooting because the light was changing so fast. I shot in appeture priority.
Nov 4, 2018 17:54:33 #
kenievans wrote:
OK, understand. There are more capable folks here who will know exactly what to do Now how come my original thumbnail was so drab and yours wasn't? it looks like you had the same outcome I had when I tried fiddling with the highlights. It loses the gold and becomes more yellow. I have only ever seen that color a few times in my life and I so wanted to capture it. What you did is a beautiful yellow though. Maybe I am remembering better than it was.
it looks like you had the same outcome I had when I tried fiddling with the highlights. It loses the gold and becomes more yellow. I have only ever seen that color a few times in my life and I so wanted to capture it. What you did is a beautiful yellow though. Maybe I am remembering better than it was.
As for the thumbnail, often when I play with these files in my online app, befunky, it either changes the color space to sRGB or UHH doesn't like what happened and doesn't reveal a thumbnail at all, just giving a download link. So what I've been doing is changing the file type to png (my only other option with this app) to hedge my bets.
Nov 4, 2018 18:01:34 #
Cany143
Loc: SE Utah
Re-working the image would simply result in a reworked --most likely 'brightened' or made more 'vivid' to some extent-- image, but I suspect that may not be what you intended to either capture or portray. Though your description describes a particular quality of light relative to the position of the sun, the image suggests otherwise: what I --a viewer-- see is an image of trees in autumn coloration lit only by the light reflected from an overcast sky.
What to do? Leaving aside camera settings (color temperature, exposure, etc), shooting a few minutes earlier while the sun is still illuminating the subject would be a place to start. Lacking that, or using only the image you've provided, you could raise slightly the luminosity of the sky while deepening its saturation somewhat, and doing so would produce an apparent accentuation of the orange/yellow leaves. This is basic color theory, one used by the Impressionists (and others, of course), and its amazingly effective in a visual sense, even when muted but complimentary tones are all that are provided.
What to do? Leaving aside camera settings (color temperature, exposure, etc), shooting a few minutes earlier while the sun is still illuminating the subject would be a place to start. Lacking that, or using only the image you've provided, you could raise slightly the luminosity of the sky while deepening its saturation somewhat, and doing so would produce an apparent accentuation of the orange/yellow leaves. This is basic color theory, one used by the Impressionists (and others, of course), and its amazingly effective in a visual sense, even when muted but complimentary tones are all that are provided.
Nov 4, 2018 18:55:40 #
kenievans wrote:
This is my attempt to shoot my lovely tree in the golden hour. I just can't seem to get it there. The sun was almost below the tree line to the West and reflecting a beautiful gold color that just bathed everything liquid gold. The skies to the East were starting to turn dark blue. I took the shot facing almost directly South. I would appreciate any suggestion or reworks and I would be happy to send you the original if you would like. Thanks for your assistance.
Keni, as I mentioned in your other thread, the best improvements will start by learning and understanding your camera settings. Knowing when to shoot in aperture priority and or shutter priority can be critical to most of your images. In low light, it would not be wise to shoot in aperture priority, IMO. It may also be best for you to shoot in the manual mode in order to help you understand camera settings. Here is a link that may help: https://www.bettertravelphotos.com/blog/item/shutter-speed-vs-focal-length-rule-for-razor-sharp-photos
When shooting at a slow shutter speed such as 1/20th of a sec as in this photo, it's recommended to use a tripod. Sorry, bracing against the side of a house, in most cases won't get you sharp images. At aperture f11 would be one reason for having to shoot at such a low shutter speed. There is still room to open up the aperture a few stops in order to increase the shutter speed, but as I mentioned, you have to understand the camera settings first. It's kinda like when you first start learning to drive a car. Did you start out learning with a stick shift or an automatic transmission? Once one learns to drive a stick shift, they should be able to drive most anything. Same with a camera, once you learn to shoot in manual, all the other settings will become so much easier, because you will understand how things are suppose to work. I hope this helps, because I see potential and enthusiasm with you and your images.
Another thought, are you shooting in auto ISO?
Dave
Nov 4, 2018 21:00:14 #
kenievans
Loc: Dallas
Dave Chinn wrote:
Keni, as I mentioned in your other thread, the bes... (show quote)
Dave i really appreciate your comments. Yes I had it on auto ISO. I do try to shoot in manual when I take the time to plan out a shot. I even have the little laminated cheat sheets in my bag. When I shot the red supper moon eclipse back in January I studied for days and planned everything from using the photographer ephemeris to what settings I needed. This was not one of those times. I had just stepped out on the patio and saw the light and ran to grab my camera. I didn’t even want to take the time to get my tripod out of the car. As they say you get what you pay for.
You are correct I need to shoot more in manual and slow down. I am on not getting what I want this way. I might as well just use a point and shoot. I probably could have used exposure compensation as well. I just get so excited I forget everything I’ve been trying to learn. So for the next month I will only shoot in manual. Develop muscle memory. I do love this hobby. Thanks again for your encouragement and suggestions.
Nov 4, 2018 21:53:09 #
kenievans
Loc: Dallas
Cany143 wrote:
Re-working the image would simply result in a rewo... (show quote)
Thank you Cany. I’m a huge fan of your work. You always have such beautiful light. I appreciate you taking the time to comment.
Nov 5, 2018 09:19:30 #

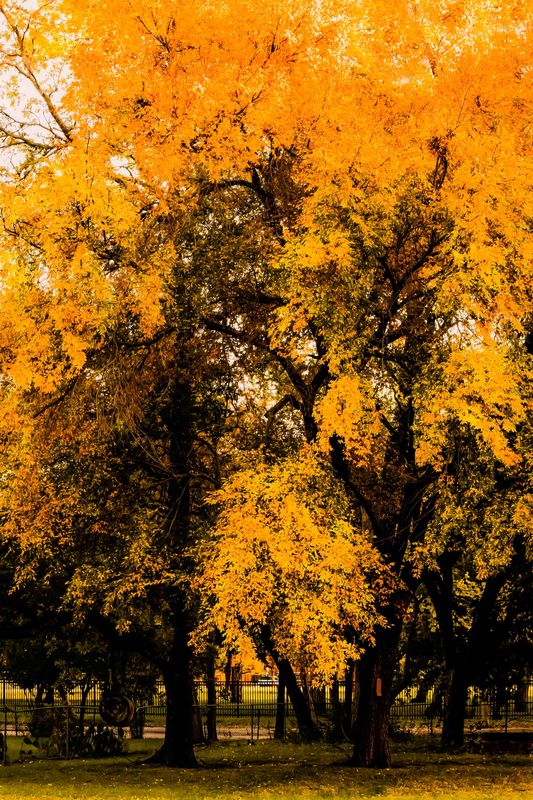
Something that annoys me in the Camera Raw Filter (using Photoshop) is using "Auto" on an image with very vibrant, high key areas. It usually dulls the whole concept by bringing up the shadows and lowering the brights. HOWEVER, I thought that might work for this photo, whose contrasts are outside believability for me. Almost. Had to fiddle a bit with vibrance to get this result.
For what it's worth, your handling of the shutter speed for this shot is not a problem for me. You were not shooting a bird's eye!
Congrats, btw, I think you have what you wanted.
For what it's worth, your handling of the shutter speed for this shot is not a problem for me. You were not shooting a bird's eye!
Congrats, btw, I think you have what you wanted.

Nov 5, 2018 10:45:34 #
kenievans
Loc: Dallas
artBob wrote:
Something that annoys me in the Camera Raw Filter ... (show quote)
Bob I do believe you have it. That is very close to what I remember seeing. Even the tree trunks and grass are picking up a touch of the color. Thank you!
Nov 5, 2018 11:48:12 #
kenievans wrote:
Bob I do believe you have it. That is very close to what I remember seeing. Even the tree trunks and grass are picking up a touch of the color. Thank you!
Good--I hope the "trick" helps with similar photos. You seem willing to take chances. In my experience, they almost always work out with some careful post processing. Love your self-challenges!
Nov 5, 2018 15:29:07 #
Well download is essential to appreciate what you have here Keni, and I reckon it’s rather good! If it were mine I’d certainly play with the luminosity sliders a little (and remember they can work in conjunction with the saturation sliders) which can help with separation of colours and individual colour brightness.
Nov 5, 2018 15:32:35 #

It's impossible for me to say if it's close to the original or not. You can use the HSL tool to make the yellows more or less orange if you want (I also gave orange a nudge towards red). Sometimes autumn yellows look stunning if you give them a good shift towards orange and boost them. It takes it away from what it was in real life, but it makes foliage look more autumnal.
I also went to +4 with both WB and Tint, used split toning to give the highlights an overall yellow/orange tint (31) and gave it positive contrast (for pop), negative clarity (to add soft glow) and some overall brightening.
-
I also went to +4 with both WB and Tint, used split toning to give the highlights an overall yellow/orange tint (31) and gave it positive contrast (for pop), negative clarity (to add soft glow) and some overall brightening.
-
If you want to reply, then register here. Registration is free and your account is created instantly, so you can post right away.