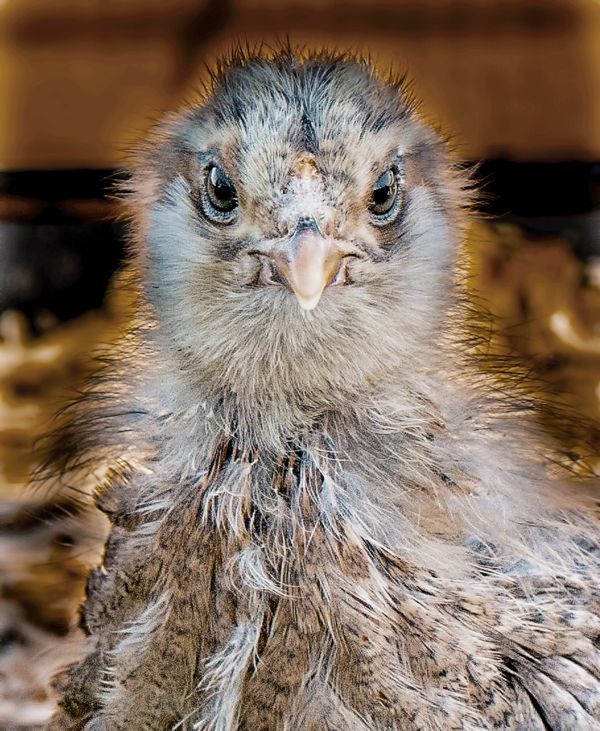
Can't get the Chick Pic to Pop!
Oct 23, 2018 10:40:01 #
RRS
Loc: Not sure
EvKar wrote:
UHH, As I attempt to learn more about PP, I keep c... (show quote)
Here is a real quick edit from what you sent.
Oct 23, 2018 10:57:10 #

olemikey wrote:
Much appreciated, though I am still a novice compared to many folks on UHH! I kept thinking I'd buckle down and learn more after my first hurdle (layers and masks) but I just kept going out and taking pictures instead Linda - you would make a great "post processing" teacher! 

Oct 23, 2018 11:41:46 #
olemikey
Loc: 6 mile creek, Spacecoast Florida
Linda From Maine wrote:
Much appreciated, though I am still a novice compared to many folks on UHH! I kept thinking I'd buckle down and learn more after my first hurdle (layers and masks) but I just kept going out and taking pictures instead
I've only been dabbling in pp for about 2 1/2 years, was a slow change-over from SOOC. Once I made the jump to raw and started PP (inspired by what I saw/read here, I would add) I started to enjoy the expanded creativity and wonderful results. You have a very non-condescending way of sharing the knowledge. Yes, there are many talented folks on UHH, and all have helped me to make more pleasing photographs, understand the digital world. For you and the other helpful folks, thanks for sharing your expertise with the rest of us!
Oct 23, 2018 14:07:47 #
EvKar wrote:
UHH, As I attempt to learn more about PP, I keep c... (show quote)
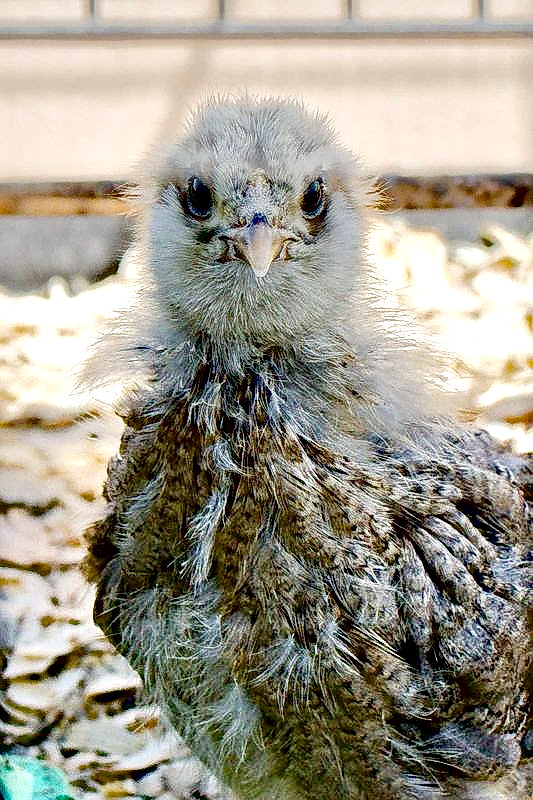
At least one thing that prevents "pop" is the similarity of the color and value of the background
to the foreground (bird). You don't want to shoot light subjects against light backgrounds or dark
subjects against dark backgrounds. That is unless you're doing it for specific creative reasons.
Oct 23, 2018 19:58:40 #
Oct 23, 2018 20:27:18 #
roadsideron
Loc: Apache Junction, AZ
Just used ON1 and kept the aspect ratio when cropping. Seems the photo is not as pix elated just using ON1 with a close crop.
Oct 23, 2018 21:39:14 #

Thank you all for all your responses, I’m soaking it all in. For clarification, this post was to help me in my PP methods, as I’m aware that the picture lacks the proper lighting from the get-go, thus the reason I chose it for a PP lesson. I’m also intrigued to see if my AfterShot Pro efforts can duplicate the Lightroom PP. What I’m learning from you UHHers is that if I want a picture to “Pop” (or if you want to refer to it as BS, a Brilliant Shot), even though shot in RAW, the lighting is key… and yes, don’t rely on PP to bring out the colors that the light didn’t have a chance to reflect off of.
Saying all that, “Linda”, “RRS”, and “roadsideron”, you all did an awesome job… with such a poor photo to work with. Linda, I’m thinking of printing the picture you did and mounting it on the wall… such a good job. Did you three utilized my RAW version to achieve the final picture? Would you have gotten the same results, if you didn’t have the RAW format to work with? Can you share with me and others more in detail the tweaking that you did? Where I’m coming from, during my PP, I adjust this, and I adjust that, soon I have a mess… and then I start all over. By trial and error, I eventually come up with an adjustment to the picture that is better than the original. Does experience in PP eventually prevail? Maybe it is the shortcomings of AfterShot Pro, but really, I think it is my lack of knowledge. Gone are the days when I was proficient in the darkroom, burning and dodging.
Saying all that, “Linda”, “RRS”, and “roadsideron”, you all did an awesome job… with such a poor photo to work with. Linda, I’m thinking of printing the picture you did and mounting it on the wall… such a good job. Did you three utilized my RAW version to achieve the final picture? Would you have gotten the same results, if you didn’t have the RAW format to work with? Can you share with me and others more in detail the tweaking that you did? Where I’m coming from, during my PP, I adjust this, and I adjust that, soon I have a mess… and then I start all over. By trial and error, I eventually come up with an adjustment to the picture that is better than the original. Does experience in PP eventually prevail? Maybe it is the shortcomings of AfterShot Pro, but really, I think it is my lack of knowledge. Gone are the days when I was proficient in the darkroom, burning and dodging.
Oct 24, 2018 00:41:03 #
EvKar wrote:
Thank you all for all your responses, I’m soaking ... (show quote)
EvKar, I'm the one who did the first Photoshop version that Linda used to work on to modify the background. My main point was that your original NEF file had MUCH more color than appeared in the version you posted. I used Adobe Camera Raw to bring out quite a bit of it. Frankly, I was surprised at how much color and contrast was available. I had very little time to work on it (about 10 minutes) Basically, I opened up the shadows, pulled down the highlights, tweaked the white balance, adjusted exposure slightly, added a bit of clarity, and boosted vibrance and saturation a little. I did not have time to play with the background, but there was quite a deep color quality there also. (If you download the picture you'll see what I mean.) I don't know the color of your chicks, so I may not have gotten it right in my hurried post-processing, but it definitely had data there to work with. And I think you are correct that this being a raw file meant that there was a greater dynamic range to work with in Photoshop than if it was a JPG file. I moved from darkroom dodging and burning and adjusting the enlarger timer and developer strength to doing post-processing in Photoshop and shooting with digital cameras. Honestly, the power and possibilities of digital processing are exciting, and you get better with practice. The internet has lots of free tutorial videos to help you along. Just keep trying!
Oct 24, 2018 08:23:07 #
My first edit used the raw file and I explained the steps in my entry, but let me know if one needs amplification. For my background replacement I used ElderJames's edit. I used the selection to tool to "somewhat" separate the background and then used the saturation slider to de-saturate just that part.
The next step involves what is often called adding a texture, even though they can be "smooth" Those usually involve working with different blend modes and opacity and I'm not sure if you want to get into that arena right now or concentrate on the editing that ElderJames and I suggested that would apply to most often with raw: saturation, clarity, highlights, shadows selective brightness etc.
I'm sure most folks learn through experience and repetition. I tend to jump around so much in my interests (right now I'm into composites), I often forget what is best way. And sometimes best way can be achieved through several means, which can make it confusing.
Note there were two steps (or more) that ElderJames and I both did: opened up the shadows, pulled down the highlights. The more you can make your raw file "normal" at the outset, the better result I believe you'll achieve when doing more detailed tweaks.
This has been a fun, productive exercise! Thanks so much.
The next step involves what is often called adding a texture, even though they can be "smooth"
Those usually involve working with different blend modes and opacity and I'm not sure if you want to get into that arena right now or concentrate on the editing that ElderJames and I suggested that would apply to most often with raw: saturation, clarity, highlights, shadows selective brightness etc.I'm sure most folks learn through experience and repetition. I tend to jump around so much in my interests (right now I'm into composites), I often forget what is best way. And sometimes best way can be achieved through several means, which can make it confusing.
Note there were two steps (or more) that ElderJames and I both did: opened up the shadows, pulled down the highlights. The more you can make your raw file "normal" at the outset, the better result I believe you'll achieve when doing more detailed tweaks.
This has been a fun, productive exercise! Thanks so much.
Oct 24, 2018 08:53:14 #
One other note: there is a post processing forum on UHH that might be a good place for the OP to hang out Though it hasn't been busy lately, there are people who participate in that section who might miss if the topic is in Gallery. Click "all sections" at bottom of page to see what UHH has to offer. Note that the daily digest does not include the specialty forums unless you are subscribed (and logged in when you view the digest), and that the daily digest is only a sampling of what is posted daily.
Though it hasn't been busy lately, there are people who participate in that section who might miss if the topic is in Gallery. Click "all sections" at bottom of page to see what UHH has to offer. Note that the daily digest does not include the specialty forums unless you are subscribed (and logged in when you view the digest), and that the daily digest is only a sampling of what is posted daily.Oct 24, 2018 09:25:24 #
ElderJames wrote:
EvKar, I'm the one who did the first Photoshop ver... (show quote)
Thanks ElderJames for your input on my PP learning. Taking what you and others have achieved, I'll see if I can duplicate, although it will be a hard act to follow... it will add to my experience.
Ev
Aug 18, 2021 14:18:56 #
throughrhettseyes wrote:
No dynamic range. Look up increasing dynamic range on you tube. You will find how to shoot with more dynamic range and how to bring it out of a raw pic with light room also.
Balderdash.
It just needs more contrast and brightening:
If you want to reply, then register here. Registration is free and your account is created instantly, so you can post right away.