Need help with Composite
Oct 20, 2018 08:22:08 #
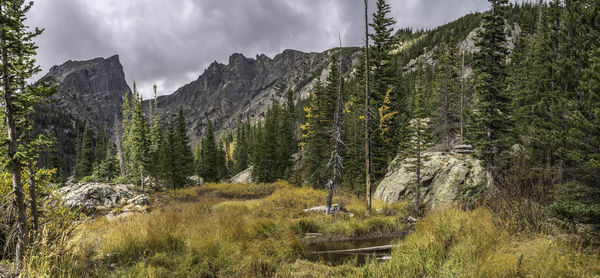
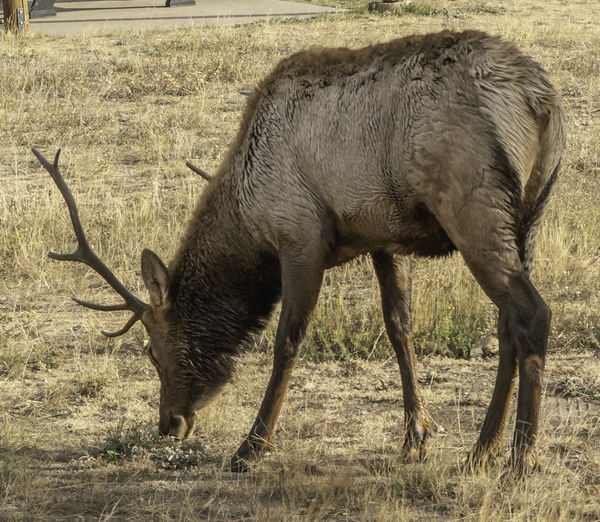
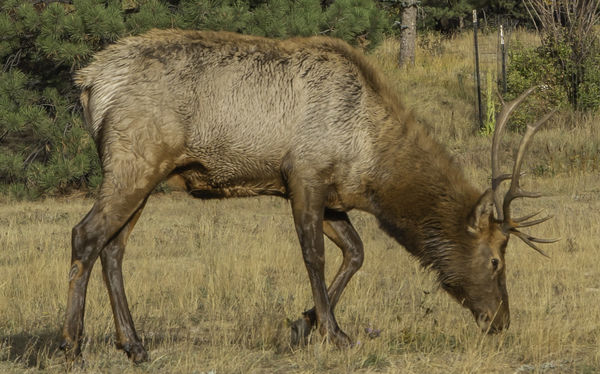
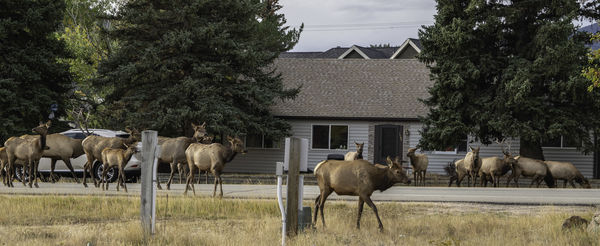
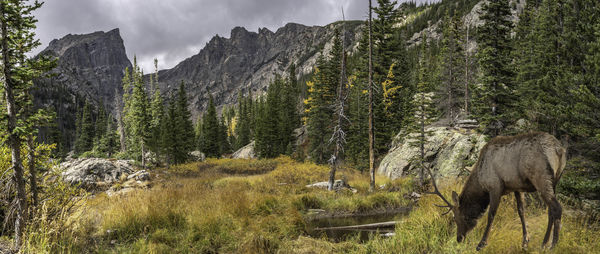
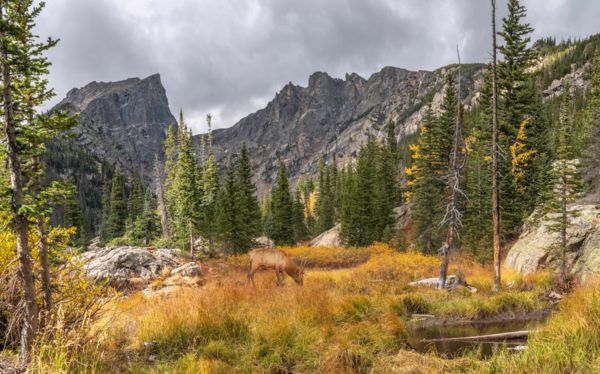
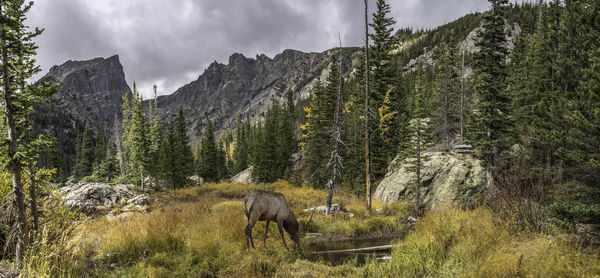
Hey all - we were hiking in RMNP a couple of weeks ago and i got a few shots that i'd like to blend, but don't know what method to really study up on and use. The first image here is the background landscape i'd like to plant a couple of elk into. The elk were in rut while we were there, which was pretty amazing to behold. They were everywhere . . . they held traffic up one morning in Estes Park, (last attached image).
Anyhoo, i'm just curious as to what method some of you more experienced composite-builders would use to blend a couple of elk into the landscape (which is actually a pano of 6 images). I've tried masking, free transform, and then placing, but it's really coming out badly - the elk look superimposed and my masking ability is terrible. The antlers come out like ghostly strings. Any suggestions would be appreciated.
PS - i realize the elk shots aren't stellar per se . . . but i think in a big scene they would be good enough, for me anyway!
Marylea
Pano Scene
(Download)
Possible elk - heavily cropped
(Download)
Possible elk2 - heavily cropped
(Download)
Traffic Jam
(Download)
Oct 20, 2018 14:25:28 #
Elk in the valley. I could make him any size but this seemed to me to be the most realistic looking.
Oct 20, 2018 18:38:30 #

SonyA580 wrote:
OP asked for suggestions on which way is best to achieve. How did you do this one: selection tool, copy/paste, masking with layers, or...?Elk in the valley. I could make him any size but this seemed to me to be the most realistic looking.
Oct 20, 2018 19:11:25 #
I cropped some of your pano because I needed to make the file smaller.
A couple of general notes:
1. You must watch the direction of light and its color, as well as shadows.
2. To help keep the "pasted" feel minimal, adjust your selection tool to feather edges and/or do a little blurring after paste. Also, with legs like this elk's, it helps to clone some grass over the feet.
I have PS Elements. I used the magnetic lasso to select the elk from your other shot. It was more difficult because of flat light and fur. The magnetic lasso will follow lines of contrasting colors or light/shadow; otherwise, you need to click in the anchor points more often.
Since I'm using "expert" mode, when I pasted the animal, it created a new layer. I cleaned up some of the edges with an erasure tool.
Then, I couldn't figure out how to make the light on the elk match the surroundings, so I did a Nik Color Efex filter called "sunlight," which I then masked from most of the image.
One last note: when you post photos to UHH, use sRGB color space. That will keep the thumbnails looking as bright and saturated as the "true" image (viewed in download).
Oct 20, 2018 19:32:22 #
Linda From Maine wrote:
I cropped some of your pano because I needed to ma... (show quote)
Thanks Linda - very helpful. I've actually done a few of the same things that you did, but when i pixel peep, i've been seeing trouble in the antlers especially. I haven't used the erasure tool on the layer; need to try that. I like the idea of the NIK filter . . . i have that set and will try that as well.
Great tip on the sRGB color space . . . i was wondering why everything looked so greenish, but then better in the download. I've posted here before but never seemed to have this issue. Anyway, thanks again!
ML
Oct 20, 2018 19:37:43 #
melueth wrote:
That was the reason I made smaller than Sony's ... but when i pixel peep, i've been seeing trouble in the antlers especially...
 You have a lot of challenges with this project, but it's such a gorgeous pano shot, I know you'll find worth the efforts.
Oct 20, 2018 23:19:02 #
Linda From Maine wrote:
OP asked for suggestions on which way is best to achieve. How did you do this one: selection tool, copy/paste, masking with layers, or...?
Sorry. I simply outlined the Elk with the "magnetic lasso tool" in Photoshop. The elk image was way too big so I re-sized it with "image size". I opened the valley picture and moved the elk to the valley picture with the Photoshop move tool. No masking; no layers.
Oct 21, 2018 07:30:44 #
SonyA580 wrote:
Sorry. I simply outlined the Elk with the "magnetic lasso tool" in Photoshop. The elk image was way too big so I re-sized it with "image size". I opened the valley picture and moved the elk to the valley picture with the Photoshop move tool. No masking; no layers.
Thanks for your breakdown! I think a free transform needs to be used to shrink the elk to fit anywhere in the pic. Like Linda said - this one is going to be a challenge, and i'm glad to hear that it's not just my poor skill set. I'm going back in!!
ML
Oct 21, 2018 07:32:12 #
Linda From Maine wrote:
That was the reason I made smaller than Sony's You have a lot of challenges with this project, but it's such a gorgeous pano shot, I know you'll find worth the efforts.
You have a lot of challenges with this project, but it's such a gorgeous pano shot, I know you'll find worth the efforts.Thank you for the compliment on the pano. My new Sunday project!
ML
Oct 21, 2018 08:26:31 #
melueth wrote:
With the elk on separate layer, in PSE it's the "move tool" that makes easy shrinking in size or moving. I do that with composites such you viewed in my newest FYC topic. On the other hand, if an element is really huge, it's probably easier to resize the file prior to pasting to new image.I think a free transform needs to be used to shrink the elk to fit anywhere in the pic...
One other thought about blending elements: seems I've read a tip about doing a duplicate layer after all are put together and then making that layer low opacity with blend mode of screen or another mode that will bring the "look" all together. A texture would do similar when the composite is heading to fanciful

Oct 21, 2018 16:13:14 #
Linary
Loc: UK
melueth wrote:
Hey all - we were hiking in RMNP a couple of weeks... (show quote)
Perhaps not as good as the other posters efforts, but an interesting exercise. I have never seen an elk, so I don't know how big they are.
Cut out the elk and pasted into the background as a placed layer. Flipped horizontally and positioned it by the water hole.
Oct 22, 2018 05:36:55 #
Linary wrote:
Perhaps not as good as the other posters efforts, but an interesting exercise. I have never seen an elk, so I don't know how big they are.
Cut out the elk and pasted into the background as a placed layer. Flipped horizontally and positioned it by the water hole.
Cut out the elk and pasted into the background as a placed layer. Flipped horizontally and positioned it by the water hole.
Thanks Linary! I love the placement, although i do think he'd be a little smaller in that overall scene. What tool did you use to cut him out? I've used your method, but the end result of my cut is not good; yours looks much better than mine. Then there's still the question of how to make it look a little less superimposed.
Oct 22, 2018 07:15:48 #
Linary
Loc: UK
melueth wrote:
Thanks Linary! I love the placement, although i do think he'd be a little smaller in that overall scene. What tool did you use to cut him out? I've used your method, but the end result of my cut is not good; yours looks much better than mine. Then there's still the question of how to make it look a little less superimposed.
Quick selection tool
Select Subject
Apply quick mask and paint with white and black to get a better selection
Select and Mask to in an attempt to select the hairs better
Close with new layer and layer mask
Place the Elk onto the background. I think the light is coming from the bottom left of your pano, so I flipped the elk to sort of match the light. I ignored putting in an Elkan shadow.
As I said before, I have never seen an Elk and have no idea of sizing. I also could not make up my mind about the trees, how far away (and how tall) are they?
To blend in a little more, I probably should have feathered the Elk more than the two pixels I chose, but my excuse is that I am still learning - and the end of the curve is nowhere in sight.
Oct 22, 2018 11:35:56 #

I think all of these are pretty wonderful. Since I've never been able to accomplish this task, I'm amazed at the ability y'all have to make these look real.
If you want to reply, then register here. Registration is free and your account is created instantly, so you can post right away.