Which is better? Lightroom or Photoshop?
Sep 25, 2018 14:40:25 #
amfoto1
Loc: San Jose, Calif. USA
It comes up often here.... People asking "Which do I need? Lightroom or Photoshop?" My usual answer is "Both!" Hopefully the following will illustrate why.
There are things that each program is great at doing! And other stuff... well not so much.
Lightroom is a powerful organizing, cataloging, and archive management tool... with "lite" image editing and optimization capabilities.
Photoshop is just about the most powerful image editing and optimization program... with minimal organizing & archive management.
Some people get by with just one or the other.... Maybe they only share their images online and don't really need the extensive image editing capabilities of PS. Or maybe they only work with a small number of images, have an independent method of handling their image archives and are fine using only Photoshop.
Or maybe those folks only using one or the other program simply don't know what they're missing.
A couple recent shoots resulted in a some examples that I though might be informative. As background, I shoot quite a few amateur sporting events, where a day's work usually ends up with 1000+ images. I mostly only shoot RAW (on rare occasions, RAW + JPEG... never just JPEGs). Back home afterward I copy all the images from my memory cards to my computer ("copy" leaves the originals on the card for now, as a precaution). Once I've done so I import into Lightroom and start sorting, inspecting focus and composition, etc. At the same time I'll often do very quick tweaks to color and exposure if needed, straighten and set a crop (mostly just 3:2 or 5:4... though occasionally a panoramic). While working through the images I also "white flag" the select images that I want to export as proofs, then do so in batches and upload those into online galleries for clients to view and make their selections.
The last event I ended up with approx. 1500 RAW images and by the end of the day I'd downloaded all to my computer, imported into LR where I sorted them into sequential order, renamed them and backed them up. I also have LR apply a couple "universal" things, that I do to all my images.... such as adding copyright info and implementing lens profiles. Then I stared working through them individually in LR, usually spending less than 30 seconds per image on the tweaks. At the same time I use the LR color and star system purely for organization (sorting by competitor, in this case). I mark the images I want to proof out with a "white flag", the ones that are bad for some reason or another (missed focus, for example) with a "black flag" and just leave a lot of images that are marginal or duplicates un-flagged.
Periodically I export batches (usually between 25 and 100 images) of watermarked, proof quality RAW conversions into folders I've prepared for them (a folder for each competitor). In the end, I had about 600 "keepers" from that day's shoot (and only twelve images "black flagged" for focus issues). While I'm doing this, I'm also uploading batches of images from the folders into corresponding online galleries (I only display images online for which I have a signed model release). It took two days to complete the process with this particular event, 600 imaged proofed out of 1500 total, uploaded into 9 different galleries for customers to see.
You'll notice, up to this point I have not used Photoshop at all. The emphasis has been on speed... getting modest size JPEG proofs up online quickly for people to review. This is where Lightroom excels.
After folks have made their selections, I start to get orders for images. The orders can be any number of image uses: digital downloads at different quality levels, prints on around 200 different products, images for use on websites or in publications, etc. I typically don't know in advance exactly how an image will be used (or even if it will be used). Once I get an order, I go back to LR to locate the image, make any necessary adjustments that are possible there (such as changing the crop), and maybe fine tune the color, contrast, yada, yada.... then pass it off to Photoshop for finishing as a TIFF or PSD, in 16-bit mode.
Once it's in Photoshop I start doing the more "serious" editing. How much is needed varies tremendously... It might involve noise reduction, selective color balance and or exposure adjustments, removal of some unwanted elements in an image, correcting any chromatic aberration and much more. Finally ending up re-sizing the image for it's intended use and sharpening it as needed (using various methods... sometimes sharpening is done selectively, too). This work is relatively easy in Photoshop, but most of it would be difficult or impossible in Lightroom. Here's an example...
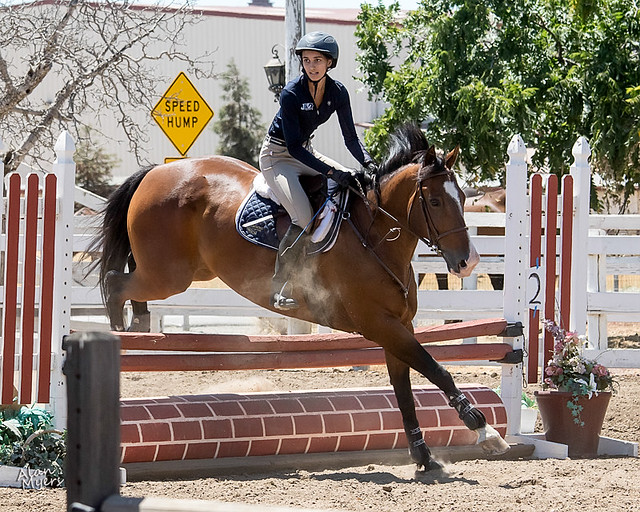
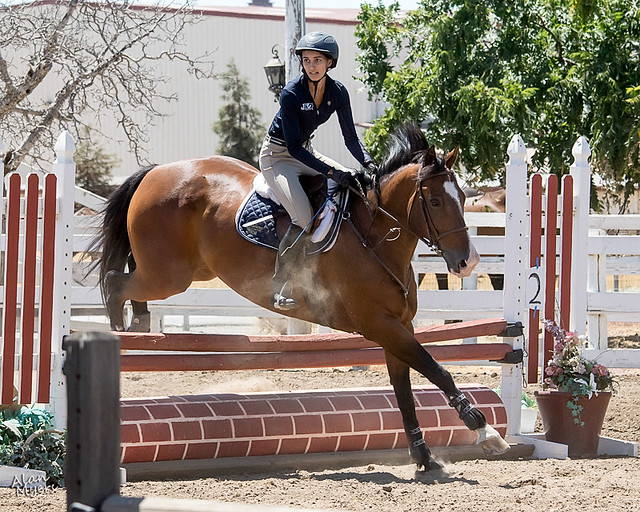
Above image was great... except for the yellow "speed bump" sign (recently installed by the city). On the one hand, it's a bit humorous. On the other hand, it's pretty distracting from the subject of the image! The customer wanted a digital file to use on her website. I decided to provide her with two copies of it: One with the sign, the other without. Removing the sign was a fairly quick, easy fix in Photoshop... probably could have been done in Lightroom, too, though not as quickly, neatly or easily.
Here's a more complex example...
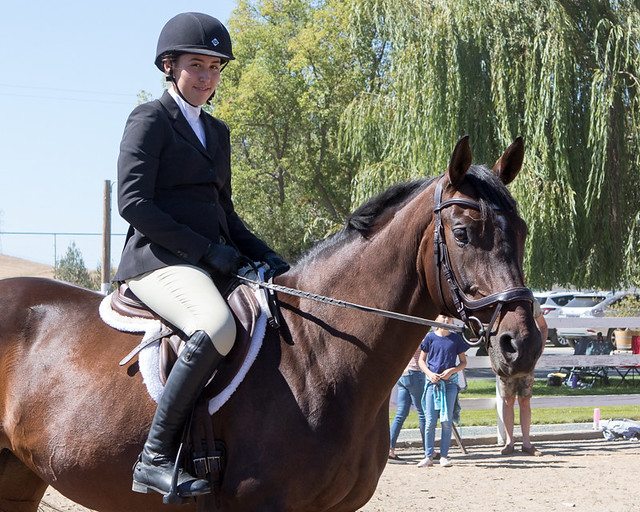
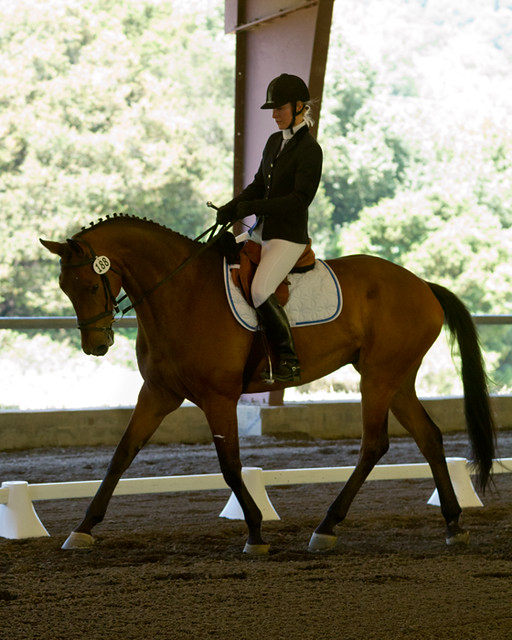
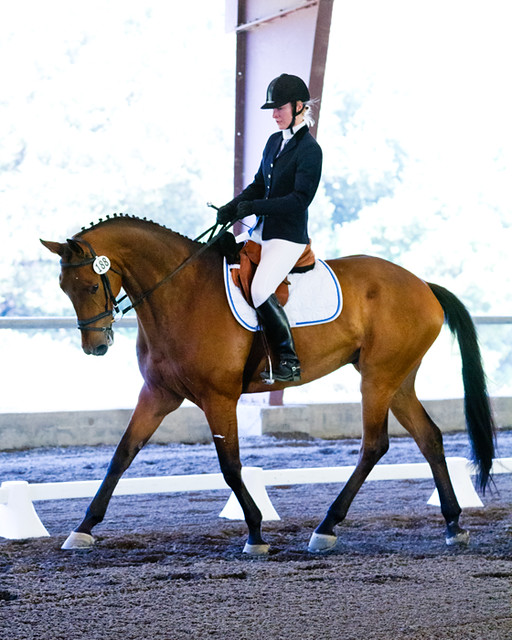
I'd been trying to get a smile from this rider and an alert pose from her horse all day! They were both "very serious" in the arena. Finally got a shot as they relaxed after leaving the arena, but the background sucks! I hate the pole "growing" from the horse's back and the legs "hanging" from it's nose, not to mention the other people and paraphernalia. A couple details to show them more clearly...
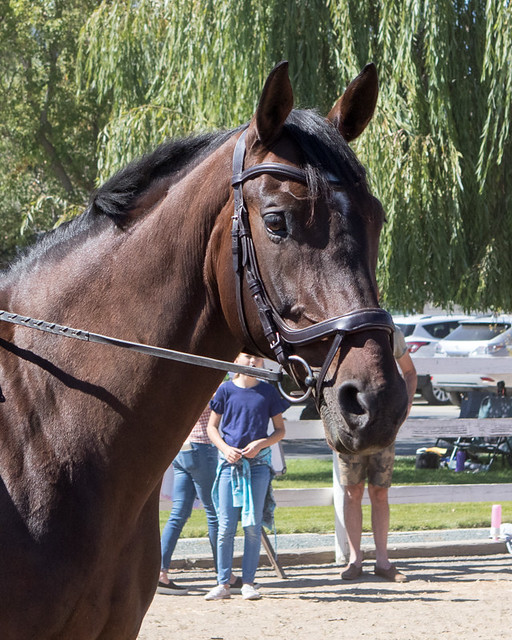
Photoshop to the rescue! It took a couple hours work using layers, cut and paste, cloning tools, color replacement, blur tools, dodging and burning.... But for the size it's going to be used, I'm happy with the results:
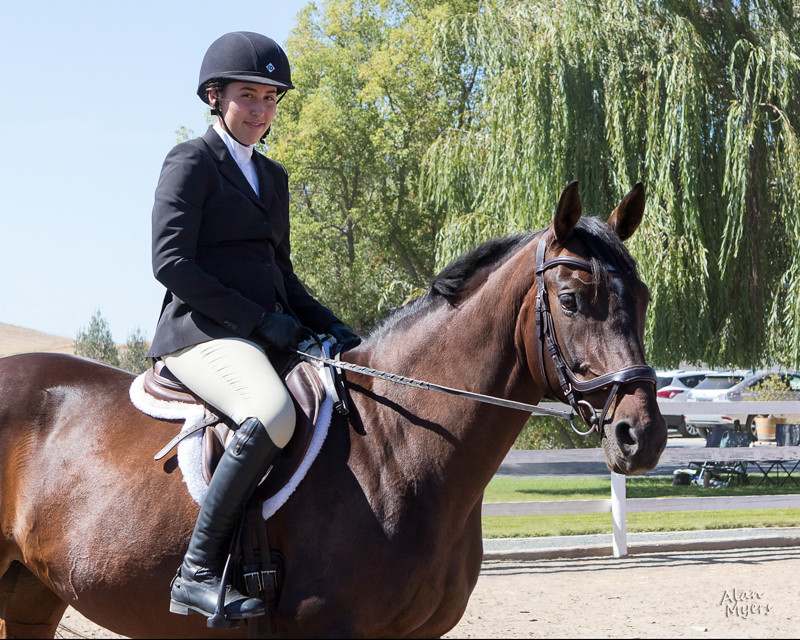
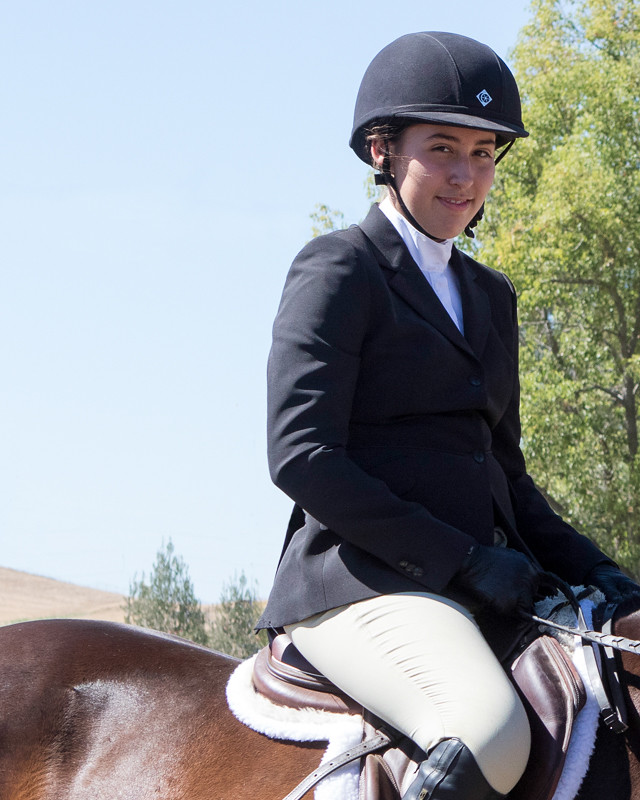
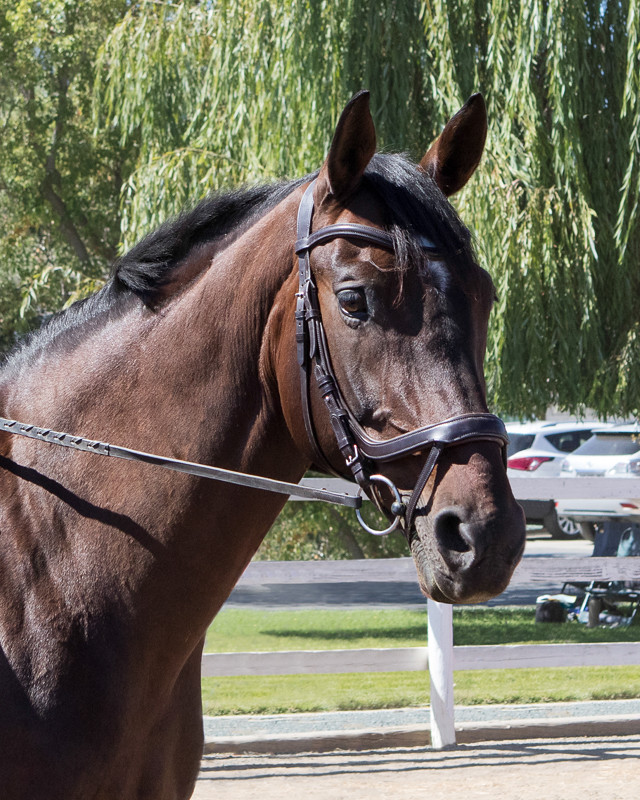
As you can see, perhaps better in the detail crops, the wires and poles are gone. And the people in the background have been deleted, as well as other background objects either removed or tones down by changing their color. To make it look natural meant some burning, dodging... as well as some blurring and blending. Some of the work was done with the image hugely magnified, at a pixel level, with brush sizes as small and precise as 2 or 3 pixels.
My goal when I edit an image in Photoshop is to improve it, while keeping it looking natural and "true to the subject". I know some people feel "Photoshopping" is "bad" and resist using it for that reason. They think it has some negative connotations and is dishonest. I've seen edits done with PS that I didn't agree with, that changed the nature of the subject. But I always try to maintain the authenticity of the image and don't hesitate to improve it a little. For example, in this case I left some of the more distant and, IMO, less distracting objects in the background. Maybe I could have done more (removing the cars, for example, which would have been difficult to do well). For another purpose, such as photojournalism, I might do less. You be the judge.
Finally, here's another, older example...

Note: Above image is slightly over-saturated deliberately, due to how it was going to be printed. It was shot in a covered arena where lighting is almost always a challenge. There's the bright daylight outdoors versus shaded areas inside which - depending upon the time of day - might be illuminated by a mix of direct daylight, reflected daylight, daylight through some diffuse (and dirty) skylights, and sodium vapor lamps! The difference between indoor and outdoor lighting is pretty extreme. No camera can manage the exposure range, let alone deal the different color balances. It's equally impossible to deal with using a filter (they don't make ND grads in this shape, to the best of my knowledge ). And since the subjects are in motion, it's also largely impossible to deal with by making multiple in-camera exposures at different settings (such as HDR technique... which also would slow down shooting a great deal, likely causing me to miss a number of other shots).
To deal with this I located the image in Lightroom and first made a virtual copy of it there. Still in Lightroom, I then adjusted the exposure of one version as best possible to retain some of the exterior detail and daylight color balance. The other version I adjusted for the shaded subject... both exposure and color balance. I then opened both versions, as shown below, in Photoshop...
Once the images were open in Photoshop (as full size, 16-bit TIFFs or PSDs) I did some other things to each, but the most important thing was selecting one and pasting it as a new layer over the other. I then used Photoshop's Layers and Masks to combine the "correct" portions from each into the single, finished image seen further above. I actually found the "outdoor" version a bit too strong and ended up using the layer transparency setting to dial it back a bit. All this would be impossible to do in Lightroom.
There's other stuff that can be done in either software. But Lightroom and Photoshop are designed to complement each other, each offering unique strengths. But each also is less than ideal or unsuitable for other things. My point here is to illustrate some of the things I regularly do with images, that require Photoshop and would be impossible if I only used Lightroom... To show why I used both and regularly recommend anyone using just one or the other at least become familiar with the complementary program, learn what it might be able to do for them. I always use Lightroom as described above... But, whenever it will be used for any purpose higher than a modest sized, lower resolution "proof", I also always end up doing at least a little work to truly finish an image in Photoshop.
Besides, if you're subscribing to the CC version, you've paid for both! It just makes sense to download and install both LR and PS, then learn to use them. Yes, Photoshop is complex and has a long, steep learning curve... so the sooner you get started, the better!
Or, just get Elements instead. It's lower cost, perpetual licensed (not a subscription) and is actually more of an "all in one", stand alone software (some people use it in conjunction with LR). Much of the process is similar, combining key aspects of both LR and PS into a single program. One thing, you can only save 8-bit files (i.e., JPEGs, GIFs) from Elements. Still, those meet most non-commercial photographers' needs very well.
There are things that each program is great at doing! And other stuff... well not so much.
Lightroom is a powerful organizing, cataloging, and archive management tool... with "lite" image editing and optimization capabilities.
Photoshop is just about the most powerful image editing and optimization program... with minimal organizing & archive management.
Some people get by with just one or the other.... Maybe they only share their images online and don't really need the extensive image editing capabilities of PS. Or maybe they only work with a small number of images, have an independent method of handling their image archives and are fine using only Photoshop.
Or maybe those folks only using one or the other program simply don't know what they're missing.
A couple recent shoots resulted in a some examples that I though might be informative. As background, I shoot quite a few amateur sporting events, where a day's work usually ends up with 1000+ images. I mostly only shoot RAW (on rare occasions, RAW + JPEG... never just JPEGs). Back home afterward I copy all the images from my memory cards to my computer ("copy" leaves the originals on the card for now, as a precaution). Once I've done so I import into Lightroom and start sorting, inspecting focus and composition, etc. At the same time I'll often do very quick tweaks to color and exposure if needed, straighten and set a crop (mostly just 3:2 or 5:4... though occasionally a panoramic). While working through the images I also "white flag" the select images that I want to export as proofs, then do so in batches and upload those into online galleries for clients to view and make their selections.
The last event I ended up with approx. 1500 RAW images and by the end of the day I'd downloaded all to my computer, imported into LR where I sorted them into sequential order, renamed them and backed them up. I also have LR apply a couple "universal" things, that I do to all my images.... such as adding copyright info and implementing lens profiles. Then I stared working through them individually in LR, usually spending less than 30 seconds per image on the tweaks. At the same time I use the LR color and star system purely for organization (sorting by competitor, in this case). I mark the images I want to proof out with a "white flag", the ones that are bad for some reason or another (missed focus, for example) with a "black flag" and just leave a lot of images that are marginal or duplicates un-flagged.
Periodically I export batches (usually between 25 and 100 images) of watermarked, proof quality RAW conversions into folders I've prepared for them (a folder for each competitor). In the end, I had about 600 "keepers" from that day's shoot (and only twelve images "black flagged" for focus issues). While I'm doing this, I'm also uploading batches of images from the folders into corresponding online galleries (I only display images online for which I have a signed model release). It took two days to complete the process with this particular event, 600 imaged proofed out of 1500 total, uploaded into 9 different galleries for customers to see.
You'll notice, up to this point I have not used Photoshop at all. The emphasis has been on speed... getting modest size JPEG proofs up online quickly for people to review. This is where Lightroom excels.
After folks have made their selections, I start to get orders for images. The orders can be any number of image uses: digital downloads at different quality levels, prints on around 200 different products, images for use on websites or in publications, etc. I typically don't know in advance exactly how an image will be used (or even if it will be used). Once I get an order, I go back to LR to locate the image, make any necessary adjustments that are possible there (such as changing the crop), and maybe fine tune the color, contrast, yada, yada.... then pass it off to Photoshop for finishing as a TIFF or PSD, in 16-bit mode.
Once it's in Photoshop I start doing the more "serious" editing. How much is needed varies tremendously... It might involve noise reduction, selective color balance and or exposure adjustments, removal of some unwanted elements in an image, correcting any chromatic aberration and much more. Finally ending up re-sizing the image for it's intended use and sharpening it as needed (using various methods... sometimes sharpening is done selectively, too). This work is relatively easy in Photoshop, but most of it would be difficult or impossible in Lightroom. Here's an example...
Above image was great... except for the yellow "speed bump" sign (recently installed by the city). On the one hand, it's a bit humorous. On the other hand, it's pretty distracting from the subject of the image! The customer wanted a digital file to use on her website. I decided to provide her with two copies of it: One with the sign, the other without. Removing the sign was a fairly quick, easy fix in Photoshop... probably could have been done in Lightroom, too, though not as quickly, neatly or easily.
Here's a more complex example...
I'd been trying to get a smile from this rider and an alert pose from her horse all day! They were both "very serious" in the arena. Finally got a shot as they relaxed after leaving the arena, but the background sucks! I hate the pole "growing" from the horse's back and the legs "hanging" from it's nose, not to mention the other people and paraphernalia. A couple details to show them more clearly...
Photoshop to the rescue! It took a couple hours work using layers, cut and paste, cloning tools, color replacement, blur tools, dodging and burning.... But for the size it's going to be used, I'm happy with the results:
As you can see, perhaps better in the detail crops, the wires and poles are gone. And the people in the background have been deleted, as well as other background objects either removed or tones down by changing their color. To make it look natural meant some burning, dodging... as well as some blurring and blending. Some of the work was done with the image hugely magnified, at a pixel level, with brush sizes as small and precise as 2 or 3 pixels.
My goal when I edit an image in Photoshop is to improve it, while keeping it looking natural and "true to the subject". I know some people feel "Photoshopping" is "bad" and resist using it for that reason. They think it has some negative connotations and is dishonest. I've seen edits done with PS that I didn't agree with, that changed the nature of the subject. But I always try to maintain the authenticity of the image and don't hesitate to improve it a little. For example, in this case I left some of the more distant and, IMO, less distracting objects in the background. Maybe I could have done more (removing the cars, for example, which would have been difficult to do well). For another purpose, such as photojournalism, I might do less. You be the judge.
Finally, here's another, older example...
Note: Above image is slightly over-saturated deliberately, due to how it was going to be printed. It was shot in a covered arena where lighting is almost always a challenge. There's the bright daylight outdoors versus shaded areas inside which - depending upon the time of day - might be illuminated by a mix of direct daylight, reflected daylight, daylight through some diffuse (and dirty) skylights, and sodium vapor lamps! The difference between indoor and outdoor lighting is pretty extreme. No camera can manage the exposure range, let alone deal the different color balances. It's equally impossible to deal with using a filter (they don't make ND grads in this shape, to the best of my knowledge
). And since the subjects are in motion, it's also largely impossible to deal with by making multiple in-camera exposures at different settings (such as HDR technique... which also would slow down shooting a great deal, likely causing me to miss a number of other shots). To deal with this I located the image in Lightroom and first made a virtual copy of it there. Still in Lightroom, I then adjusted the exposure of one version as best possible to retain some of the exterior detail and daylight color balance. The other version I adjusted for the shaded subject... both exposure and color balance. I then opened both versions, as shown below, in Photoshop...
Once the images were open in Photoshop (as full size, 16-bit TIFFs or PSDs) I did some other things to each, but the most important thing was selecting one and pasting it as a new layer over the other. I then used Photoshop's Layers and Masks to combine the "correct" portions from each into the single, finished image seen further above. I actually found the "outdoor" version a bit too strong and ended up using the layer transparency setting to dial it back a bit. All this would be impossible to do in Lightroom.
There's other stuff that can be done in either software. But Lightroom and Photoshop are designed to complement each other, each offering unique strengths. But each also is less than ideal or unsuitable for other things. My point here is to illustrate some of the things I regularly do with images, that require Photoshop and would be impossible if I only used Lightroom... To show why I used both and regularly recommend anyone using just one or the other at least become familiar with the complementary program, learn what it might be able to do for them. I always use Lightroom as described above... But, whenever it will be used for any purpose higher than a modest sized, lower resolution "proof", I also always end up doing at least a little work to truly finish an image in Photoshop.
Besides, if you're subscribing to the CC version, you've paid for both! It just makes sense to download and install both LR and PS, then learn to use them. Yes, Photoshop is complex and has a long, steep learning curve... so the sooner you get started, the better!
Or, just get Elements instead. It's lower cost, perpetual licensed (not a subscription) and is actually more of an "all in one", stand alone software (some people use it in conjunction with LR). Much of the process is similar, combining key aspects of both LR and PS into a single program. One thing, you can only save 8-bit files (i.e., JPEGs, GIFs) from Elements. Still, those meet most non-commercial photographers' needs very well.
Sep 25, 2018 14:45:04 #

Sep 25, 2018 14:58:58 #

Sep 25, 2018 15:01:56 #
WJB
Loc: Salisbury, MD
Thank you very much. For me, up to now, I've only used Lightroom. But, since I can now see better the possibilities, I'll sign up for Photo Shop.
Thanks again,
Bill
Thanks again,
Bill
Sep 25, 2018 15:11:09 #
amfoto1 wrote:
...up to this point I have not used Photoshop at all. The emphasis has been on speed... getting modest size JPEG proofs up online quickly for people to review. This is where Lightroom excels...
While I agree that both programs are useful (if not essential) Lightroom is not just for Preliminary Proof Production.
First of all, not all of us are in business to sell prints. Probably most of us take photos for our own purposes, possibly for distribution to family members on occasion. For those people many of them can get by with LR alone, although if there's an interest in polishing an image, PS is a great tool.
For myself, my average image stops at LR. It has enough tools in the kit to produce reasonable images. Occasionally I have to go to PS, but it's something like 10% of the keepers that go there. (The keepers are on the order of 10% of the total). But the main reason I use LR is that it makes it possible to find images down the road. As I age, my memory develops holes that things fall through. With LR, I can enter a keyword (e.g. a name) and LR will show me all the images I have that fit that criterion. That includes things that I took so long ago I can't even remember taking the shot.
Were it not for that aspect of LR, I could use most any editing program to develop my raw image files. But some of them would still be run through PS for those special things I want to do with them. That includes swapping heads (to get everyone smiling and eyes open in a group shot) and image transmogrification. Some people would call it a crutch, but when my memory limps, a crutch is most helpful.
Years ago in grad school we had a toolmaker who said "better is the enemy of good enough". It sometimes takes a bit of experience to recognize just where "good enough" is. For family shots, my family is pretty forgiving. They are even happy with iPhone photos taken in low light. So I don't have to polish everything to the same extent.
Sep 25, 2018 15:17:11 #
Sep 25, 2018 15:18:42 #
Sunnely
Loc: Wisconsin
amfoto1 wrote:
It comes up often here.... People asking "Whi... (show quote)
All I can say is, WOW!
I have both PS and Lr but I almost always use Lr alone and happy with results.
Thanks for the info and accompanying illustrations.
Sep 25, 2018 15:22:46 #
loosecanon
Loc: Central Texas
Over my head but beautifully explained--with clear examples. You're a good teacher.
Sep 25, 2018 15:40:36 #
Since each of us shoots differently, LR & PS are great tools to develop an efficient and personalized workflows - when traveling I typically shoot 300-1000 images per day; my SONY 77 allows me to shoot both std and HDR at the same time, so there's a lot of quick editing to do. on tour, I dont always have time (or energy) to get through a complete day's shoot. I use the old WIndows Photo Viewer to do this since it's faster than either program allowing quick views at 100% and deletes. then each day goes into a prelim folder until I run them thru LR for its easy renaming. images are now named YYMMDD-xxx and go into a holding folder
most of my images will be sent to microstock agencies, so each needs detailed caption & keywording. (I do some of this with a beer in the bar, but editing is done later.) I take 100 image batches and add metadata thru LR since it handles this much easier and quicker than PS. the captioned images are then sorted to those that can be submitted directly; those needing resizing to increase sharpness (LR) and those needing further editing (PS)
'to-edit' images are sent to subfolders based on need for adjustment (to remove minor trademarks and personal data such as icense plates);dust or sensor spot removal; straightening; lighting changes, etc
i'll later concentrate on one type of PS editing and those images eventually find their way to the agencies. a bonus feature of thois system is that images from one shoot get sent to agencies over time, ensuring a constant stream of new images (helps in display in agencies)
some days create large number of images that need the same edit (esp'ly lighting on cloudy days where quick autotone or leveling is needed, or same small sensor dot needs removal) PS excels at setting up quick batch scripts
Since my workflow leaves images in many different (but efficient) folders, i dont use the cataloging of LR. instead i archive the original image, replacing it later with an unaltered but metadata image, and then separately any edits.
Sep 25, 2018 16:09:53 #
Sep 25, 2018 16:29:24 #

With the new ON1 update coming out in December with cataloging capabilities, it looks like you’ll basically get both in one program.
Sep 25, 2018 16:50:35 #

jaymatt wrote:
With the new ON1 update coming out in December with cataloging capabilities, it looks like you’ll basically get both in one program.
Close but not quite. It still lacks the refinement of Photoshop in certain areas - Content aware operations, high pass sharpening, general noise reduction, spot healing brush, Creative Brushes, Layer Styles/Blend If CMYK and Lab Color Modes, etc. On the other hand there is no program I'd rather have for really accurate selections and masking. It would be great if it had the option to Apply Image, Stackmode with Smart Objects etc. I still have a bone to pick with On1 Raw - they took away the Quick Mask tool from the Effects Module and haven't put it back. It still has some distance to go before it will replace Lightroom and Photoshop.
Sep 25, 2018 16:53:35 #

This write-up shows some good examples of editing that are better performed in PS. But, to present Lightroom as nothing more than a catalog system, culling tool and basic editor for creating low-grade JPEGs is factually incorrect. To quote Adobe's own marketing literature, my emphasis:
Lightroom offers a broad range of state-of-the-art tools for developing individual images and for efficiently adjusting many images at once. Switch to Photoshop for pixel-level precision, intelligent content-aware editing, and advanced tools for masking, layer blending, realistic painting, compositing, selecting intricate image content, and more.
https://www.adobe.com/creativecloud/photography.html
Most images do not require pixel-level editing (nor multi-image composites, nor text, nor intricate selection of content, nor the so forth ...) where PS is by far superior. Example, to completely remove the sign from the first edit example is a minute or few in LR with experience that would not include the conversion back n forth from RAW to 16-bit TIFF into PS and back to LR. At the pixel level, maybe / maybe not LR would be as 'complete' as the corresponding PS edit for this example. But, given that edit is to remove a background distraction rather than the focus of the image, it doesn't / shouldn't really require a pixel-level editor to remove. The example of removing the people below the horse, that's a much more relevant example. Trying to make the same edit in LR is an exercise in frustration. Another approach would be to step the left or right while shooting to control the background or ask the rider or people to move. Not always an option, but something to consider rather than creating a complex edit later.
Photoshop is the gold standard, no argument there. Thankfully, most digital images don't require that level of editing.
Sep 25, 2018 16:58:31 #
amfoto1 wrote:
It comes up often here.... People asking "Whi... (show quote)
The answer to your question is a resounding YES!!!
BTW, you were late on the first shot - the forelegs should be tucked under the chest, ears forward and but rider and ride fully concentrating and anticipating the landing. I'm just being fussy, with a little chain yanking tossed in. Excellent article and illustrations.
I might add that I agree 100% with the proof nature of Lightroom and ACR. People who "get by" with no further editing are often, as I like to say, "leaving money on the table". They stop short of a truly finished image, perhaps because they are ok with the results. I look at a lot of Lightroom-only images and see so much unrealized potential. But then again, many are just doing post processing for themselves and tend to be less critical than a creative director or gallery owner/manager - where all aspects, including the small, often overlooked details, matter. There clearly is a world of difference between the hobbyist/enthusiast and the working successful pro - and it can be found in the details and small stuff.
Sep 25, 2018 17:38:22 #

If you want to reply, then register here. Registration is free and your account is created instantly, so you can post right away.