need some help!!
Oct 11, 2011 14:10:57 #

I am in a photography class and we had to take pictures this week of portraits of strangers..i saw something in this picture but cannot decide how to edit it. the portraits did not have to be of just their face..just to kinda explain why it is just of him reading..so if you have any suggestions i would greatly appreciate it! (also could not decided which one looked better!)
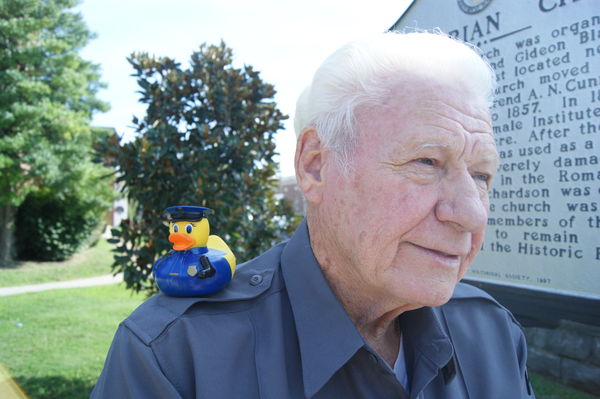
and the old man just looked so adorable sitting on this wall and reminded me of my grandfather but just like the other one im not sure how to edit it so his hair and the sky blend together. its not over exposed or anything the sky was jus pure white and i was having issues with my camera that day...so any suggestions would be awesome! thank you!
and the old man just looked so adorable sitting on this wall and reminded me of my grandfather but just like the other one im not sure how to edit it so his hair and the sky blend together. its not over exposed or anything the sky was jus pure white and i was having issues with my camera that day...so any suggestions would be awesome! thank you!


Oct 11, 2011 14:28:02 #

Oct 11, 2011 14:37:38 #

Oct 11, 2011 14:46:40 #
its the sony a390..the old man was shot at 1/640 and f5 and the guy was shot at 1/800 and f4 and the second guy one was shot at 1/1250 and f4...
ryan, i will try to do that thank you! do you think i should add any effect to it?
ryan, i will try to do that thank you! do you think i should add any effect to it?
Oct 11, 2011 17:44:31 #
I'm working on it right now. I'll send you a copy of my results and how you can achieve it with editing as soon as I'm done.
caitlyn13 wrote:
I am in a photography class and we had to take pic... (show quote)
Oct 11, 2011 19:09:57 #
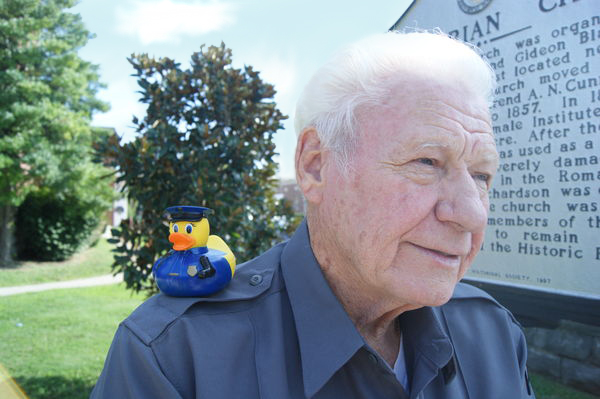
Ok, here it finally is. Lots of fun playing with it even though it took a while. I enjoy doing this because I always learn something new. It is actually not that complicated but I tried several approaches to see what was the easiest. Here's what I did with photoshop elements 9. I hope you have a similar program or can translate this into the program you have. Enlarge you photo to aprox 250 % (this amount would vary with different photos depending on how large the original photo was). If all along the line you want to see what your work looks like at 100% just switch to that and then go back to the enlarged to work. Position the photo so you can see the entire area you will be working on. You must always set the feather amount before selecting the area. Go into select/feather. Select 99%. I took magic want set at 15% tolerance. I selected the sky area. The very top of the hair is pure white and you'll get some of that in your selection. However, play around with touching your magic wand in different areas of the sky until you get all of the sky (including the pale blue in the left corner) and only a little hair. Then select the paint brush tool and set at approx 7px and 100% opacity. Chose the color you want for the top of the sky (the top is always darker than the bottom). Do pick a fairly light color because it will look darker when you paint a larger area. If you picked darker or lighter than you want just go back in and select a new color and try that. You will first put a small band around the hair where the sky touches it. The small area of hair that will be included in your selection is near the shed. In this area you will have to use your judgement where the hair line is when painting in sky. I will continue this on the next comment in case there is a limit to how much you can write in one. The pictures are attached to this one.
original photo
edited photo
Oct 11, 2011 19:53:22 #
Part 2 ;-) As you see on the edit I put clouds in the sky. You don't need to if you don't want to. I will tell you later how just in case you do. With your brush tool paint a narrow line along hair line from right to left until it is over about 1/2 of the hair. Change your brush setting to 60%. (FYI: do not repeat going over same area with the brush set at less than 100% because it will continue to make it darker with each pass). With the previously set 3% feather the paint will barely lap into hair and should not show. (FYI; the larger you set the feather, the larger the gradual lightening of what you are painting will be). With the 60% setting do the narrow line down so it covers about 1/2 of the remaining hair. Set brush to 40%. Paint a narrow line next to the rest of the hair and a little into the ear area. Deselect the selected area. Now, the color of Your lines may be slightly darker than when you paint the larger sky area. The way to fix this is to select the smudge tool. Set it at about 25px and 38%. Use this brush to carefully touch the edge of your previously painted sky (don't touch hair or shed because then those colors will smudge into the sky). Smudge out and up to blend that edge into some of the white area of the sky that is near your work. Keep smudging until you are happy with it. The edge where you painted should be not visible when you are done. Now set feather to 99%. Use magic wand (set to about 35 tolerance) to select the sky area. You want to select all of the sky including the blue parts and part of the hair will also end up selected but don't worry about that. Play around with where you need to put your magic wand until it selects this way. Select the paint brush tool. Set it to about 100px and 100 % opacity. Now it gets easier!
Select the paint brush tool and set to about 100px and 100% opacity. Paint a large area across the top of the photo overlapping the treetop a tiny bit. Make sure not to touch hair where it is in the selection. Set the paint tool to 20px and 42%. If you want any clouds that touch the tree leave the cloud areas untouched. Paint the rest starting where the top color fades out. Deselect. Check the sky to see if any small parts of the sky did not get colored. If so deselect. Select the brush tool and set to about 20px. Especially check upper right corner near shed roof. and along hair. If there is any missed you should now retouch those areas carefully so as not to touch any non-sky areas. Use 100% strength brush for top sky area touch up and 42% brush for lower areas. If you want to put clouds into the sky use the dodge tool (found in same place you click for sponge or burn). Dodge will lighten the cloud areas. Set dodge tool to 12px and 40% exposure. Lighten the cloud area you desire in the sky. Select the smudge tool (in area with blur tool) and set for 20px and 50% strength. Smudge outward starting at the cloud to soften edges and shape cloud an any way you desire. (a unicorn perhaps? :lol: ) You may find a small area on the hair about half way down where the hair was so white at the edge that the hair appears to be sky or white. You can get rid of that easily by either cloning or smudgin outward until it is covered. If any questions you may PM me. Good luck. If you do it I would love to see your results. Just add it to this thread. That being said, if you prefer you can skip all this. Just select the sky as you did in the beginning. Select a very pale blue color. Select the paint brush tool and set to 100px and 100% strength and paint making sure to miss the bit of hair that is also selected. I probably should have put that first!
Select the paint brush tool and set to about 100px and 100% opacity. Paint a large area across the top of the photo overlapping the treetop a tiny bit. Make sure not to touch hair where it is in the selection. Set the paint tool to 20px and 42%. If you want any clouds that touch the tree leave the cloud areas untouched. Paint the rest starting where the top color fades out. Deselect. Check the sky to see if any small parts of the sky did not get colored. If so deselect. Select the brush tool and set to about 20px. Especially check upper right corner near shed roof. and along hair. If there is any missed you should now retouch those areas carefully so as not to touch any non-sky areas. Use 100% strength brush for top sky area touch up and 42% brush for lower areas. If you want to put clouds into the sky use the dodge tool (found in same place you click for sponge or burn). Dodge will lighten the cloud areas. Set dodge tool to 12px and 40% exposure. Lighten the cloud area you desire in the sky. Select the smudge tool (in area with blur tool) and set for 20px and 50% strength. Smudge outward starting at the cloud to soften edges and shape cloud an any way you desire. (a unicorn perhaps? :lol: ) You may find a small area on the hair about half way down where the hair was so white at the edge that the hair appears to be sky or white. You can get rid of that easily by either cloning or smudgin outward until it is covered. If any questions you may PM me. Good luck. If you do it I would love to see your results. Just add it to this thread. That being said, if you prefer you can skip all this. Just select the sky as you did in the beginning. Select a very pale blue color. Select the paint brush tool and set to 100px and 100% strength and paint making sure to miss the bit of hair that is also selected. I probably should have put that first!
Oct 12, 2011 12:26:29 #
thank you so much! i was having such a hard time figureing out how to do the sky i use lightroom the majority of the time so i will try to do that!!
Oct 12, 2011 13:00:45 #
You know I didn't notice the yellow something in the lower left corner. If this is the photo you decide to use, you might want to consider cloning it out.
caitlyn13 wrote:
thank you so much! i was having such a hard time figureing out how to do the sky i use lightroom the majority of the time so i will try to do that!!
Nov 7, 2011 02:37:26 #

If you want to reply, then register here. Registration is free and your account is created instantly, so you can post right away.