Have some Photoshop questions....
Sep 14, 2018 11:03:01 #
Hello;
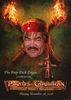
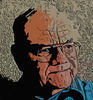
Attached is an image that I photographed at a Pow Wow quite a while back, printed on stretched canvas, after which my wife painted over it, (adding some features such as as stylized ribbons...)
We have quite a few others that we would like to do the same thing with, but are in need of the following help; (to get it done properly and quickly.)
-How can I quickly "cut and paste?" an image that we want to put against a solid color background? (When I try to use the quick selection tool, not only does it take long, but cuts out small details.) I have TRIED learning layers, but have not had much success at all...
-Does anyone know how to prepare an image for getting it printed on stretched canvas? A lot of time we get it back with the things cut off because it was too close to one of the edges. Is there a formula, on a way to make (say) a white border around the desired image, so that when the printer receives it, the complete wanted image is showing, and the border is wrapped around the sides?
Hope this gibberish makes sense to some members...
Sep 14, 2018 11:07:43 #
buddah17 wrote:
Hello; br Attached is an image that I photographed... (show quote)
Image not attached.
Sep 14, 2018 11:12:41 #
Sep 14, 2018 11:16:10 #

All things are possible with Photoshop. Some not as quickly as others. In general, if you can think of what you want, it can be done.
Sep 14, 2018 11:17:39 #
I went back to my original posting, and edited it to include the image. Is the image now there? (I can't see it on this end...)
Largobob wrote:
Image not attached.
Sep 14, 2018 11:21:05 #

buddah17 wrote:
I went back to my original posting, and edited it to include the image. Is the image now there? (I can't see it on this end...)
No
Sep 14, 2018 11:29:22 #
* * *
Here is a short 11-minute video doing what you want in a much, much, MUCH quicker method using a PS alternative program... ($50) ...
IF your time to complete a mask in PS is costing you more than that... it might very well solve your problem with much less aggravation...
actually NONE at all. . . (enjoy) ... available in both PC and Apple ... I run it on both...
https://www.youtube.com/watch?v=lnurTrgE85M
Until that time. . .
Sep 14, 2018 11:41:12 #
Thanks will check it out...
EarlJ wrote:
* * *
Here is a short 11-minute video doing what you want in a much, much, MUCH quicker method using a PS alternative program... ($50) ...
IF your time to complete a mask in PS is costing you more than that... it might very well solve your problem with much less aggravation...
actually NONE at all. . . (enjoy) ... available in both PC and Apple ... I run it on both...
https://www.youtube.com/watch?v=lnurTrgE85M
Until that time. . .
Here is a short 11-minute video doing what you want in a much, much, MUCH quicker method using a PS alternative program... ($50) ...
IF your time to complete a mask in PS is costing you more than that... it might very well solve your problem with much less aggravation...
actually NONE at all. . . (enjoy) ... available in both PC and Apple ... I run it on both...
https://www.youtube.com/watch?v=lnurTrgE85M
Until that time. . .
Sep 14, 2018 11:52:33 #
buddah17 wrote:
Hello; br Attached is an image that I photographed... (show quote)
To attach an image, after choosing the file, click the box that says "store original" then add the attachment.
All of the things you want to do can be done. It sounds like a lot of your problems involve not having a basic understanding of how to use the PS tools. The Quick Selection tool actually does a pretty good job. But for the little areas that are either unwanted additions or ones you want included, you need to tweak the selection. For instance, working from inside the selected area, you hold down "Shift" to get a + sign on the cursor, and it will let you nudge the "marching ants" to where you want them. To work from outside the selected area, the cursor is already a minus sign, so you can nudge the "marching ants" from that side. For straight lines you can use the Polygonal Lasso tool by clicking once on the starting point, then clicking again at the end of that straight line or surface you want to outline. For curved edges you can use the Magnetic Lasso tool which detects edges. For all of these, you need to remember that it may take time for the tool to complete its action. Not always, though. Also, if it does not get it exactly right the first time, try again because PS "remembers" and "learns". But it also needs to have clear edges to find. So if your subject blends in with the background, you will have to temporarily make it much brighter or much darker so there is contrast while making the selection. If you want to select a second area without the first one disappearing, hold down Alt while making a second selection.
Learning to use layers is very important to using PS. Without layers, you will risk making what is known as "destructive" edits which cannot be changed without pretty much starting over from the point where you made the edit. Layers allows making editable "non-destructive" changes.
I hope this little bit has been helpful. If you want to learn, there are many places to go. You-tube has video tutorials, but it can be time consuming to find the right ones. There are several individuals that I have used [and am still using] to help with improving my abilities to make use of PS. They have websites for learning tools and Facebook pages for discussions. You can subscribe by the year or purchase tutorials, and the prices are reasonable especially when you need a lot of help. The beauty of it, is that you can work at your own pace and the instructors are pretty much always available to answer questions. Plus the "community" of subscribers are helpful, too.
If you want some names and a bit more description, let me know and I will send you a Private Message.
Susan
Sep 14, 2018 12:05:17 #
Thanks Susan I will need a bit more time to digest this. Gotta go out, but will watch the video from the other menu and go through your procedures more in-depth
SusanFromVermont wrote:
To attach an image, after choosing the file, click... (show quote)
Sep 14, 2018 12:51:29 #
buddah17 wrote:
Hello; br Attached is an image that I photographed... (show quote)
Best to become efficient with layers and things will fall in place, that's what PS is all about!
Sep 15, 2018 09:37:46 #
If you get the latest version of Photoshop CC 2018, it has tools that help to isolate elements in a photo. But only help, it's still hard around areas like hair or woods.. If you have a green screen or a solid color background, that's not the color(s) of your element, then you can do it easier.
I would do the items to be added individually on a clean page, photograph the element and Photoshop that. Once all the elements are done you can make each a Smart Object and add as wanted in layers to other photos.
I would do the items to be added individually on a clean page, photograph the element and Photoshop that. Once all the elements are done you can make each a Smart Object and add as wanted in layers to other photos.
Sep 15, 2018 10:39:01 #
With the select and mask feature in PS CC, you can select very well the hairiest of the hairy.
CPR wrote:
If you get the latest version of Photoshop CC 2018... (show quote)
If you want to reply, then register here. Registration is free and your account is created instantly, so you can post right away.