Getting details in white subjects
Aug 31, 2018 23:50:47 #

Welcome to UHH where you get expert advice, strong conflicting opinions and completely wrong answers. It’s up to the reader to sort them out.
Sep 1, 2018 03:55:41 #
Pablo8
Loc: Nottingham UK.
Plenty of (basic) advice about your picture, and how to improve on it, even at the taking stage. Get that right, and it might be worth adding your name to the print. To me, a signature and 'Photography' / 'Photographer', suggests Professional person.
Sep 1, 2018 08:17:16 #

Have read about and used Exposure Compensation set to a +1 or +2 for snow - works nicely. Might this also be something for you to try?
Sep 1, 2018 08:19:39 #
Ed Walker
Loc: Eclectic, Alabama U.S.A.
MMC wrote:
I am sorry if you do not like it.
Thanks. I appreciate your efforts to help.
Sep 1, 2018 08:26:22 #
Sep 1, 2018 12:46:45 #
The key to white subjects is that if you blow-out the white there is no way to recover the detail because it's just not there. If you expose for the detail of the white usually everything else will be underexposed, BUT you can deal with underexposed because some of the detail is there and can be brought out with post-processing.
Sep 1, 2018 16:44:08 #

There is a trick I learned in Photoshop Elements that works fairly well to adjust white subjects in post. Duplicate the image in Layers. Change the new layer to black and white. Set the blending mode to Luminosity and adjust the transparency of that layer to the desired level. Flatten the layers if you are done.
Sep 1, 2018 17:18:54 #
hassighedgehog wrote:
There is a trick I learned in Photoshop Elements that works fairly well to adjust white subjects in post. Duplicate the image in Layers. Change the new layer to black and white. Set the blending mode to Luminosity and adjust the transparency of that layer to the desired level. Flatten the layers if you are done.
This will get a less bright white but if it's washed out there is no detail to bring out. You'll have a nice smooth white. Useful if you have a photo with a spot or a non critical area that you want to work on.
Sep 10, 2018 01:12:49 #
Ed Walker wrote:
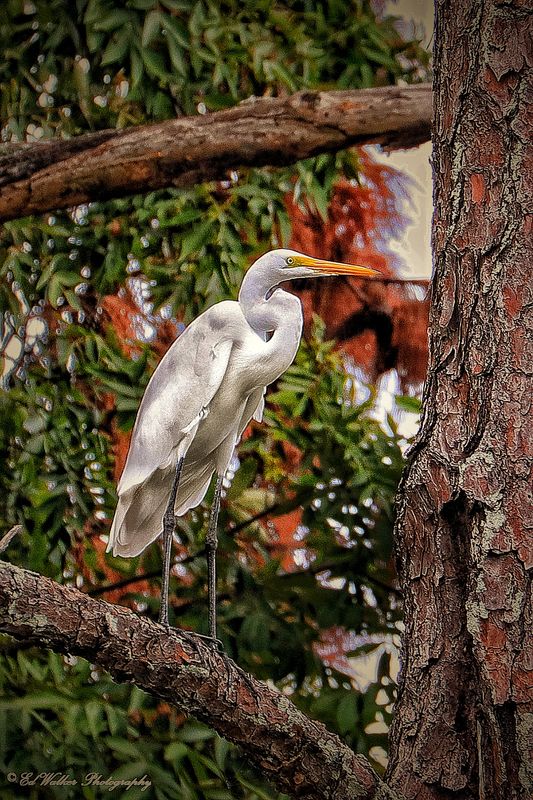
I have great difficulty getting details to show up in white subjects, for example a white flower or bird. Sample attached. Any suggestions will be welcomed. I'm pure amateur, but love making pretty pictures.
This is a tricky situation, no doubt about it:
-- back-lit
-- white, almost uniform subject
-- distracting brackground
-- auto-focus will *love* that tree bark!
-- white subject (medium-toned subjects are easiest to meter)
The good news is the color balance is excellent, and it's a great wildlife subject!
As for the rest:
Image: consider using a circular polarizer filter. It might darken the white sky a bit.
as well as any glare from the feathers. Otherwise, at least use a UV filter, if you didn't already.
Focus: you will have to try to force the camera to focus on the bird. It if refuses to focus on the plumage,
then try the legs. Depth-of-field is about right, IMHO--but it's a matter of taste.
Exposure: select spot metering mode, if your camera supports it, or center-weighted if it doesn't.
Meter on the bird's plumage:
Spot mode: set exposure compensation to +2 stops. Best to bracket exposure:+1.5, +2, +2.5
Center-weighted: set exposure compenstation to +0.5 stop. Best to bracket exposure: +0, +0.5, +1
(I'd have said 3 stops compensation for spot mode, but I think the built-in spot meter is giong to
pick up some flare and see whiter-than-white, so to speak.)
Yes, Linda, this mostly repeats what other people have said, but I hope with more detail.
I'd rather be wrong than vague. :-)
Oct 27, 2018 21:27:11 #

The detail (information) is in your original file. Just adjust the density in your editing until the detail appears. Your exposure is probably correct otherwise the whites would just gray down rather than retain detail.
Oct 28, 2018 11:58:19 #
Ed Walker wrote:
I have great difficulty getting details to show up in white subjects, for example a white flower or bird. Sample attached. Any suggestions will be welcomed. I'm pure amateur, but love making pretty pictures.
Hi Ed. First, nice sharp shot from a boat! Good composition, too. You are doing great as an "amateur." Exposure is one of the most difficult things to learn in digital photography. It can vary so much depending on the circumstances. When I shoot egrets or other white subjects I always expose for the highlights. In fact, in digital photography, exposing for the highlights in most of our shots is the correct thing to do to get the best exposure; there are always exceptions. Shooting for the HL becomes very important when shooting white subjects. Learning to quickly assess the surroundings to determine that you can take up the shadows in post is a good idea. Place your exposure point on the whitest part of the subject, take a quick shot to assess it, and then correct as needed. You don't have to wait for a bird to do this, find something else in the area to test exposure on. If the HL are still too bright, then use -exposure compensation. I, too, often shoot in A mode; if the bird is far away and the day is bright you can start with a mid-range aperture setting and then adjust it as needed. Aperture settings depend on many variables so it would be difficult to tell you exactly where to start. If it's early morning, I open the aperture up all the way and then adjust from that setting as needed but I never go below f/5.6 for birds as a more open setting would not get me enough DOF in many cases and it all happens fairly fast when I start shooting. In any case, always shoot for HL and adjust for shadows when shooting digital. Keep on shooting!
Oct 28, 2018 12:01:13 #
JD750 wrote:
Welcome to UHH where you get expert advice, strong conflicting opinions and completely wrong answers. It’s up to the reader to sort them out.
Had to comment, you are so very right! And some of the so-called "experts," as they have called themselves, might be the most wrong in some cases. I do think, however, we all mean well, for what that is worth! Some of the re-edited shots I see by these "experts" are astounding...
Oct 28, 2018 14:22:50 #
E.L.. Shapiro wrote:
The detail (information) is in your original file. Just adjust the density in your editing until the detail appears. Your exposure is probably correct otherwise the whites would just gray down rather than retain detail.
That' much better, at first glance. The colors are pleasing. But now it looks like
the bird was cut out and pasted on--sharpen filter? And the background is distracting--
which wasn't true in the original. And all the colors seem to be more saturated,
making it phony-looking.
It's probably the best that can be achieved by messing around with PhotoShop.
The exposure wasn't "correct" because the original photo was unacceptable.
However, E.L. Shaprio has proven that it was within the latitude of the sensor.
Oct 28, 2018 14:27:09 #
via the lens wrote:
Had to comment, you are so very right! And some of the so-called "experts," as they have called themselves, might be the most wrong in some cases. I do think, however, we all mean well, for what that is worth! Some of the re-edited shots I see by these "experts" are astounding...
It's too bad when well meaning attempts to assist an OP has to (as oftentimes) include snide comments and inflammatory remarks. Nobody posting in this thread claimed expertise- they just stated their ideas and opinions and provided food for thought. Even in a academic setting, in formal technical classes, their can be different opinions and approaches to the same subject or issue. It is always up to the student or reader to sort things out, experiment and adopt the best method based on actual results. Also- the site provides a downloaded image and the OP approved editing so...if you have an improved edit, why no show it and explain what you would have done?- SHARE!
My own expertise is certainly not in bird photography- I have no knowledge of ornithology- I'm lucky if I can tell a chicken from a duck! I don't know if the bird in the OP's image is actually pure white- oftentimes subjects are perceived as pure white but in actuality contain many other tints and colors some of which are reflected from surrounding objects and other environmental elements.
My actual expertise is in commercial, portrait and wedding photography where the detailed rendition of white fabrics, subjects and products is a frequent requirement. Of course precise exposure is one of the important requirements as is the direction and angle of incidence of the light. Theses elements are easily controlled in a studio or more contrived situation- not as easily coped with in a wildlife environment.
I certainly don't encourage sloppy an or haphazard shooting that requires radical post-processing, however, a photograph made under spontaneous conditions, has an interesting subject and good composition deserves some remedial work, or at least an attempt, to create a higher quality rendition to maker's satisfaction. Theses casual re-edits are usually experimental in nature and again, are just suggestions and are not intended to represent finished salon quality work.
As others have stated, in the effort to preserve highlight detail in "whites" it is important expose accordingly for the highlights and either fill the shadows or depend on adequate dynamic range to properly record shadow and middle-tone detail as well. Under ideal conditions, spot exposure readings are best- as opposed to matrix or integrated readings.This would entail making the spot reading and locking in that exposure setting and then recomposing the image for good composition. Other suggestions such as the use of a CPL filter are all reasonable suggestions, however, in wildlife settings, their may not be time to incorporate all of theses techniques and still capture the subject. This all depends on the photographer's experience and savvy in controlling all theses elements in very small widows of opportunity. Practice makes perfect! As one's skills improve, more attention can be dedicated to focal length usage, depth of field or lack thereof (bokeh) and selective focus can be applied. Folks who are more familiar with the behavior of various birds and animals get to know how long a particular bird or othere animal may remain in place and if there s time to make precise or substitute readings, check out their histogram or even take the time to rotate a polarizing filter. I refer to their expertise.
I have long experience as a custom printer and have participated as a print judge in many professional competitions. I have seen many prints which have scored poorly only because the information on the negative (or file) never made it to the final print- a simple case of minus density. I have also seen many washed out prints because the maker was trying to purify the whites in a subject that is actually not pure white or fake a high key effect where the lighting ratio or contrast is not truly high key.
Oct 28, 2018 15:53:02 #
E.L. Shapiro "I don't know if the bird in the OP's image is actually pure white- oftentimes subjects are perceived as pure white but in actuality contain many other tints and colors some of which are reflected from surrounding objects and other environmental elements."
The attempt to make what appears as pure white to the eye to look pure white in the image can be a trap. A color cast that is part of the environment is not a fault. Trying to correct this is often a cause of an artificial look to the white (?) object. Unlike a camera, the eye automatically adjusts to the surrounding light and the brain calls it white, when it may have a tint.
The attempt to make what appears as pure white to the eye to look pure white in the image can be a trap. A color cast that is part of the environment is not a fault. Trying to correct this is often a cause of an artificial look to the white (?) object. Unlike a camera, the eye automatically adjusts to the surrounding light and the brain calls it white, when it may have a tint.
If you want to reply, then register here. Registration is free and your account is created instantly, so you can post right away.