HDR Results
Aug 29, 2018 18:34:09 #
Sure Admin. will move if not posted in correct location.
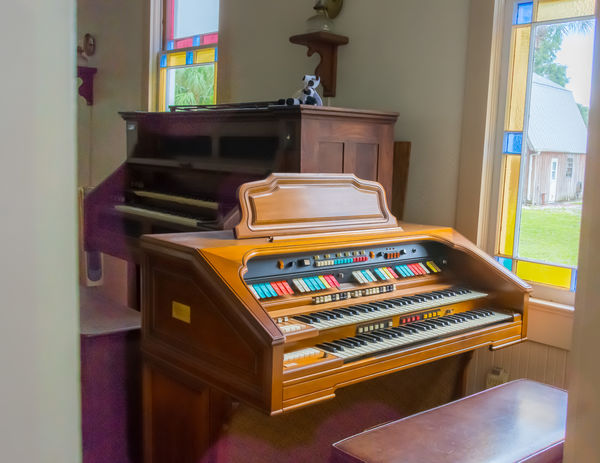
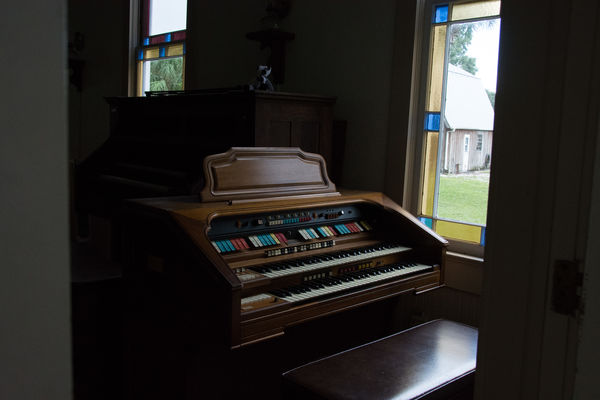
Recently trying to learn bracketing & HDR. I am doing a 5 shot set with a 1 stop or a .7 stop difference between each shot. Objective is to help with interior shots in historic buildings. Trying to keep light coming in windows from being blown out. Not very satisfied with my results. Also might be having some ghosting or some other odd happening. Look at the left side of the image posted.
Using HDR in Lightroom 6. Shooting with a Nikon D7200 and this shot was with my 18-200mm lens.
Any suggestions???
Thanks,
Don
Aug 29, 2018 21:12:24 #
Noticed you were shooting at ISO 3200 and 1/1000th second. If you could drop the ISO to 800 and decrease the speed to 1/125th you would probably end up with much less noise in the shadows. Actually I'm impressed with the way it turned out at such a high ISO. Are the windows important? If not, use the light but shoot away from the windows. Looks like the sun coming through the stained glass window might have made the purple flare on the left side and bottom of the photo. Keep experimenting!
Aug 30, 2018 01:27:46 #
I've found that a 3 image set, +-2 stops is all that is really necessary to get a decent merged HDR final image. That is why you highlights look about to be blown out. I shoot in Continuous High mode to fire off 3 quick shots, and evaluate in post if I should use all 3 or 2. One of the +2 or -2 plus middle rather than all 3. Was your camera on a tripod or were you hand held? Hand held would explain if you got ghosting.
Nice job.
Nice job.
Aug 30, 2018 05:57:12 #

Good advice from sony and rg. I would like to have seen all the shots before merging. I do not really know if you needed HDR or would have been better off masking and manipulating locally. Those purple shadows are distracting.
Aug 31, 2018 16:54:39 #
SonyA580, rgenaderphoto & abc1234,
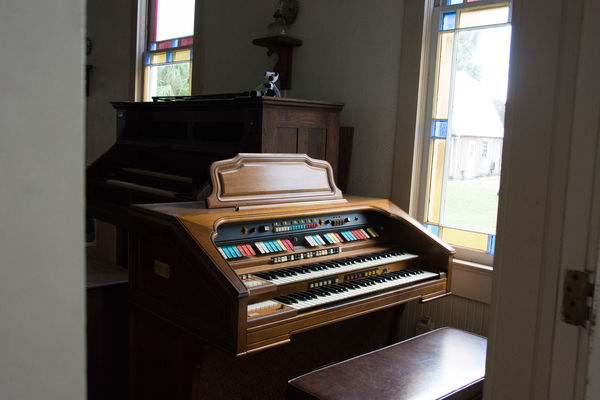
Sorry it took me so long to get back to you. All the images were taken hand held, no tripod. I cranked up the ISO to get a high enough shutter speed to reduce camera movement. All images were shot at ISO 3200. The HDR merge was made with a set of 4 images, I did not use the image that was 2 shots over.
I have attached the set of 4 images and the HDR so all of you can compare. Most of these older buildings have many windows down each side and really not much latitude to avoid the harsh light. Most if not all are not open during the "golden hour".
Please let me know your critique and suggestions. Trying to get to know how to use HDR, WHEN to use it and when NOT to.
Thanks for your assistance.
Don
1/250 at 6.3
(Download)
1/1000 at 6.3
(Download)
1/500 at 6.3
(Download)
1/100 at 6.3
(Download)
HDR Image with some addition PP work

(Download)
Sep 1, 2018 04:33:17 #

The scene is predominantly dark shadow but there are small very brightly lit areas. You'll probably find that even when you include the darkest exposure in the merge the sky is still blown. If you were shooting single exposures and you definitely wanted to save the sky you would have had to use substantial negative exposure compensation.
In less demanding circumstances exposure bracketing usually gives enough protection from blown highlights, but this is a good example of the sort of circumstances that can catch you out. If you're using matrix or evaluative metering the camera meters mainly for whatever predominates (in this case the dark areas), and while the camera includes the smaller bright areas in its evaluation, it doesn't provide sufficient compensation to stop the highlights from ending up blown.
It looks like the darkest exposure was at -2 EVs - and it still wasn't enough. If -2 is the darkest your camera can go for exposure bracketing you could have added negative exposure compensation. That's assuming it was important for you to save the sky.
Normally I would suggest that you don't need either of the bright exposures, but the high ISO suggests that noise will be a problem, so the shadows need all the help they can get. It's often the case that the bright exposures take away more than they add to the merge because the slower shutter speeds soften the image, and if there is glare or bright haze the over-exposed images will reduce the merge's contrast. Your choice of including the second-brightest exposure and excluding the brightest one sounds about right.
Sep 2, 2018 05:02:17 #
abc1234 wrote:
.......I do not really know if you needed HDR or would have been better off masking and manipulating locally.....
You could have done it by taking two exposures - one exposed for the interior and one exposed for the view through the windows - then combined the required bits in PP. However, that requires considerably more PP skills than a simple HDR merge, even if you did have a tripod available to you.
While we're on the subject of tripods, if you'd used a tripod or monopod you could have used much slower shutter speeds since there's no significant movement within the frame and all you would have had to worry about was camera shake. In this sort of situation the high ISO becomes a very significant factor where sharpness and general IQ are concerned. Even with just a monopod and no special shutter release skills you can get sharp photos using shutter speeds down to 1/30 sec. (or even lower with a steady hand).
Note that when you're using exposure bracketing, the darker exposures all use shutter speeds faster than the neutral exposure requires, whereas the brighter exposures use slower shutter speeds. The settings that you input to take the shots are what the camera uses for the neutral exposure, and if you don't intend to use the brighter exposures in the merge, your inputted shutter speed will be the slowest one used for the exposures that you will be using (the neutral and dark ones). If that shutter speed is good for the neutral exposure it'll be good for the rest of the exposures that you intend to use. But if you were intending to use the bright exposures you would have to think about what shutter speeds would be used to get them. In some situations those shutter speeds could be prohibitively slow.
Sep 2, 2018 17:18:19 #
R.G. wrote:
The scene is predominantly dark shadow but there a... (show quote)
Tried just using the two shots underexposed, the correct exposure and none of the over exposed images. Results a little better. Might try 7 exposures using none of the over exposed ones and see how that works R.G. Think that way I can lower the ISO to a less noisy level and keep the shutter speed up some.
As the light from the windows in other situations are coming in from the sides, 90 degrees, what are your thoughts on using a polarizing filter?
Don
Sep 3, 2018 01:26:14 #
PAR4DCR wrote:
....that way I can lower the ISO to a less noisy level and keep the shutter speed up some.....
If you don't have a tripod or monopod you should try to find something to rest the camera on. LR6's merge tool has Auto Align so it's not essential for each exposure to line up exactly and all you have to worry about is camera shake for the individual exposures. Even just leaning against something should allow you to keep the shutter speed to something like 1/80 or thereabouts.
24mm for a DX lens would still be classified as wide angle. Polarising filters can produce funny effects on a wide angle lens. Apart from that they block a significant proportion of the light, which is the opposite of what you want.
If you want to reply, then register here. Registration is free and your account is created instantly, so you can post right away.