Before and after with Photoshop
Aug 29, 2018 12:18:54 #
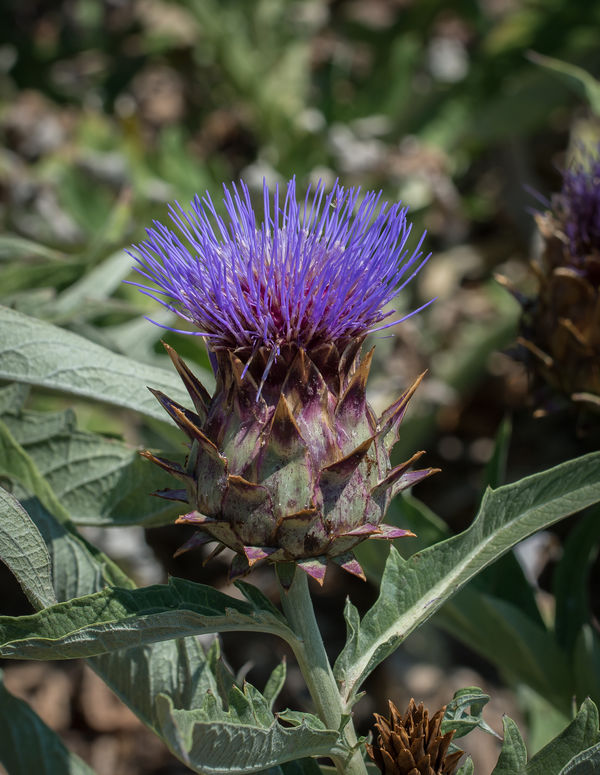
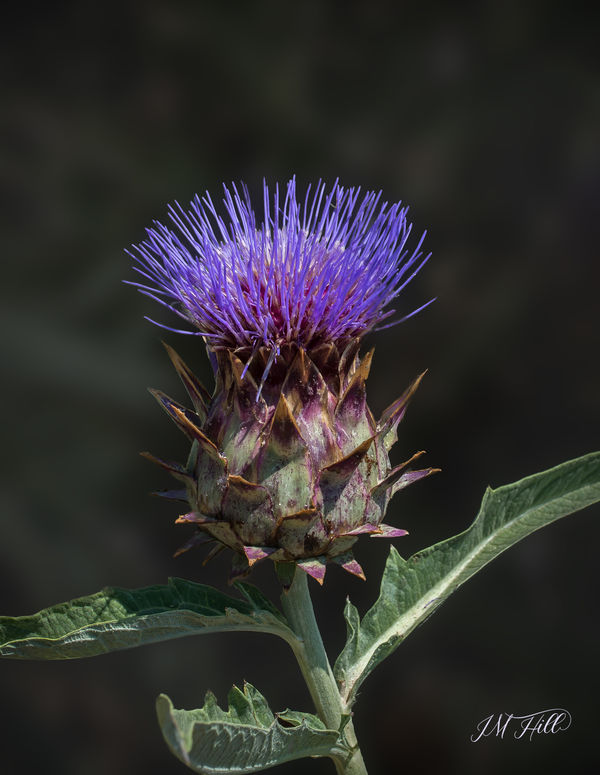
Grabbed a photo I took a couple of years ago and wanted to try some procedures I have learned since then.
Before I get started I do understand I probably took the long way to get to my final edit. I will not mention all the layers I tried and looked terrible and tossed.
I got my picture from my Lightroom data base.
Opened in Photoshop CC
Duped layer
Made a mask with Quick Selection Tool
Once mask was made refined edges manually using paint brush
Opened first layer Camera Raw and darkened for background and brought Highlights down.
Blurred Background with Gaussian Blur.
Added new layer but keeping the main flower layer on top. Used a cloud brush and painted white clouds. Blurred layer. This created a glow around the flower while creating an additional texture in the background. Set layer to 55%
At this point background was looking too bright.
Added another layer solid black and set Opacity at 60%
At this point it looked fairly good wanted a small amount of vignette.
Grouped all layers and made a composite layer (Shift>alt>Command>E)
Opened this new composite layer in Camera raw and applied a min vignette.
Aug 29, 2018 12:23:34 #

Jim-Pops wrote:
Jim, Great Post processing makes for an outstanding image.Grabbed a photo I took a couple of years ago and w... (show quote)
Aug 29, 2018 12:26:01 #
PixelStan77 wrote:
Jim, Great Post processing makes for an outstanding image.
Thanks Stan, It looks a little fuzzy on this page better on the download page. Thanks for stopping by.
Aug 29, 2018 12:38:08 #

Great example and greatly improved! An additional idea would be to add some saturation or WB change to the colors. The green of the leaves are a bit washed-out by the light. You can test these subtle ideas quickly in LR against the finished image:
WB:
Temp +3
Tint -5
Presence
Vibrance +5
Saturation +5
HSL - Luminance
Green -10
WB:
Temp +3
Tint -5
Presence
Vibrance +5
Saturation +5
HSL - Luminance
Green -10
Aug 29, 2018 12:46:14 #
Thanks CHG. Never ending to adjustments had to stop somewhere 
I did try you moves. I see what you mean.
I did try you moves. I see what you mean.
Aug 29, 2018 12:48:35 #

Aug 29, 2018 13:39:32 #
Cany143
Loc: SE Utah
Nice job, Jim. Know well what you mean about 'all the layers I tried and looked terrible and tossed....'
Aug 29, 2018 13:50:35 #

Aug 29, 2018 14:05:20 #
Cany143 wrote:
Nice job, Jim. Know well what you mean about 'all the layers I tried and looked terrible and tossed....'
Thanks Cany
Aug 29, 2018 14:08:39 #
DWU2 wrote:
It looks great. Just out of curiosity, how long did it take?
About 2 hours. The longest time was the masking, probably took over an hour just for that. Went over each one of the blue fingers on top at least 2 times and then cleaned up in between some of them.
Aug 29, 2018 16:18:36 #
Jim-Pops wrote:
Grabbed a photo I took a couple of years ago and w... (show quote)
Great job Jim . . . keep up the good work!
Aug 29, 2018 19:06:10 #
Weddingguy wrote:
Great job Jim . . . keep up the good work!
Thank you for the nice comment.
Aug 29, 2018 19:19:13 #

Aug 30, 2018 06:38:20 #
Nice work, very impressive.
Jim-Pops wrote:
Grabbed a photo I took a couple of years ago and w... (show quote)
Aug 30, 2018 09:37:47 #

If you want to reply, then register here. Registration is free and your account is created instantly, so you can post right away.