Affinity Photo Tutorial - from original RAW image (dng) to processed export (jpg)
This topic is locked to prevent further replies.
Aug 23, 2018 12:49:37 #

If anyone is looking for a backup (or replacement) program to the Adobe LR/PS CC Subscription, I highly recommend Affinity Photo by Serif. It will process RAW images all the way through to a processed image file (most standard formats included), and allow one to incorporate Photoshop Plugins from within the program. At a one time cost of $49.99, it's almost impossible to beat for a quality photo editor.
I wrote this tutorial just to give a brief overview of the steps to convert a RAW (dng) image to a processed .jpg file. One can do everything within Affinity Photo, without having to leave the program, save a file, then reopen again to finish processing. It's a one-stop photo editor.
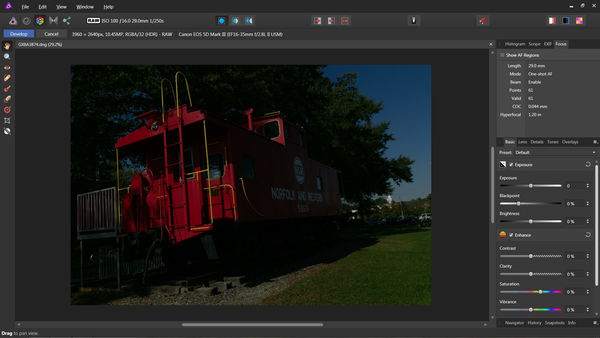
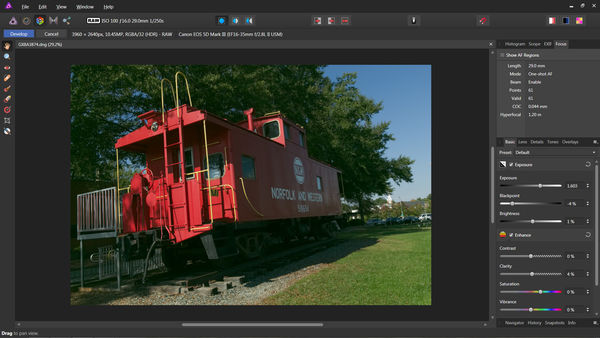
1. File>Open and chose a dng file from my photo archives. If one imports any of the various RAW files, Affinity Photo will open in the "Develop" persona
2. Like Lightroom, the Develop persona is good for making universal changes to exposure, tone, detail and noise reduction.
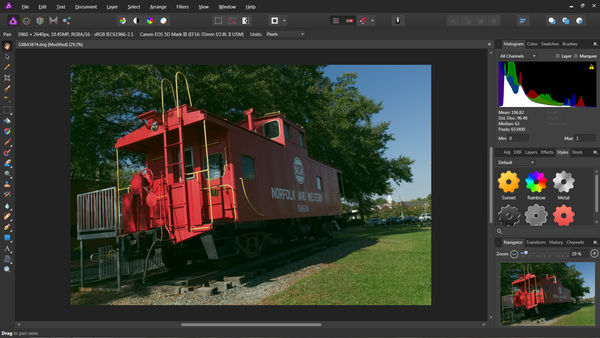
3. At the completion of using the Develop panels, one clicks a button that says Develop. Affinity Photo will then move the image into the Photo persona for continued editing (much like LR moves a photo into PS CC). The Photo Persona offers many more editing tools and access to filters and plugins. The interface and icons are similar to Photoshop and were very familiar to me.
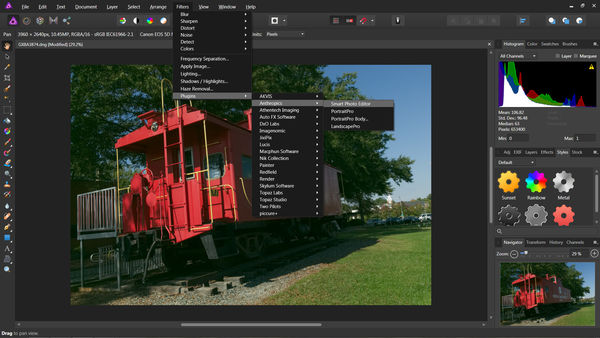
4. I decided to use a plugin for some further changes to the processed image. As you can see, if you click on the Downloaded image for figure 4., you can see there is a rather extensive list of plugins that can be incorporated into Affinity Photo. All of these will open in their own interface, allow you to make changes, and then will return you to Affinity photo with changes intact. Although it's not part of this tutorial, one could create a new layer to blend in the changes later. Affinity Photo has fully functional layers and masks.
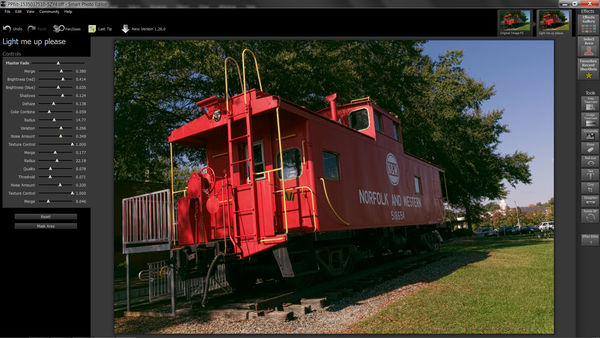
5. I made some modifications within Anthropics Smart Photo Editor. That image was later sent back to Affinity Photo.
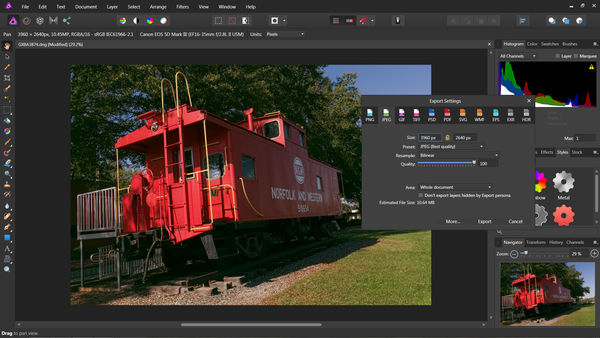
6. When ready to save the file as another graphical image, one clicks File>Export and can then save the files as tif, jpg, png, gif or a host of others.
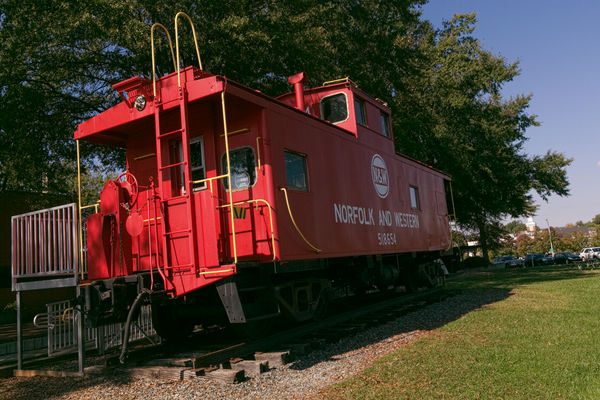
7. The final image: displayed as a jpg file (having started the journey as a RAW file).
Affinity Photo has over 200 video tutorials one can access via the Help>Tutorials menu, that will explain everything in much more detail than here. I hope this little foray will help you to decide if it's a program you might wish to add to your toolbox. All the images in this tutorial were produced in Affinity Photo, with no editing in any other program.
I wrote this tutorial just to give a brief overview of the steps to convert a RAW (dng) image to a processed .jpg file. One can do everything within Affinity Photo, without having to leave the program, save a file, then reopen again to finish processing. It's a one-stop photo editor.
1. File>Open and chose a dng file from my photo archives. If one imports any of the various RAW files, Affinity Photo will open in the "Develop" persona
2. Like Lightroom, the Develop persona is good for making universal changes to exposure, tone, detail and noise reduction.
3. At the completion of using the Develop panels, one clicks a button that says Develop. Affinity Photo will then move the image into the Photo persona for continued editing (much like LR moves a photo into PS CC). The Photo Persona offers many more editing tools and access to filters and plugins. The interface and icons are similar to Photoshop and were very familiar to me.
4. I decided to use a plugin for some further changes to the processed image. As you can see, if you click on the Downloaded image for figure 4., you can see there is a rather extensive list of plugins that can be incorporated into Affinity Photo. All of these will open in their own interface, allow you to make changes, and then will return you to Affinity photo with changes intact. Although it's not part of this tutorial, one could create a new layer to blend in the changes later. Affinity Photo has fully functional layers and masks.
5. I made some modifications within Anthropics Smart Photo Editor. That image was later sent back to Affinity Photo.
6. When ready to save the file as another graphical image, one clicks File>Export and can then save the files as tif, jpg, png, gif or a host of others.
7. The final image: displayed as a jpg file (having started the journey as a RAW file).
Affinity Photo has over 200 video tutorials one can access via the Help>Tutorials menu, that will explain everything in much more detail than here. I hope this little foray will help you to decide if it's a program you might wish to add to your toolbox. All the images in this tutorial were produced in Affinity Photo, with no editing in any other program.
1. Original dng file opened in the Develop Persona of Affinity Photo1.
(Download)
2. Global changes to Exposure, Black Point, White Point, Develop Persona
(Download)
3. After Develop Button is pushed, image opens in Photo Persona
(Download)
4. Filters>Plugins Dropdown List
(Download)
5. Modifications in Anthropics Smart Photo Editor [Light me up please]
(Download)
6. File>Export Menu
(Download)
7. Final image exported as a .jpg file
(Download)
Aug 23, 2018 12:56:43 #

Aug 23, 2018 13:10:26 #
Aug 23, 2018 20:44:55 #
Bob Yankle wrote:
If anyone is looking for a backup (or replacement)... (show quote)
Thanks for posting, Bob; I think we're a small community (Affinity users) compared to the LR/PS behemoth and your post is a welcome input to our knowledge base.
Aug 24, 2018 05:58:47 #

Sep 23, 2018 16:29:34 #

I've been using Affinity Photo off and on, and am pushing myself to use it more. One of these days, my Photoshop CS5 is going to stop working. If anyone has the NIK Collection, it's possible to use those filters with Affinity Photo, though the installation is a little strange. One difference: in Photoshop, most filters automatically apply to a new layer. Not so with Affinity, so you'd be well-advised to duplicate a layer before applying a NIK filter.
Sep 23, 2018 19:43:10 #
Bob Yankle wrote:
br br 4. I decided to use a plugin for some fur... (show quote)
Good to know RMM. I pretty much do that automatically so it won't be too hard to extend to NIK.
If you want to reply, then register here. Registration is free and your account is created instantly, so you can post right away.