Night shot
Aug 14, 2018 00:09:25 #
manofhg
Loc: Knoxville, TN
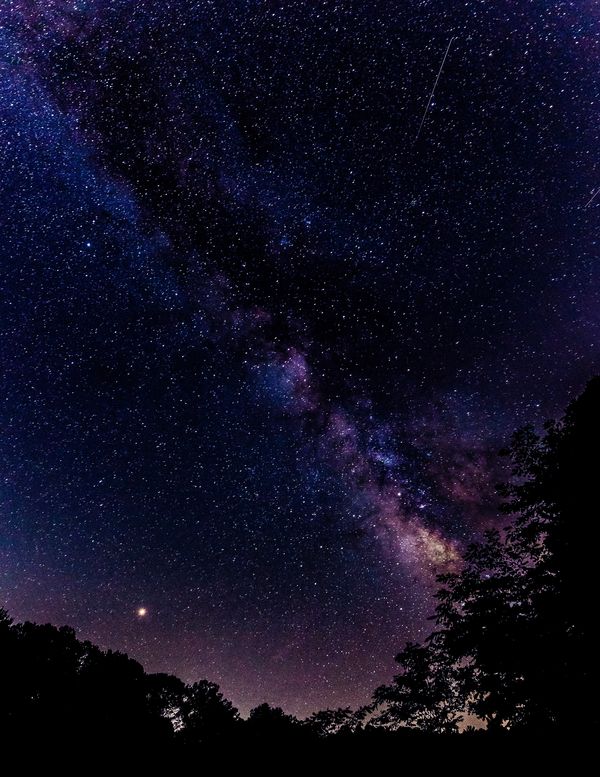
Trying out my new 20mm Sigma. Wanted to be able to do a better job of catching the Milky Way among other things. Here is one of my first results. Please comment, tell what could be done differently or shouldn't have been done. I'm not as concerned with composition in the way of framing as I am with the shooting and processing in order to get the stars visible and exciting.

Aug 14, 2018 00:40:37 #
manofhg wrote:
Trying out my new 20mm Sigma. Wanted to be able to do a better job of catching the Milky Way among other things. Here is one of my first results. Please comment, tell what could be done differently or shouldn't have been done. I'm not as concerned with composition in the way of framing as I am with the shooting and processing in order to get the stars visible and exciting.
Zooming into the image, I can see some star movement, as there are small trails, not points of light. The Sigma ART lenses are hoovers for light, and the 500 rule does not always apply. Lower your shutter speed from 28 sec to closer to 25 or 20 seconds. You can fix a slightly underexposed image easily. Apply some DeNoise to fix the graininess that is apparent when you zoom into the image.
For Post Processing, start with the foreground. crop out some of the trees from the bottom, as the black mass does nothing for your image and only distracts from the magnificence of the milky way. For what of the foreground that is left, assuming you use Adobe Lightroom, apply a graduated filther up from the bottom to about the top of the trees, and another from the right side diagonally matching the treeline. Adjust exposure and shadows to bring our the hidden detail to provide some texture to the black.
Another graduated filter to cover the part of the sky just above the trees where most of the light pollution is. Lower exposure to dim the skyloom slightly.
For the main part of the MW, apply a radial filter sized and tilted to match the central portion of the nebulosity. Adjust, and these are slight adjustments, exposure, whites, blacks and shadows to enhance the central core to draw the eye into the image. In the lower left portion of the milky way, add another radial filter and bring up the whites to make the dust lanes pop.
Fiddle with the color sliders to see if adjusting reds, yellows, etc bring out the colors of the stars.
There you go.
Aug 14, 2018 02:09:59 #
rgrender knows what he is talking about ....I tinkered on my IPADPRO .., could not resist ..., and of course I went over board as usual ...
Aug 14, 2018 06:27:08 #
Aug 14, 2018 06:31:37 #
manofhg
Loc: Knoxville, TN
rgrenaderphoto wrote:
Zooming into the image, I can see some star moveme... (show quote)
Thank you for taking a look and all the suggestions. I do use LR, but v.4, pretty old. I also use Elements which is easier to do many of the things you are talking about. I would have posted what I considered a better picture, but it was too big to be allowed.
Aug 14, 2018 06:33:04 #
manofhg
Loc: Knoxville, TN
Dr.Nikon wrote:
rgrender knows what he is talking about ....I tinkered on my IPADPRO .., could not resist ..., and of course I went over board as usual ...
Thanks for posting your efforts as well. I'm always interested in what someone else can do with my pics.
Aug 14, 2018 07:34:17 #

Aug 14, 2018 07:47:38 #
Aug 14, 2018 20:39:17 #
Aug 15, 2018 07:28:25 #

manofhg wrote:
Trying out my new 20mm Sigma. Wanted to be able to do a better job of catching the Milky Way among other things. Here is one of my first results. Please comment, tell what could be done differently or shouldn't have been done. I'm not as concerned with composition in the way of framing as I am with the shooting and processing in order to get the stars visible and exciting.
You did a good job of exposing the stars. The only thing I can think of is timing the rising and setting of the center of the galaxy. An hour either way would have put the brightest "center" stars in the middle of the image. Good job, however!
Aug 15, 2018 11:19:31 #
manofhg
Loc: Knoxville, TN
rmm0605 wrote:
You did a good job of exposing the stars. The only thing I can think of is timing the rising and setting of the center of the galaxy. An hour either way would have put the brightest "center" stars in the middle of the image. Good job, however!
Thanks, rmm0605. If I were to just move some to the left, I would have been able to see more of the bottom section of the MW.
Aug 22, 2018 23:06:12 #

Aug 22, 2018 23:10:55 #
If you want to reply, then register here. Registration is free and your account is created instantly, so you can post right away.