Macro Photography of rocks, minerals and coins.
Jul 14, 2018 22:30:19 #
Macro Photography of rocks, minerals and coins.
I am just beginning Macro Photography and would appreciate some information, techniques, and does or dont's.
I will be using my new Canon T6i camera and currently have a Canon 50 mm 1.8 lens and a Canon 18-55 mm lens that was included in my kit.
I also have a set of Viltrox Extension tubes (12 mm + 20 mm and 36 mm tubes)
What combination of lens and tubes do you recommend?
Most rocks and minerals display well on a green velvet cloth although I am open to back ground suggestions.
What about lighting? I prefer daylight natural lighting.
If I don’t use a tripod what should my settings be?
Thanks BodieBill
Jul 14, 2018 22:41:29 #
bodiebill wrote:
Macro Photography of rocks, minerals and coins. br... (show quote)
You would be better served if you asked in the Macro Photography section. https://www.uglyhedgehog.com/s-102-1.html
Jul 14, 2018 22:56:00 #
bodiebill wrote:
Macro Photography of rocks, minerals and coins. br... (show quote)
Lenses: Use the 50, and stop down past f/8.
Tubes: You'll probably only use the 12.
If you use a green cloth don't use AWB or your pix will shift red.
Daylight works well. If not daylight use LEDs.
Settings for not using a tripod: Set the power switch to "OFF". Yup.
Jul 14, 2018 23:52:52 #
Well, you can use the equipment you have. If you get carried away, you will see what you need. For a scholarly approach to this field, get the Kodak workshop book, "Photomacrography" used on eBay, or for something less technical, check your local library. You might also find resources just by Googling.
The advantage to books is that they have all sorts of illustrations showing what you can do, and different books will give you different ideas, with explanations.
I think the extension tubes are good (they add no distortion) when a good lens is used. A lens does not have to say "macro" to be good at it (with extension tubes), but some designs work better. A prime lens (no zoom) is better for this. I don't run out and buy expensive equipment for something I rarely use--in that case I make do with what I have. To get closer, just use longer extension--what you see is what you get.
There are as many styles and techniques for macro as there are for photojournalism, sports, landscapes, or other special areas--you don't have to copy one thing unless you want to. Just to practice different macro methods, I think a good book is better because it is systematic and organized, and you can skip what does not interest you.
bodiebill wrote:
Macro Photography of rocks, minerals and coins. br... (show quote)
Jul 15, 2018 07:11:49 #

bodiebill wrote:
Macro Photography of rocks, minerals and coins. br... (show quote)
You'll find that a macro lens is well optimized for close work, at 1:2 down to 1:1 without tubes and greater magnification with tubes. While you can use tubes pretty much with any lens, most general purpose lenses are optimized for working at greater distances - lens aberrations, sharpness and contrast, etc all look better at normal shooting distances. Conversely, macro lenses can be used for distance, but are less desirable as well.
A macro lens has a very long "throw" on the focus ring - it will take a great deal of turning to get it from infinity to minimum focus distance. Non-macro lenses will be much quicker to manually focus but you will lose the precision. Using live view magnification will help offset that.
As far as settings go, you'll need to experiment to see what works for you. Generally speaking, a faster shutter speed is better for motion blur, a smaller aperture is better for depth of field, and you need to set your ISO as high as you are comfortable with because noise becomes an issue as you go higher. If your lens has optical stabilization, use it. It will let you shoot at slower speeds and still use smaller apertures.
Use a tripod, you'll be happier with your results. Don't buy a cheap one, it won't be any better than hand holding the camera.
Jul 15, 2018 08:00:13 #
rdubreuil
Loc: Dummer, NH USA
Gene51 wrote:
You'll find that a macro lens is well optimized fo... (show quote)
Spot On, well said Gene.
Jul 15, 2018 10:48:36 #
User ID wrote:
Lenses: Use the 50, and stop down past f/8.
Tubes: You'll probably only use the 12.
If you use a green cloth don't use AWB or your pix will shift red.
Daylight works well. If not daylight use LEDs.
Settings for not using a tripod: Set the power switch to "OFF". Yup.
Tubes: You'll probably only use the 12.
If you use a green cloth don't use AWB or your pix will shift red.
Daylight works well. If not daylight use LEDs.
Settings for not using a tripod: Set the power switch to "OFF". Yup.
I like that power setting tip. Caught me off guard. Heh Heh
Jul 15, 2018 12:00:16 #
amfoto1
Loc: San Jose, Calif. USA
bodiebill wrote:
Macro Photography of rocks, minerals and coins. br... (show quote)
Hi,
You'll need to experiment with combinations of lenses and extension tubes. A "short telephoto" such as the 50mm or the zoom around the 50mm setting will typically be best for close-up/macro. I don't know those lenses' native minimum focus distance/maximum magnification, so would just be guessing... but I suspect you'll need at least the 20mm extension tube. The more extension you add, the closer the lens will focus and the higher the magnification. The limit is that at some point you'll be too close to the subject (blocking light or even touching it and unable to focus).
A tripod is often useful when shooting macro/close-up. It's very hard to keep things steady at high magnification! A sturdy and stable tripod also would let you use longer exposures, with which you can keep from having to use a too high/too noisy ISO.
Lens aperture does need to be stopped down to some extent... f/8, f/11, f/16... again you should experiment because really small apertures like f/16 and f/22 cause an optical effect called "diffraction" which robs the image of fine detail. (I try not to use smaller than f/11 when shooting macro with my APS-C cameras... full frame cameras can tolerate a little smaller with f/16).
But to use those smaller apertures (for sufficient depth of field, which also tends to get very shallow at high magnification and short distances), you either have to: bump up your ISO (risking noisy images).... or use longer exposures (tripod required probably)... or add light in some way (flash, bounce cards, continuous light such as LEDs, etc.).
Often it's easiest with macro work to turn off autofocus and focus manually... First setting the focus on the lens approx. (actually sort of using the focus setting as a "zoom", determining to an extent how much you'll be magnifying the subject in the image), then slowly moving the entire camera and lens closer or farther from the subject to achieve focus. This is a lot easier with inanimate subjects such as coins and rocks, than it is with live critters! It's possible, but difficult to do hand holding the camera and lens... can be done using a monopod... or with a tripod and a "focus slider" or fancier, geared "macro focusing rail".
Flash works differently at high magnifications. Don't be afraid to try it, though if you don't have one you'll probably need to buy one (the camera's built-in flash sucks in general, but expecially won't work well for close-ups). I use two macro-specific flashes... a "twin light" with two flash heads and a "ring light" which mounts directly on the front of the lens. For most macro work up to around life size {1:1) or a little higher magnification and for the type of subjects I usually shoot, I prefer the twin light. I mostly use the ring light on much higher magnification shots done with a specialized, ultra high magnification macro lens (Canon MP-E 65mm). But I also sometimes just use a single, standard flash held off-camera (attached via an off-camera shoe cord) and heavily diffused so that it doesn't overpower a close-up subject.
Here are some examples that might help....
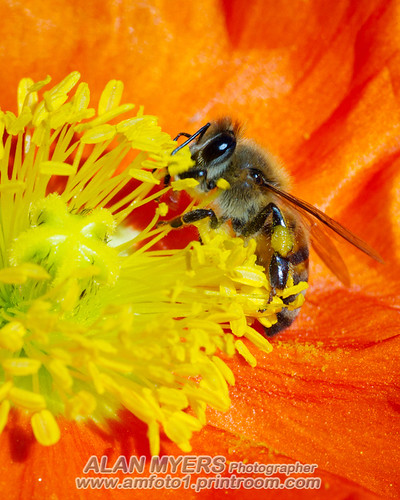
This bee on an orange poppy was shot using a vintage, manual focus Tamron SP 90mm macro lens (1:2) with a 20mm macro extension tube (still not quite 1:1). Lens was stopped down to f/11, ISO was 400 and shutter speed was 1/400. It was done in full sun, without flash and handheld (chasing the bee from flower to flower). Shooting that way, I probably took 75 shots to get a couple "keepers" like this... A LOT missed focus or the bee had flown away before I got the shot! I'm showing this as an example how difficult it can be to get a macro level shot hand held, even with very bright light. It's possible, but not easy!
Below is an example more like I think you'll be shooting... inanimate objects, probably best done indoors under controlled conditions. This is one of a large number of product shots I made for someone to use on her website. This was done by available light (no flash), indoors using a tabletop studio setup. The lens was a Canon TS-E 45mm that's manual focus on an APS-C camera. I used a tripod, a moderate ISO, smaller lens aperture and longer exposures that required a tripod (and mirror lockup/remote release to prevent camera shake blur in images). The background is a "seamless" made from a sheet of matte white plastic that's curved up behind the subject (as pure white as possible background was wanted, for the website). For this image I used black "flags" and white "bounce" cards outside the image area to control the light from several windows. I also used a circular polarizing filter on the lens to control the reflections off the clear plastic wrap, which needed to be visible but not obstruct the product inside.
But you really should explore using flash or some other form of lighting, too. You can use the light's shadows and highlights to "model" the shapes of whatever you're photographing. The details of coins, for example, might be more clearly seen with side lighting. The two macro flashes I use have multiple flash tubes that can be set separately to provide full and fill light on different sides of a subject, But a single larger diffused flash used for high magnification shots also tends to "wrap around" the subject, may not need any "fill" at all or can be used in conjunction with some sort of bounce card to provide more or less fill light to the shadow side (bounce cards can be plain white for subtle effect, or silver metallic for a "crisper" look, or even gold metallic for a warmer, crisp look). Following was done using a single flash, handheld.... (camera and lens were also handheld, but resting on a support, in this case an empty 5 gallon paint bucket upside down). Lens was a Canon 100mm macro and camera an APS-C model. Exposure was f/11, ISO 200, 1/200 shutter speed. In order to cause the busy leaves and branches in the background to go black, I used the flash fairly strongly (with Canon gear stronger "full" flash is pretty easily achieved by setting the camera to M.... but thanks to flash ETTL it's still an "auto exposure").
Here's another example where I used similar single flash setup, except this time I left the camera in Av (aperture priority) to get lighter "fill flash" instead. In this case I was using a 70-200mm non-macro lens along with a 25mm macro extension tube (film camera, so settings aren't recorded... but I used ISO 50 or 100 film most of the time and recall using a tripod for this shot, probably f/8 to f/11):
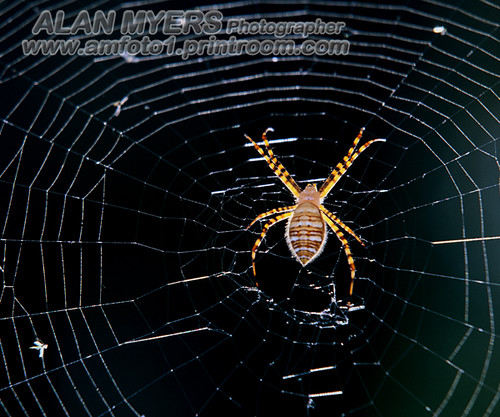
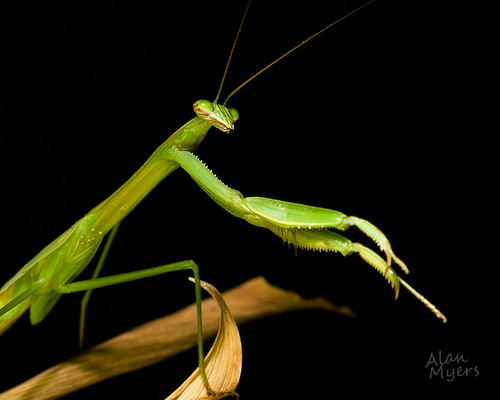
Below shows how I set up a single flash to use for close-up and macro, hand held (usually) and connected to the camera. This is a good option to have available and know how to use, when out shooting and a close-up opportunity presents itself, but I don't have a macro flash with me. (I simply use a couple layers of white gauze over the flash head, held in place with a rubber band, to diffuse the flash and reduce it's output so it wouldn't overpower the subject... this was used for both the praying mantis and garden spider shots above)....
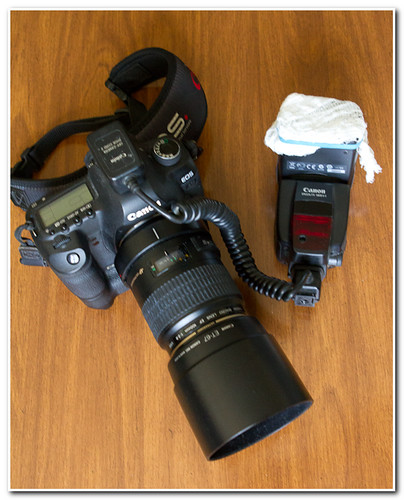
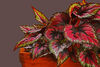
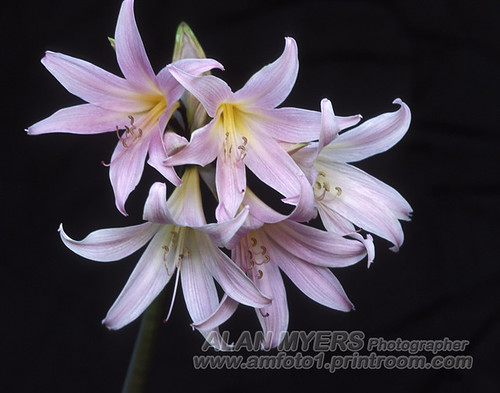
Below is the Canon MT-24EX Twinlite I mentioned earlier, mounted on one of my cameras with Canon 100mm macro lens. I used it (dialed back for slight fill) for the shot of the amaryllis shown on the right, which was in deep shade (note, for that I used a black velvet background hung behind the flower.... and I used 100mm macro lens and a tripod).
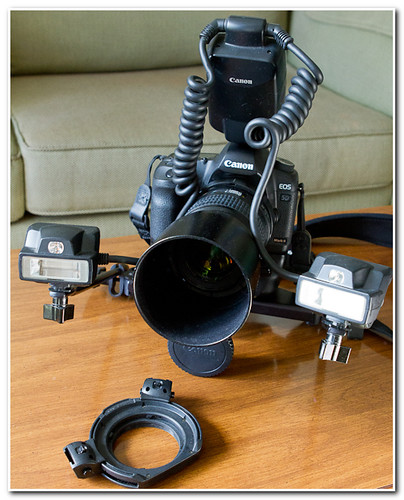
(Note: I don't use Canon's lens mount for the Twinlite, which is shown lying in front of the rig... I prefer a different, dual flash bracket that gives me more flexibility positioning the flash heads.)
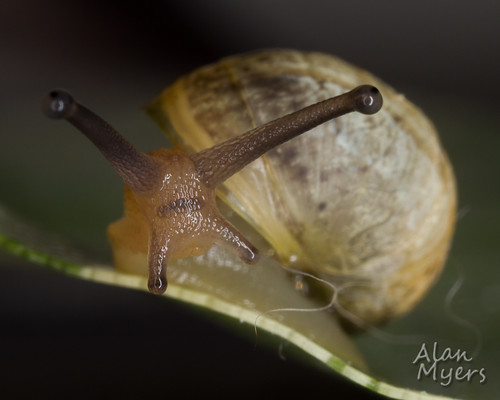
Below is a the Canon MR-14EX Ringlite mentioned earlier, shown mounted on Canon MP-E 65mm macro lens. Some people like to use a ring flash such as this for coins and such, but I find it's lighting rather "flat" for my subjects, except for those at really high magnifications such as this lens can do. So that's almost exclusively what I use it with. The shot of the tiny, freshly hatched garden snail on the right was done with the Ringlite and MP-E 65mm, at around 3.5X magnification (on a tripod, f/16, ISO 400, 1/250).

For what you want to shoot, you might consider getting a "light tent". With those you put your small object inside and set up lights outside (can be flash or various types of continuous light) and the tent serves to diffuse the light nicely.
Here are a couple more close-up, macro shots. Both were done by available light, no flash. The rose bud on the left was shot outdoors on a bright day but in light shade, using a 20mm or 25mm macro extension tube on my non-macro Canon 50mm lens... similar to what you are wanting to do. I deliberately chose to use that lens at a fairly large aperture (f/2) because I knew that would cause some softening and vignetting of the image, effects I felt would be nice for this particular image. It's not a super high magnification shot, but the rose bud was pretty small.

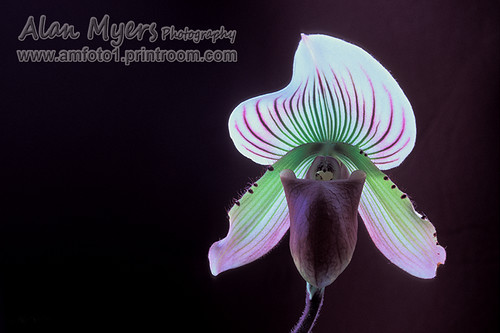
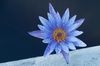
The orchid on the right above was shot indoors using a 100mm macro lens.... not particularly high magnification, but a longer exposure using only available light (no flash), requiring a tripod. Here I used a velvet cloth backdrop behind the flower... a deep purple color that nicely complemented the colors of the flower itself. You mention wanting to use a back ground, but I'd recommend keeping it low key.
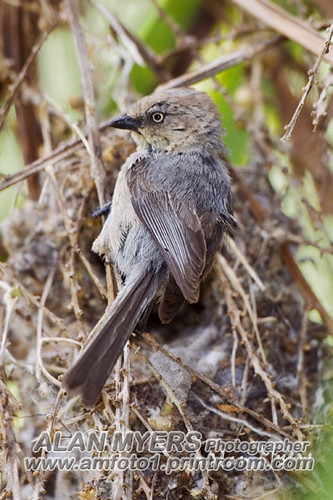
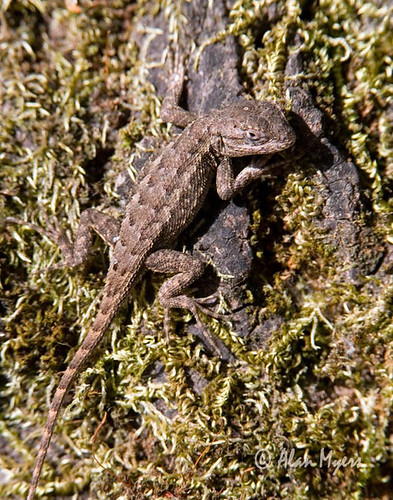
Finally.... how much extension will you need? It depends upon the focal length you're using. The longer the lens focal length, the more extension that's needed to significantly increase magnification. Conversely, with shorter focal lengths it's easy to end up with too much extension, so that you cannot even focus on the subject. I always carry a set of extension tubes with me because I never know when I might want to use one to make a non-macro lens focus closer. For example, both the little bush tit on its nest and the fence lizard below I used 36mm extension to make 500mm and 300mm lenses (respectively) a bit closer focusing, though not really "macro" by any means.
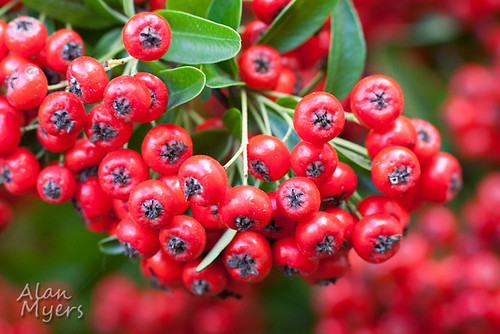
But for the following I used shorter focal length non-macro lenses with considerably less extension... an 85mm lens with 20mm extension for the red berries on the left.... and a 20mm lens with 12mm extension for the California poppies on the right.
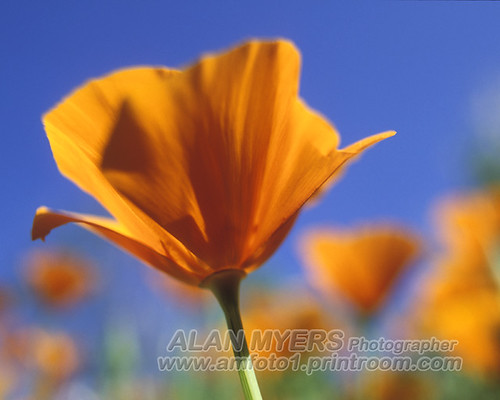
Incidentally, the petals of that orange poppy were touching the front element of the 20mm lens! So there was absolutely no "working room". I wanted to use a wide angle lens in order to increase depth of field, so that the other poppies in the background wouldn't be completely blurred and unrecognizable. But the 12mm extension tube is the shortest I've got for use with my Canon cameras and lenses!
Hope this helps! Have fun experimenting with your lenses and extension tubes.
Jul 15, 2018 12:20:15 #

Photography of rocks and minerals requires high fidelity to color. Any colored background will comprimise the actual colors of the minerals through reflection onto the subjects. Do some trials of neutral backgrounds. If some of your mineral pictures are shot in situ, then you will have to live with the ambient light's color distribution. There are several mineralogy manuals that will instruct you on mineral colors.
Jul 15, 2018 13:00:51 #
Thank you for such an informative post. I learned a few things and enjoyed the writing style.
amfoto1 wrote:
Hi, br br You'll need to experiment with combina... (show quote)
Jul 15, 2018 13:15:29 #

Hello Bodiebill - you have an interesting handle what is your attraction to Bodie - mine is it reminds me of the meany mining towns I lived in while growing up -my dad was a "tramp hard rock miner" - I have been experimenting with macro (on the cheap) for a few years I find coins interesting subjects as the DOF is more flat and the need to layer is not realy there. I use a Canon T3i and a reversed 35-70 lens with a macro bellow, a 4 direction rail, a macro bellows and a tripod with a crank center post for easy adjustment/focus - I have used prime 28 & 50 mm that worked fine but for some reason I am using the 35-70 set at 35 f8 thru f14 and getting good results.
Here are some of my results.
Harvey in the Sierras
Here are some of my results.
Harvey in the Sierras
bodiebill wrote:
Macro Photography of rocks, minerals and coins. br... (show quote)
Jul 15, 2018 14:22:13 #
I recommend a tripod and either a 10 sec delay or a remote shutter release to avoid camera shake.
Jul 16, 2018 01:38:39 #
great information here. Experiment and enjoy. I have used basic colored construction paper as backdrops. Have a variety of colors as you don't want your subject to disappear into the backdrop. Ruby gemstones don't show well on a red backdrop and emeralds show poorly on green. Also be aware that colored backdrops may add color to your subject particularly if it is reflective or translucent. When I photograph gems I usually use a white or black backdrop depending on how dark or light the stone may be and use the contrasting color. Of course if you are wishing to make an artistic rendering use whatever color strikes your fancy. And, again, enjoy the experiments.
Jul 16, 2018 09:02:41 #
I agree with what "user ID" stated but I would add that if you are using natural light you may want to use a white card of some type as a reflector. Also be cautious of the background. Some rocks/minerals may contain a lot of green so a green background could compete. Good luck!
Dave
Dave
Jul 16, 2018 12:56:26 #
Silly me. When recommending daylight as a
light source, I never mentioned bounce cards
or other light modifiers cuz those go with ANY
light source ... but yes I agree, especially with
shiny objects, you can't just let the daylight in
and hit the shutter button !
If you keep you shutter times slow, and likely
you will, to get low noise and deep DoF, then
a bounce card is even more versatile than it
would be at high shutter speeds. During long
exposures [even as short a 1/2 second] you
can move the card during exposure to effect
a more natural fill light, and to reshape the
broad highlight that sometimes occurs. I find
it's easier to hold the card at its maximum
effective position as I hit the remote release,
and then move the card in a predetermined
path away from maximum. You can plot the
path before exposure by watching the image
effects on the LCD screen. The LCD is also a
guide to assuring that the card is located at
maximum effectiveness just before exposure
begins. For the shorter longish speeds, 1/2
second down to 2 or 3, you should practice
moving the card on its path in the allotted
brief time. LCD helps with that as well. It's
unlikely you can repeat the motion exactly
the same twice, so shoot a few, cuz small
variations in the result can be rewarding :-)
When I shoot small things, you see me with
card in one hand, remote in the other, body
and arms arched around the camera rig at
barely a safe distance to not bump it, doing
my "bounce card dance". I do look silly.
`
If you want to reply, then register here. Registration is free and your account is created instantly, so you can post right away.