Exposure Help Needed Please
Jul 11, 2018 15:56:20 #
rdrechsler
Loc: Channel Islands Harbor, CA
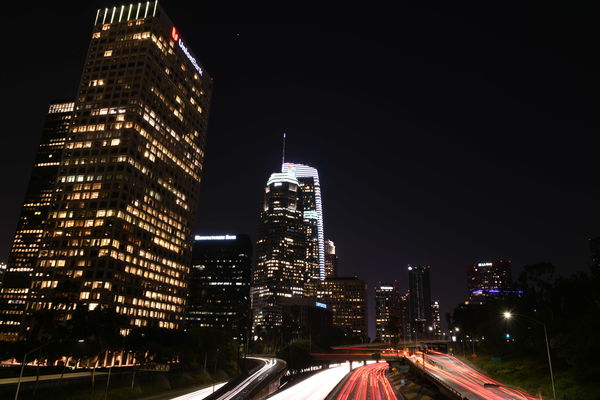
In the attached photograph I'm trying to capture the skyline and use a slow shutter to create the lights in the road effect, but in order not to blow out the extremely bright lights on the building near the center and to get good focus throughout the image I used f/11. The EXIF data is f/11, ISO 100, 29 seconds, Nikon 24-70mm lens @ 24mm. No filters. I've seen a lot of your pictures where you manage to capture the shadows and still not blow out the bright lights. I managed to get a pretty good correction in PP, but I should be able to get a much better image straight from my Nikon D850. Your help and advice would be most appreciated. Thank you all in advance.
Jul 11, 2018 16:08:58 #

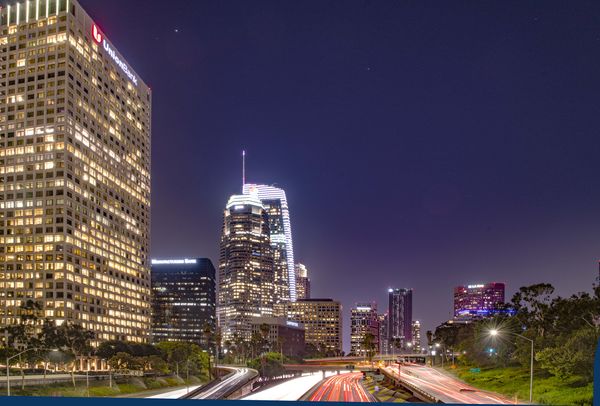
Why don't you post the original in the post processing section and ask for help in processing? Pulling the attached version into LR and running auto gives the suggestion to add 1.4 to the exposure and adjust the shadows by +10 (and a few other changes). Not the best results, but a starting idea. Given the reduced size of this attachment, the sky is pixelated even if the exposure is increase by just 0.3. On your end, try the following against the full-sized image as additional edits to your posted version:
Jul 11, 2018 16:12:57 #
rdrechsler
Loc: Channel Islands Harbor, CA
CHG_CANON wrote:
Why don't you post the original in the post processing section and ask for help in processing? Pulling the attached version into LR and running auto gives the suggestion to add 1.4 to the exposure and adjust the shadows by +10 (and a few other changes). Not the best results, but a starting idea. Given the reduced size of this attachment, the sky is pixelated even if the exposure is increase by just 0.3. On your end, try the following against the full-sized image:
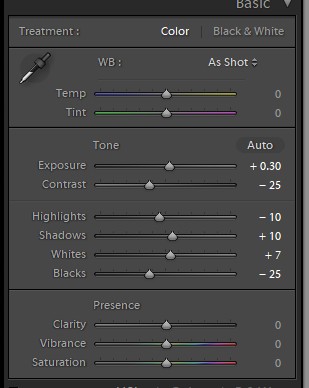
Thanks for the speedy answer. Here's what I got in PP. Not bad, but I'm still wondering how to get a better exposure result in the camera?
Jul 11, 2018 16:15:26 #

You simply can't unless you use the camera built in HDR function. Otherwise you can simply bring up the shadow like you did or do a multiple shots HDR but still they involve PP.
Jul 11, 2018 16:23:23 #
rdrechsler
Loc: Channel Islands Harbor, CA
BebuLamar wrote:
You simply can't unless you use the camera built in HDR function. Otherwise you can simply bring up the shadow like you did or do a multiple shots HDR but still they involve PP.
Good to know. I don't feel quite so bad now

Jul 11, 2018 16:40:11 #
rdrechsler wrote:
Thanks for the speedy answer. Here's what I got in PP. Not bad, but I'm still wondering how to get a better exposure result in the camera?
Expose for the highlights. That is:
1. Set our camera to capture in the large RAW format for that model.
3. Develop your exposure settings for the desired composition, shooting in manual.
2. Take multiple test exposures until you have the highlights blinking in the highlight warnings. For example, your test image may be blinking for the light at the top of the tower in the center and the roadway coming at the camera.
3. Take multiple images with changes to the exposure. Say your test image was ISO-100, F/11 and 29-seconds, modify the shutterspeed taking away 1- to 5-seconds per exposure (reduce shutterspeed in 1/3 stops or one "click" per image). Review the highlight warnings for each new exposure until you've found the exposure (based on just changes to the shutterspeed) where you no longer have blinking highlights.
3a. Also take a few captures with the shutterspeed lengthened where the highlight warnings increase.
4. On your computer, process all the images and compare the results and select the keeper(s). You may find you need to lower the exposure when you start editing. Certainly, you'll need to lower the highlights so the whites are not overexposed in the processed results.
5. Do not delete the images from the camera until you've evaluated the extent of the highlight warnings in relation to the processed result. Take the image number of the keeper, look at the histogram and highlight warnings from the camera and look at the processed result. Note where and how much the highlight warnings are blinking. By trial and error, and evaluation of your camera capabilities and your processing capabilities, you'll begin to develop a sense (aka experience) of how far you can push the highlights without blowing those highlights beyond recovery in post.
The dynamic range of the camera can be 'extended' in post. The process above captures the most detail in the shadows for subsequent processing while you have highlights that are not captured as complete white (aka blown highlights) in the RAW file.
6. Repeat until the process becomes natural in your technique and approach to creating these types of image.
I'd also look at the selection of a point of focus. You have sharply focused details on the near building on the left and the Carpenters in the sign in the lower middle. But, the visual center of the image (the Korean Air Tower?) is not as sharp. I would prefer that portion of the image be the sharpest / sharper.
Jul 11, 2018 16:42:46 #
rdrechsler wrote:
Good to know. I don't feel quite so bad now
But, you can "HDR" a single image in post. You can mock-up two other files by lowering the exposure and saving "Pic-LOW" and increasing the exposure and saving "Pic-HIGH". Then, run a 3-image HDR with the appropriate software with the original "Pic-REG".
Jul 11, 2018 16:43:13 #
Here is what I would try --- I'll "assume" you could 2 to 3 more stops of shutter time -- Say 36 seconds to 39 seconds --- Switch to bulb & use via your camera's menu option "bulb timer" & then dial-in the extra time values
Jul 11, 2018 18:18:34 #
rdrechsler
Loc: Channel Islands Harbor, CA
CHG_CANON wrote:
But, you can "HDR" a single image in post. You can mock-up two other files by lowering the exposure and saving "Pic-LOW" and increasing the exposure and saving "Pic-HIGH". Then, run a 3-image HDR with the appropriate software with the original "Pic-REG".
Thanks for that great information. I'm going to re-shoot it on Thursday. I'm also going to get there earlier so I can catch the view during the golden hour. Might make it much easier to get the right exposure!
Jul 11, 2018 18:22:31 #
rdrechsler
Loc: Channel Islands Harbor, CA
ken_stern wrote:
Here is what I would try --- I'll "assume" you could 2 to 3 more stops of shutter time -- Say 36 seconds to 39 seconds --- Switch to bulb & use via your camera's menu option "bulb timer" & then dial-in the extra time values
I did all that. I think the trick to this picture is to shoot it during the golden hour when the car and building lights come on and the sky is still bright enough to cast more light. I'm going to try the shot again tomorrow night. I also want to try a wider-angle lens. I'll nail this sucker yet...LOL.
Jul 12, 2018 06:06:47 #
canonuser25
Loc: Cardiff (Wales NOT England)
As a complete change & to avoid too much faffing in pp I use a grad nd filter to avoid blowing the highlights. Found this very useful in very bright Mediterranean sunlight with it’s high contrast. Try in the future. Good luck
Jul 12, 2018 06:13:06 #
rdrechsler
Loc: Channel Islands Harbor, CA
canonuser25 wrote:
As a complete change & to avoid too much faffing in pp I use a grad nd filter to avoid blowing the highlights. Found this very useful in very bright Mediterranean sunlight with it’s high contrast. Try in the future. Good luck
Interestingly, I bought a graduated lens just for that reason but, unfortunately, it didn't really make taking the picture any easier. I don't think they work at night the way they do in the daytime. Thanks for passing along the information. I needed the filter for my wide angle lens anyway for slow shutter work during the day, so I'll make good use out of it.
Jul 12, 2018 07:42:21 #

I suggest spot metering from the bright area. Take three shots: one at the exposure suggested by the camera, one with a one stop overexposure from meter reading and the last one at two stops over the meter reading.
I bet one of them will be perfect.
I bet one of them will be perfect.
Jul 12, 2018 08:08:17 #

This isn't all that difficult a "problem" to solve. Getting the exposure you need to facilitate the processing of the image is what's important. In order to do that, one would need to spot meter the brightest portion of the scene. Then, increase the exposure a few stops. The amount is determined by the Zone in which you want to place that value and the capabilities of the camera. Those capabilities would be determined through structured testing.
This exposure increase will also brighten the shadows by an equal number of stops. In processing, particularly starting with a RAW file, which for this is a necessity, initial adjustment in ACR will provide a satisfactory start to achieve the appearance one desires in the final "print".
--Bob
This exposure increase will also brighten the shadows by an equal number of stops. In processing, particularly starting with a RAW file, which for this is a necessity, initial adjustment in ACR will provide a satisfactory start to achieve the appearance one desires in the final "print".
--Bob
rdrechsler wrote:
In the attached photograph I'm trying to capture t... (show quote)
Jul 12, 2018 09:08:56 #

rdrechsler wrote:
In the attached photograph I'm trying to capture t... (show quote)
There is no point in trying to meter this type of scene. It's dynamic range is too wide.
Based on what you will find in this article on Exposure value, your image is overexposed by about 3 stops. An exposure of about 4 seconds would have captured the lights of the traffic and buildings better without blowing them out. For a longer exposure you would probably need a neutral density filter.
You are going to need to pull the shadows up in port processing or shoot during the golden or blue hour, not too long after sunset.
The article is assuming a "typical" scene and there is a wide variation around that. What works for one scene might not work for another. The only way to narrow this down is by trial and error - maybe bracketing.
If you want to reply, then register here. Registration is free and your account is created instantly, so you can post right away.