Real Estate / Construction Questions
Jul 8, 2018 13:07:35 #
BrianFlaherty
Loc: Wilseyville, CA
Finally a topic I can REALLY claim "expertise" on: Real estate photography <smile> [I was a "forensic construction photographer," dealing with "defects" and courtroom "testimony" for over 20 years. Plus, providing "real estate photography" for friends and realtors]
re: the lenses: I shot 35mm film (both color and B&W) with a Nikon F-3 and/or a F-100, using only two lenses: a Sigma 18-35mm, f3.5-4.5; and, a Tamron 28-300mm, f3.5-6.3.
The 18-35m has an 85 degree field, allowing you to stand in two corners of a 12'x 12' room and shoot virtually the entire room with only two shots and a minimum of "architectural distortion"(and, great "depth of field"). The 28-300mm was more than adequate for exterior shots (also worked well for "long room" interiors; and, high-ceiling details)
I probably shot most pictures using available light. . .The "natural" light of different times of day, should demonstrate the way the house will appear to persons who are actually living in the house. Camera-mounted flash should be used sparingly to simply "high-light" from a person's actual point-of-view. [My recommendation re: furnishings, unless you are specifically-asked by the client, should be minimized in the photograph. You do NOT want to distract the "audience attention" from the home and its architectural features. Remember, you are NOT attempting to sell the furnishings!]
If you have specific issues during a "shoot" feel free to contact me privately: expert@volcano.net
Good shooting,
Brian
My mantra overall was: Keep it simple; and, clear. . .Don't get caught up in "artsy-fartsy" You are NOT doing an "Architectural Digest" shoot. . .You're trying to sell a house that people will actually want to live in! <smile>
PS #2: For over 40 years, During holidays, I shot (for "fun") pictures of churches and "ancient" buildings in England, Scotland, Ireland, Spain and South Africa. Plus, all over the United States! [I used to shoot pictures in airports (while waiting to "board"). . However, doing that these days will result in a "cavity search" and missing your flight! <smile>]
Jul 8, 2018 13:38:28 #

Here's some practical advice for the OP:
Perspective, lighting and exposure: When you shoot interiors, exteriors, real estate, architecture and construction progress (before and after etc) images by available light only and with no perspective control lenses, your image management, as per perspective, color balance and density, must take place in post processing. You can also take some precautions in shooting by keeping the camera level, parallel to vertical lines- no tilting up or down and later cropping out excessive floor and ceiling or sky and ground in editing.
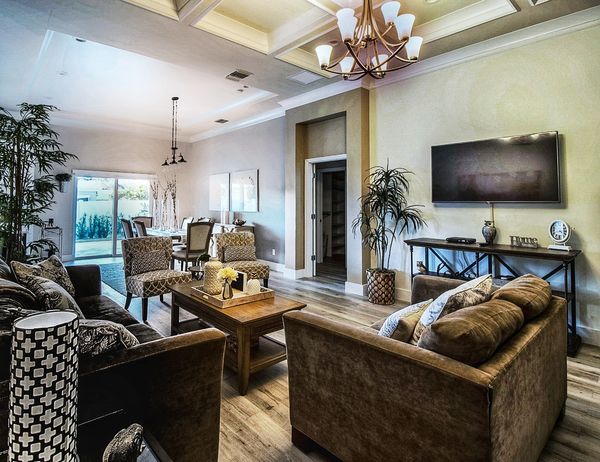
Interiors, like the one in your post, presents the photographer with a kind of mess of mixed and uneven lighting. The incandescent lighting from the fixtures and the natural light entering through the windows are diametrically opposite in color temperature. You can white balance of the dominant light source or come in between and correct local areas in post processing. There are also differences in exposure which can be somewhat corrected.
In cases like theses, with limitations in budget and perhaps a lack of very specialized lighting equipment- and lots of it, you are not expected to produce results like those featured images in the Architectural Digest magazine. Realistically, folks are not gonna buy a house or hire a contractor or decorator strictly on the basis of photographs in the advertisements, however, you don't want to give viewers the impression, subliminal as it might be, that the walls are crooked or caving in, that the paint job is poorly matched or wildly off color from one room to the the next, or that there's no green space outside of the home due to overexposed windows.
I am on the road and not at my studio so I did a quick and dirty color correction of your image on my smartphone's Lightroom app. I straightened out the walls, improved the contrast and saturation SLIGHTLY, brought up some of the shadow detail in the furniture, tried to balance the differentials in color between the two parts of the space with conflicting color temperatures and did a bit of cropping. I toned down the lamp in the lower cleft of the composition. It's good to keep the foreground a bit darker- that leads the eye into the room. I brought a bit of detail back into artwork on the right wall and put a bit more detail into the patio door door.
This is 5 minute. quick and dirty, edit on a tiny screen but I think it gives a more “welcoming” and cleaner look to room. This app enables spot correction of color, contrasts, saturation and density. There is no gray card or color reference in the scene so I have no idea as to the actuarial color of the walls- strictly guesswork!
As to your construction question: Working with direct overhead sunlight can be problematic, especially without flash or reflector fill in illumination. Early morning, late afternoon sunlight or working on a hazy or overcast day may be preferable. open shad is good too- it there is enough of it at the site. Harsh sunlight can bring about dense shadows which obscures details and casts shadow patterns in places where they become distracting. Flash fill can preserve more normal contrasts, keep thing within the dynamic range of you camera system and render more transparency in shadows areas.
If you intend to do more of this kind of work on a professional/part time basis- for pay, I would suggest that you investigate the techniques relating to flash fill and other light balancing and exposure balancing methodologies as well as the principles pertaining to perspective management. A PC lens can be a godsend in precluding very radical post processing corrections.
If an interior is primarily lighted by incandescent, LED, halogen or even fluorescent fixtures and lamps, a continuous fill in source of the same approximate temperature can work well- oftentimes just a touch of fill in light bounced off of a far wall will illuminate the shadows and preserve the natural look of the room. If the room is mainly lighted by natural light, the same technique with electronic flash or blue photo-floods (if they still make and sell them). Out of doors, for construction progress and exterior images, if fill in is required, electronic flash is your best bet- A Speedlight will oftentimes be sufficient. Another method that is very dramatic and appealing, of finished exteriors, is to shoot at twilight, the magic hour and balance for interior light coming out through the windows and exterior (outdoor) incandescent light light. You will get a dramatic deep blue sky and a warm rendition of the building.
Quick tip- In a room with a standard 8 foot ceiling, place the camera a height of about 4 feet and keep it level. Line the verticals up with a grid on your viewfinder screen or, at least, with the edges of the frame. A little bubble level atop the camera may help- some tripod heads are are equipped with theses kinds of levels. For vaulted and cathedral type ceilings, just step back or use a wider focal length- don't tilt! With a tilt/shift lenses, once you get the hang of it, you can preserve perfect perspective an short order.
I hope this helps.
Please see my corrections in the next reply area.
Perspective, lighting and exposure: When you shoot interiors, exteriors, real estate, architecture and construction progress (before and after etc) images by available light only and with no perspective control lenses, your image management, as per perspective, color balance and density, must take place in post processing. You can also take some precautions in shooting by keeping the camera level, parallel to vertical lines- no tilting up or down and later cropping out excessive floor and ceiling or sky and ground in editing.
Interiors, like the one in your post, presents the photographer with a kind of mess of mixed and uneven lighting. The incandescent lighting from the fixtures and the natural light entering through the windows are diametrically opposite in color temperature. You can white balance of the dominant light source or come in between and correct local areas in post processing. There are also differences in exposure which can be somewhat corrected.
In cases like theses, with limitations in budget and perhaps a lack of very specialized lighting equipment- and lots of it, you are not expected to produce results like those featured images in the Architectural Digest magazine. Realistically, folks are not gonna buy a house or hire a contractor or decorator strictly on the basis of photographs in the advertisements, however, you don't want to give viewers the impression, subliminal as it might be, that the walls are crooked or caving in, that the paint job is poorly matched or wildly off color from one room to the the next, or that there's no green space outside of the home due to overexposed windows.
I am on the road and not at my studio so I did a quick and dirty color correction of your image on my smartphone's Lightroom app. I straightened out the walls, improved the contrast and saturation SLIGHTLY, brought up some of the shadow detail in the furniture, tried to balance the differentials in color between the two parts of the space with conflicting color temperatures and did a bit of cropping. I toned down the lamp in the lower cleft of the composition. It's good to keep the foreground a bit darker- that leads the eye into the room. I brought a bit of detail back into artwork on the right wall and put a bit more detail into the patio door door.
This is 5 minute. quick and dirty, edit on a tiny screen but I think it gives a more “welcoming” and cleaner look to room. This app enables spot correction of color, contrasts, saturation and density. There is no gray card or color reference in the scene so I have no idea as to the actuarial color of the walls- strictly guesswork!
As to your construction question: Working with direct overhead sunlight can be problematic, especially without flash or reflector fill in illumination. Early morning, late afternoon sunlight or working on a hazy or overcast day may be preferable. open shad is good too- it there is enough of it at the site. Harsh sunlight can bring about dense shadows which obscures details and casts shadow patterns in places where they become distracting. Flash fill can preserve more normal contrasts, keep thing within the dynamic range of you camera system and render more transparency in shadows areas.
If you intend to do more of this kind of work on a professional/part time basis- for pay, I would suggest that you investigate the techniques relating to flash fill and other light balancing and exposure balancing methodologies as well as the principles pertaining to perspective management. A PC lens can be a godsend in precluding very radical post processing corrections.
If an interior is primarily lighted by incandescent, LED, halogen or even fluorescent fixtures and lamps, a continuous fill in source of the same approximate temperature can work well- oftentimes just a touch of fill in light bounced off of a far wall will illuminate the shadows and preserve the natural look of the room. If the room is mainly lighted by natural light, the same technique with electronic flash or blue photo-floods (if they still make and sell them). Out of doors, for construction progress and exterior images, if fill in is required, electronic flash is your best bet- A Speedlight will oftentimes be sufficient. Another method that is very dramatic and appealing, of finished exteriors, is to shoot at twilight, the magic hour and balance for interior light coming out through the windows and exterior (outdoor) incandescent light light. You will get a dramatic deep blue sky and a warm rendition of the building.
Quick tip- In a room with a standard 8 foot ceiling, place the camera a height of about 4 feet and keep it level. Line the verticals up with a grid on your viewfinder screen or, at least, with the edges of the frame. A little bubble level atop the camera may help- some tripod heads are are equipped with theses kinds of levels. For vaulted and cathedral type ceilings, just step back or use a wider focal length- don't tilt! With a tilt/shift lenses, once you get the hang of it, you can preserve perfect perspective an short order.
I hope this helps.
Please see my corrections in the next reply area.
Jul 8, 2018 13:45:57 #
If you want to reply, then register here. Registration is free and your account is created instantly, so you can post right away.