Wasatch Panorama
Jun 26, 2018 13:53:17 #

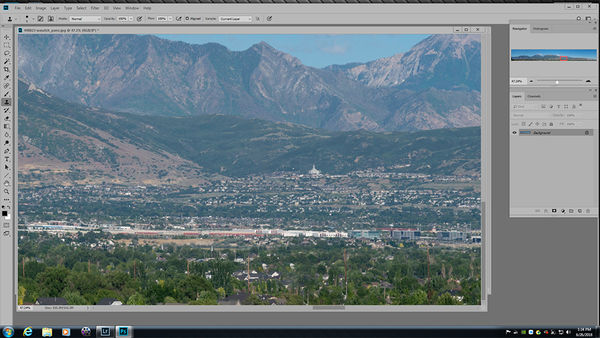
This is my first attempt using LightRoom to create a pano. It is too wide, but I wanted to see what LR could do. Next I need to learn more about Photoshop to get rid of the crane in the lower right.

Jun 26, 2018 14:11:43 #

UTMike wrote:
This is my first attempt using LightRoom to create a pano. It is too wide, but I wanted to see what LR could do. Next I need to learn more about Photoshop to get rid of the crane in the lower right.
I agree, that crane is kind of in a bad spot. If you cropped the image there it breaks up the symmetry. But it isn't a major problem to my mind.
It is a nice image even with the crane!
Thanks for posting the pano, it has been far to long since I've seen them "face to face"
Jun 26, 2018 14:42:44 #
Cany143
Loc: SE Utah
Just guessing, of course, but is this 10 (or so) horizontally shot photos that you then stitched together in LR? Whatever, the ease of making panos now will likely open whole new horizons (pun intended) for you. Well done! (Piece of cake to remove the crane, if you choose to do so. PS's clone tool is your friend, Mike.)
Jun 26, 2018 14:56:50 #
Rich1939 wrote:
I agree, that crane is kind of in a bad spot. If you cropped the image there it breaks up the symmetry. But it isn't a major problem to my mind.
It is a nice image even with the crane!
Thanks for posting the pano, it has been far to long since I've seen them "face to face"
It is a nice image even with the crane!
Thanks for posting the pano, it has been far to long since I've seen them "face to face"
Thanks for looking and the encouraging comments.
Jun 26, 2018 15:00:18 #
Cany143 wrote:
Just guessing, of course, but is this 10 (or so) horizontally shot photos that you then stitched together in LR? Whatever, the ease of making panos now will likely open whole new horizons (pun intended) for you. Well done! (Piece of cake to remove the crane, if you choose to do so. PS's clone tool is your friend, Mike.)
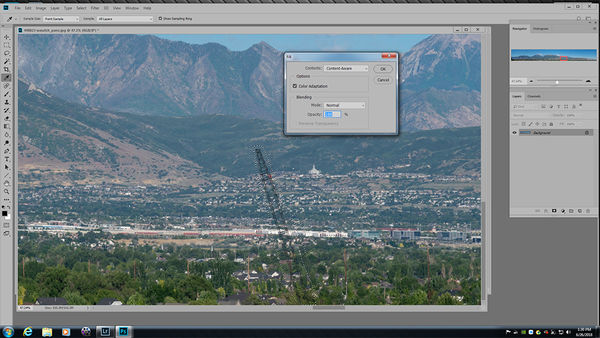
Thanks for looking, Jim. I used the new PS CC 2018 and the old brush has been replaced with with an eraser. I could make marks on the crane, but it did not 'erase", just white marks. I am going to figure out what went wrong. The Adobe video tutorial does not have this tool (just the old top that I knew how to use) and my google question to Adobe did not solve how to use "eraser".
Jun 26, 2018 16:05:52 #
Cany143
Loc: SE Utah
UTMike wrote:
Thanks for looking, Jim. I used the new PS CC 2018 and the old brush has been replaced with with an eraser. I could make marks on the crane, but it did not 'erase", just white marks. I am going to figure out what went wrong. The Adobe video tutorial does not have this tool (just the old top that I knew how to use) and my google question to Adobe did not solve how to use "eraser".
Mike: Ok. First thing, the eraser tool is not what you want to use. Two tools above that, you'll find the clone tool. As with everything in PS, it has variables available, but you'll want to use 100% opacity, see that the 'aligned' box is checked, and use a relatively small brush (I used 9 pixels). Holding the Alt key down, sample (click on) an area along side the area you'll be removing (the crane) and that echoes the surrounding area that isn't being filled, and essentially 'paint' in over the crane. That's what I did with the upper portion of the crane, and its now gone. Then, I decided to save some time in the lower portion, so I used the lasso selection tool, selected the area around the crane, then went up >Edit >Fill >and opted for 'content fill' (see attached screen shot). The fill is imperfect, but it makes using the straight clone tool operation a lot easier while finishing off the fix. There are other ways of doing essentially the same thing, but these are some of the simpler ones. There ought to be YouTube videos and Photoshop tutorials available on the use of cloning and filling and such. Hope that helps rather than confuses. (It took me longer to write this out than it did to remove the crane.)

Jun 26, 2018 16:06:02 #

You did a good job for your first try. The crane is not really an issue as you have to deal with what you have. Getting rid of it or cropping is really up to you and quite frankly I do not see the issue.
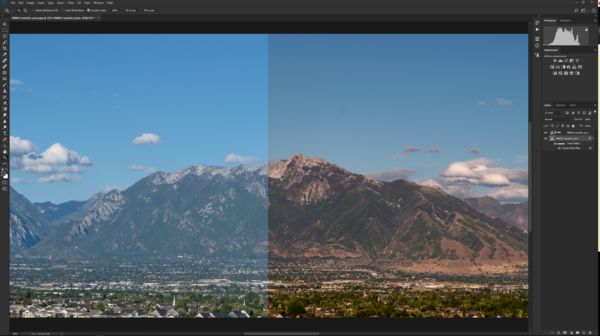
On the other hand I see an PP issue - After the stitching - It has to do with both color balance and haze. I will post a partial sample so that you see what I mean.
-
.
On the other hand I see an PP issue - After the stitching - It has to do with both color balance and haze. I will post a partial sample so that you see what I mean.
-
.
While this is likely not what you remember you get the idea. PS CC haze slider is your friend, among other things.
(Download)
Jun 26, 2018 16:24:16 #
Rongnongno wrote:
You did a good job for your first try. The crane is not really an issue as you have to deal with what you have. Getting rid of it or cropping is really up to you and quite frankly I do not see the issue.
On the other hand I see an PP issue - After the stitching - It has to do with both color balance and haze. I will post a partial sample so that you see what I mean.
THanks, I look forward to it.
-
.
On the other hand I see an PP issue - After the stitching - It has to do with both color balance and haze. I will post a partial sample so that you see what I mean.
THanks, I look forward to it.
-
.
Jun 26, 2018 16:29:47 #
Cany143 wrote:
Mike: Ok. First thing, the eraser tool is not wh... (show quote)
Jim, you are truly a man for all seasons - raconteur, master photographer and PP wizard! Thanks for the help.
Jun 26, 2018 16:31:00 #
Rongnongno wrote:
You did a good job for your first try. The crane is not really an issue as you have to deal with what you have. Getting rid of it or cropping is really up to you and quite frankly I do not see the issue.
On the other hand I see an PP issue - After the stitching - It has to do with both color balance and haze. I will post a partial sample so that you see what I mean.
-
.
On the other hand I see an PP issue - After the stitching - It has to do with both color balance and haze. I will post a partial sample so that you see what I mean.
-
.
Thanks, I look forward to it - sorry that I hit the wrong button in my first attempted reply.
If you want to reply, then register here. Registration is free and your account is created instantly, so you can post right away.