Air Museum Pano.....and the "How" of it...
Jun 15, 2018 17:59:59 #
kskarma
Loc: Topeka, KS
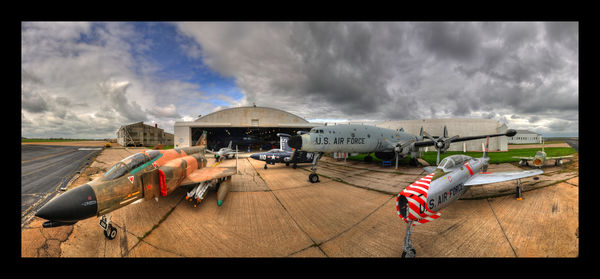
Every spring, our local Combat Air Museum in Topeka, KS, sponsors a Celebrity Pancake Feed to raise funds for the operation of this entirely volunteer-operated air museum. In order to create enough room inside the hangar for the preparation of the 'cakes as well as seating for all of the guests, some of the planes in the collection are moved to the outside apron. A few years ago, when this event was about to take place, I decided to try to use this once-in-a-year opportunity to see if I could put together a nice pano.
The day before the event, after the planes had been moved to the tarmac, I erected my 12 foot ladder and moved it around a bit to select what I hoped would be a good vantage point that would show-off the museum and a few of the planes. I knew that light during the Magic Hour would showcase the scene, even though it meant getting up before the crack of dawn.
The next morning, I arrived early, just at daybreak and set up my gear. On the top of the ladder, I mounted my Nikon D-700 using a 360Precision panoramic mount and my 17-35mm f2.8 Sigma lens. (EXIF....f 16, 1/1000th sec. ISO 1100) This mount holds the camera in 'portrait' mode, which is what I use nearly all the time for this work. I selected a bracketing sequence of 7 frames with full stop increments and I made 8 overlapping images while rotating the mount through about 200 degrees. My camera position was close to the edge of the apron as you can see from this photo. Barely visible on the right side of the photo is the same edge of the runway that can be seen on the left edge. The wind was blowing briskly...maybe 20 MPH...(feel free to translate that into knots if you insist..!), the early spring temps were 'bracing' and my position atop the ladder was not exactly the most comfortable I had ever been in. To expose each of the 8 segments, took a minute or so...and I ALWAYS do a second pass as insurance. So the whole shoot took about 20 or so minutes....my fingers were crossed that it all would turn out fine when I did the HDR and PhotoMerge operations. I certainly hoped that putting together these 56 frames would go smoothly...
When I was initially involved in setting up the ladder, affixing my camera, etc., I was disappointed to see that the sky was a uniform gray...it could have been used for that legendary 18% gray card..! But...since I have lived a charmed life, by the time I started the series of actual exposures, the clouds had started to break up, some patches of blue sky were visible, and there was a nice white accent near the horizon!!!..truly the Photographic Powers were smiling on me then....!!
Later that day, I offloaded the files to my PC and then started the incremental process of loading 7 frames into the PhotoMatix HDR program, saving the outputs, repeating this 8 times....then loading those 8 images into PhotoMerge...(Photoshop's Pano program), pressing "Enter" and then sitting back with my fingers crossed, hoping that Murphy's Law would not bite me in some unknown way.
To say that I was amazed and delighted with the resulting output would be an understatement...!! The dramatic clouds would make ANY photo look good and the vintage planes added a nice splash of color. The curvature of the seams in the apron are a result of the stitching in PhotoMerge. In some earlier versions of Photoshop pano programs, the intersection of those joints would have been pretty random and very distracting. I generally print this as a 13" X 28" panoramic print, using an Epson 1403 and feeding roll paper into it manually. This makes a very striking photo with a lot of history...
Jun 15, 2018 18:08:52 #
Low Lids
Loc: Gainesville, Florida
Great shot of a historical bunch of planes! Brought back memories of working on some of them. You went through lots of work for the picture but your results were worth it!!! The download was beautiful!!!
Jun 15, 2018 23:39:38 #
kskarma
Loc: Topeka, KS
Low Lids wrote:
Great shot of a historical bunch of planes! Brought back memories of working on some of them. You went through lots of work for the picture but your results were worth it!!! The download was beautiful!!!
Thanks for your comment...and, when I am at the Museum, I hear a lot of people with similar remarks...how they at one time, worked on, flew, admired, etc. one of the planes on display. Many people have some strong connection with these aircraft.
And...I had fun setting up, shooting and processing the photo...glad you liked the download...the original image is 22 meg...too large for here...!
Jun 16, 2018 07:03:41 #
Jun 16, 2018 08:38:54 #

Jun 16, 2018 09:16:36 #
I rather like it.
The curvature of the seams is because of the camera's side to side movement and the distance of the seam to the camera as you move it and click. Ther may be away to avoid or fix but if si, I don't know it. IKf you ant ot spend the time you might check PTGui's forum - ptgui@googlegroups.com
The curvature of the seams is because of the camera's side to side movement and the distance of the seam to the camera as you move it and click. Ther may be away to avoid or fix but if si, I don't know it. IKf you ant ot spend the time you might check PTGui's forum - ptgui@googlegroups.com
Jun 16, 2018 12:09:57 #

Jun 16, 2018 14:25:40 #
BboH wrote:
I rather like it.
The curvature of the seams is because of the camera's side to side movement and the distance of the seam to the camera as you move it and click. Ther may be away to avoid or fix but if si, I don't know it. IKf you ant ot spend the time you might check PTGui's forum - ptgui@googlegroups.com
The curvature of the seams is because of the camera's side to side movement and the distance of the seam to the camera as you move it and click. Ther may be away to avoid or fix but if si, I don't know it. IKf you ant ot spend the time you might check PTGui's forum - ptgui@googlegroups.com
To correct my goofs:
The curvature of the seams is because of the camera's side to side movement and the distance of the seam to the camera as you move it and click. There may be away to avoid or fix this but if so, I don't know it. If you want to spend the time you might check PTGui's forum - ptgui@googlegroups.com[/quote]
Jun 16, 2018 16:17:57 #
kskarma
Loc: Topeka, KS
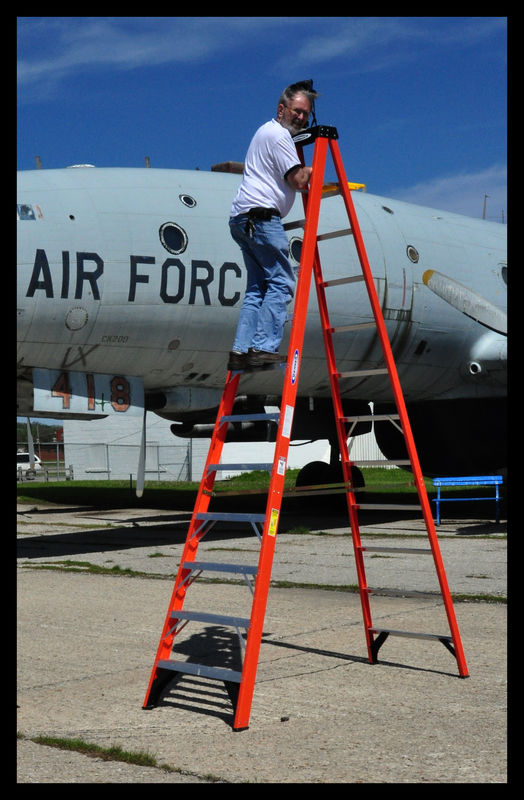
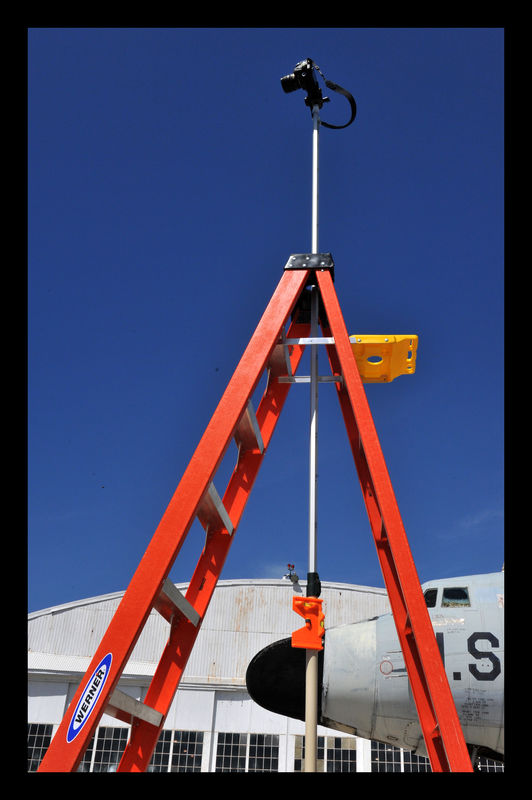
Thanks to those 'hogs' who have viewed and commented on this Panoramic photo. I've added a few more 'action shots' that illustrate my gear...and MY graceful techniques in doing the photo. The first two photos show the 12 foot ladder I used for this...it's a high quality ladder with a wide and stable base. When I'm a dozen feet in the air and concentrating on my camera work, I don't want to have to be concerned about my support... The first of these photos shows the ladder with my camera mounted at the top...the second one shows how I can achieve an additional 4 feet of height. To do this, I use a 'painters pole' that is 16' long and slip it through the 'paint bucket holder' at the top surface of the ladder. I can view the photo I am taking with a Wi-Fi link to my iPhone or iPad and 'pan' the camera by rotating the painters pole... The second of these shots shows a common "fence level" that is used to get the pole in a truly vertical position...
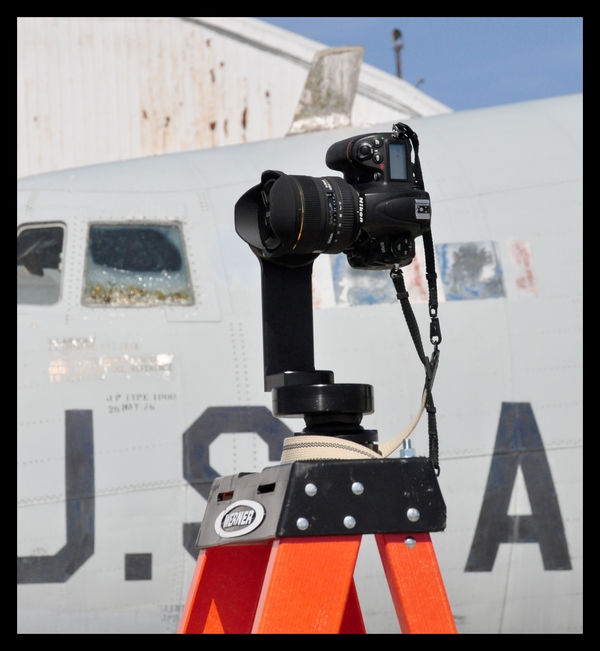
The next two shots are of my 360Precision pano head. This is an 'over-engineered' head made in England...don't think they still make this model BTW. When I was first starting to do pano work, I had read a lot of 'warnings' about making absolutely certain that the camera and mount were exactly level and..even more critically, that the "nodal point" ….more accurately called the "Entrance Pupil"..or the "No Parallax Point", had been determined. This point being the location IN the lens about which the lens should be pivoted in order to achieve images that are accurately registered so that they can be correctly 'stitched' together. As can be observed in this pair of photos, the pano mount I used DID do this....the company offered many mounting options, each of them calculated for a specific lens/camera combination. You will note that this mount has the ability to not only rotate 360 degrees in the horizontal plane, but also to be rotated in a full circle in the vertical plane. Different mounts for different lenses offer the correct detents to match the field of view of each lens...! It's an impressive piece of hardware and does exactly what it is designed to do...
Now...that being said....since I have used this mount...(and it works perfectly...!)...on several projects, I have come to the conclusion that with the amazing ability of PhotoMerge to align and stitch images that...to be charitable....are 'less than perfect'....I feel totally comfortable now, doing most of my panos hand-held! I do try to maintain a level 'sweep'...and make sure that I have adequate 'overlap' from image to image. But I know that current software can blend, align, mask and merge anything that is even close to being correct. I DO make two passes on any of the panos I do, just to make sure that I have one good series. This means that I don't have to tote around a bit of heavy gear, but can shoot a pano series anytime the subject calls for one....
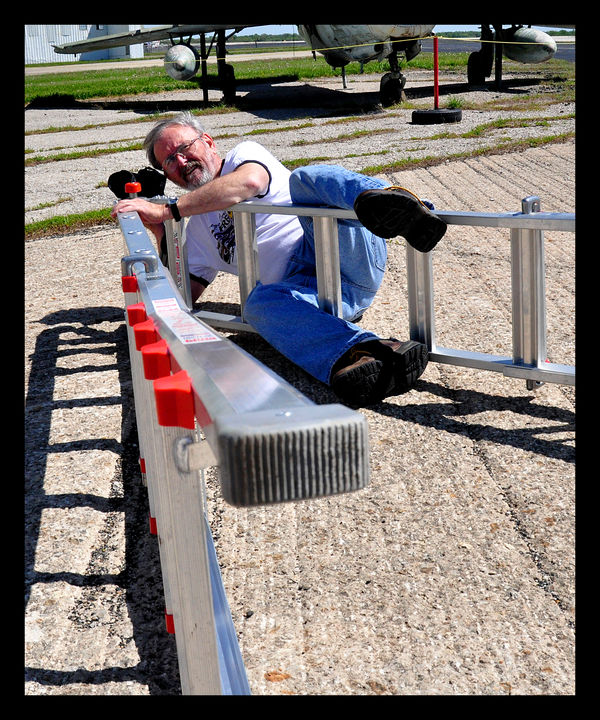
Finally.....pay attention to the last image......when doing ANYTHING on a ladder...even just using a kitchen step stool....use utmost caution....a fall of even a few feet can cause serious injury...or even be fatal..!
SO...gotta 'fess up now...the last shot was staged just to illustrate what CAN happen....NEITHER the photographer nor his gear was injured making this photo....!!!

The next two shots are of my 360Precision pano head. This is an 'over-engineered' head made in England...don't think they still make this model BTW. When I was first starting to do pano work, I had read a lot of 'warnings' about making absolutely certain that the camera and mount were exactly level and..even more critically, that the "nodal point" ….more accurately called the "Entrance Pupil"..or the "No Parallax Point", had been determined. This point being the location IN the lens about which the lens should be pivoted in order to achieve images that are accurately registered so that they can be correctly 'stitched' together. As can be observed in this pair of photos, the pano mount I used DID do this....the company offered many mounting options, each of them calculated for a specific lens/camera combination. You will note that this mount has the ability to not only rotate 360 degrees in the horizontal plane, but also to be rotated in a full circle in the vertical plane. Different mounts for different lenses offer the correct detents to match the field of view of each lens...! It's an impressive piece of hardware and does exactly what it is designed to do...
Now...that being said....since I have used this mount...(and it works perfectly...!)...on several projects, I have come to the conclusion that with the amazing ability of PhotoMerge to align and stitch images that...to be charitable....are 'less than perfect'....I feel totally comfortable now, doing most of my panos hand-held! I do try to maintain a level 'sweep'...and make sure that I have adequate 'overlap' from image to image. But I know that current software can blend, align, mask and merge anything that is even close to being correct. I DO make two passes on any of the panos I do, just to make sure that I have one good series. This means that I don't have to tote around a bit of heavy gear, but can shoot a pano series anytime the subject calls for one....
Finally.....pay attention to the last image......when doing ANYTHING on a ladder...even just using a kitchen step stool....use utmost caution....a fall of even a few feet can cause serious injury...or even be fatal..!
SO...gotta 'fess up now...the last shot was staged just to illustrate what CAN happen....NEITHER the photographer nor his gear was injured making this photo....!!!

Jun 21, 2018 01:18:18 #
Nice work kskarma!
I’ve lived in The Kansas City area for about 28 years now and despite loving military aircraft and seeing the sign for the museum many times, went to there last week for the first time.
Quite a collection and a bargain price for admission!
Thanks for posting.
I’ve lived in The Kansas City area for about 28 years now and despite loving military aircraft and seeing the sign for the museum many times, went to there last week for the first time.
Quite a collection and a bargain price for admission!
Thanks for posting.
If you want to reply, then register here. Registration is free and your account is created instantly, so you can post right away.