A most challenging subject....and Focus Stacking to the rescue...!
May 24, 2018 12:47:40 #
kskarma
Loc: Topeka, KS
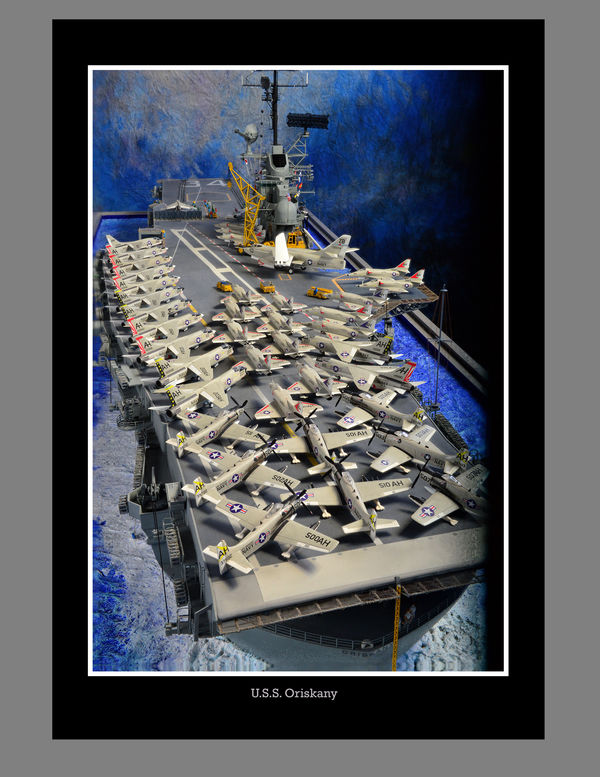
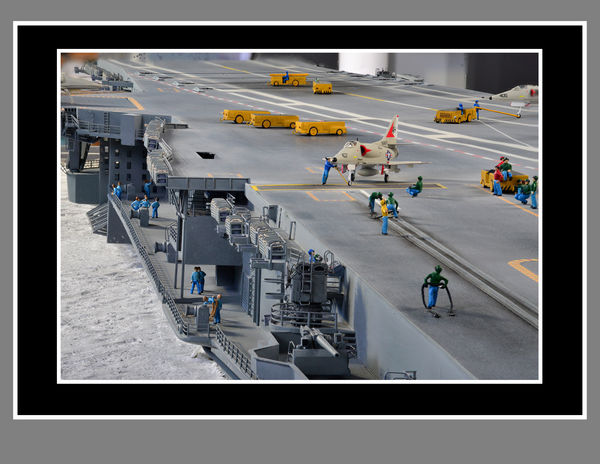
Quite often I called upon to photograph models...such as railroad layouts, ships, dioramas, etc. As many of us know, trying to achieve an acceptable...and 'believable' depth of field can present many challenges....the closer you get, the shallower your DOF is...stopping down has its limits....including diffraction, a wide angle lens can include too much background....on and on...
For this assignment, I was asked to take photos of a model aircraft carrier. This is the U.S.S. Oriskany, an Essex-class carrier that was built at the end of WWII and served until 1989. In 2006, it was "reefed" and has been a popular diving object just off Pensecola. The model itself is about HO scale...and a carrier of this size and at that scale is 10 feet long...!! No way can a single image manage to maintain focus over that great a distance. My solution was to rely on an often used tool in my Photo Editing Bag O' Tricks...and use the technique of "Focus Stacking"... In this shot, my camera was about 7-8 feet from the stern of the ship, I was using a zoom lens, I think set about 100mm...and probably f5.6. I lit the ship with a couple of Alien Bees that were bounced into umbrellas. Starting at the stern end, I focused on the safety net, took an exposure...then manually rotated my lens to focus an inch or so farther down the deck...this was repeated nearly 4 dozen times...I have had enough experience using this techniqe, that I have a good 'feel' for how much I need to manually increment the focus to make sure that the areas of sharp focus overlap and to give the software...(CombineZP is what I use...there are many others..) plenty of areas of sharpness with which to work. After I review my shots...(and do it all over a second....or even a third time...just for "Insurance Purposes", Murphy is always lurking around...!)...then I offload the shots to my PC...open CombineZP and select the range of images I want to use. As I recall, in this shot I ended up using 43 of my exposures. The first step in using CombineZP is to process the images using one of the "Align Images" options....this gets all of the shots in register. Since the changing focus of the lens makes some difference in the registration from shot to shot, this allows the final "Stack" option to proceed with the best set of images.
This "Focus Stacking" is most often used to take photos of insects...usually it is combined with a microscope with a camera mounted on it...and the whole assembly is racked up and down to alter the 'plane of focus' by teeny-tiny amounts (a very scientific measurement, by the way...!) incrementally. My guess is that when moving the entire camera/lens combo, that the 'alignment' option might not need to be used as the lens is not re-focused for each image...just my two cents worth...I should say that I personally have never used Focus Stacking in this manner...
It takes a few minutes...6-8 I recall...in this case, to process all 43 shots...it 'magically' can tell where the sharpest focus is from frame to frame...and then it assembles them all into this final image.. Let me add that as many of these as I have done, it's always a fresh surprise to see the end result.... Please do a "Download" to appreciate the end to end focus of this image.
Tourist Info....This magnificent model is on permanent display at the Combat Air Museum in Topeka, KS. Except for the aircraft, which were built from kits...the rest of the model...the hull, deck, control tower ("Island"), sailors, pilots, deck items....all of it...was scratch built by three very talented and dedicated modelers. The hull/deck took one fellow the better part of 8 years from start to finish, the control tower was built in 2-3 years by a second modeler..and all of the planes were done by a 3rd member of the Museum. All of the unit numbers, plane designators, etc....are prototypically correct for the time of service of the Oriskany. The ship was originally built as a straight deck craft and was assigned the number CV-34...she later was converted to an angled deck...as shown here...and then was the CVA-34.
May 24, 2018 13:11:45 #

kskarma wrote:
Quite often I called upon to photograph models...s... (show quote)
IMO, and for the particular perspective that you used for this subject, a tilt lens could have given you very good DOF in a single exposure - maybe not quite as good as combining 43 exposures tho .....??
..
May 24, 2018 13:18:21 #
May 24, 2018 13:26:45 #
May 24, 2018 14:55:40 #
Beautiful shot. There is a guy in my neighborhood (ssh clear lake Texas) that served aboard her late 60s as a cop in ic room.
May 25, 2018 07:09:01 #
Great shot, excellent detail. Had a close friend who was on the Oriskany when the fire broke out, left for dead but survived.
May 25, 2018 10:42:45 #
You did an excellent job on this, WOW, and the model builders did a great job also, fantastic job.
May 25, 2018 11:37:51 #
kskarma
Loc: Topeka, KS
Blaster34 wrote:
Great shot, excellent detail. Had a close friend who was on the Oriskany when the fire broke out, left for dead but survived.
Thanks for your kind words...and your friend was extremely lucky...I'm sure that fire was terrifying....
Here is another view of the Oriskany model showing the action around one of the front catapults. ALL of the sailor's figures were hand made, starting with a single model of a highway worker from another project, then re-cast and copied dozens of times. After over a hundred figures had been made, each of them was modified by selective cutting and bending to the appropriate positioning, painted and fixed in the correct location. Model makers are a compulsive group....!!!
Again, this shot is "Focus Stacked"...about a dozen frames...the "Download" will show more of the realistic deck action of launch time on the Oriskany.
May 25, 2018 11:52:25 #
kskarma
Loc: Topeka, KS
ebbote wrote:
You did an excellent job on this, WOW, and the model builders did a great job also, fantastic job.
All the credit goes to the three Museum Members who put in thousands of hours of work and lots of research to get it all correct. In the fall of 2014, the Annual Reunion of the Oriskany Association was held in Topeka, KS. This is when the model pictured here was unveiled and dedicated. When the spotlights were turned on and the shroud was pulled aside to reveal this model, there was not a dry eye in the crowd of several hundred former crewmen and their families...a very emotional time for everyone to once again see the ship that had been home for so many years looking so good.
May 25, 2018 12:46:02 #

Nice lighting and the end results look very pleasing. Since you do so much photo stacking, try the Nikon D850 with its photo stacking option.
May 25, 2018 12:56:22 #
kskarma
Loc: Topeka, KS
JeffDavidson wrote:
Nice lighting and the end results look very pleasing. Since you do so much photo stacking, try the Nikon D850 with its photo stacking option.
Thanks for your kind words...and some of the features of the D850 are tempting, for sure. I'd like to play with one for awhile... Please send $$$$$...[G]
May 25, 2018 16:13:56 #

Thanks for the complete description of your process. The pic is beautiful and I'm sure many who view it in the future will have no idea of all you did to create it.
May 25, 2018 19:03:40 #
May 25, 2018 19:06:48 #
kskarma
Loc: Topeka, KS
MikWar wrote:
Thanks for the complete description of your process. The pic is beautiful and I'm sure many who view it in the future will have no idea of all you did to create it.
I really appreciate the positive comments from folks who understand the steps needed to get a good photo. My goal in my work is to please the viewer and try to give them an understanding of the subject, the 'feeling' that might have accompanied it or the grandeur of a place. I am especially pleased when I hear someone say something like..."You made me look good"...or..."I'd like to go see that myself sometime"... I can't think I've EVER had anyone ask me what lens or f-stop I used, if I processed the image with a particular bit of software, whether or not I shot it in RAW or used Manual mode....did I use Auto ISO...?..on and on. (At times, I do get asked, "What kind of camera do you have?", however...)
From most peoples viewpoint, the main thing they see...is a "Picture" of something or someone, and the process does not matter to them at all. SO...it's great to get the feedback here from those who are involved with some of the mechanics of photography....and understand that it can be a LOT more than just pressing a button.
Still...I like to hear the ultimate compliment..."Your camera takes REALLY good pictures...!!"
May 25, 2018 19:09:04 #
kskarma
Loc: Topeka, KS
the f/stops here wrote:
Terrific image and excellent use of stacking. Thanks for sharing.
The "f/stops here".....love the humor....!!


If you want to reply, then register here. Registration is free and your account is created instantly, so you can post right away.