Long Exposure in B&W with RGB Processing
Apr 22, 2018 00:56:04 #
phil9945
Loc: British Columbia, Canada
Probably not to everyone's taste -
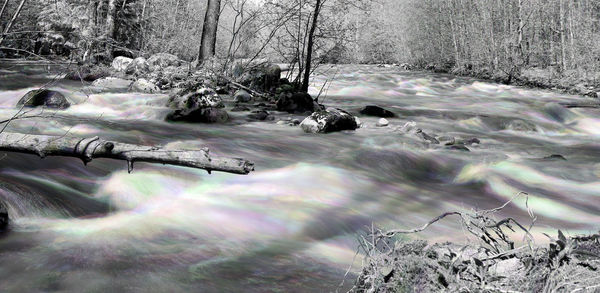
I tried this technique a couple of years ago - posted here in UHH - always vowed to get to a better place to shoot a nicer pic ... this is one I totally prefer :) (of course - my most favourite spot on 'my' river)
dl recommended
cheers
Phil
I tried this technique a couple of years ago - posted here in UHH - always vowed to get to a better place to shoot a nicer pic ... this is one I totally prefer :) (of course - my most favourite spot on 'my' river)
dl recommended
cheers
Phil
Apr 22, 2018 15:28:54 #

phil9945 wrote:
Probably not to everyone's taste -
I tried this technique a couple of years ago - posted here in UHH - always vowed to get to a better place to shoot a nicer pic ... this is one I totally prefer :) (of course - my most favourite spot on 'my' river)
dl recommended
cheers
Phil
I tried this technique a couple of years ago - posted here in UHH - always vowed to get to a better place to shoot a nicer pic ... this is one I totally prefer :) (of course - my most favourite spot on 'my' river)
dl recommended
cheers
Phil
Pretty cool, Phil. I used to do something similar on film with 3 exposures thru different filters. I think I may like your effect better. Wanna share technique?
Apr 23, 2018 02:08:24 #
phil9945
Loc: British Columbia, Canada
cameraf4 wrote:
Pretty cool, Phil. I used to do something similar on film with 3 exposures thru different filters. I think I may like your effect better. Wanna share technique?
absolutely ... I take 3 shots (camera on tripod) long exposure is best (I used a 3 stop) ... leave a few minutes between shots (I leave about 30 seconds) - in your editing program (I use Corel Paintshop Pro X9 - but anyone should do) - each shot is opened as a layer - open the Color Channel to use only the R, G and B channel of each shot (layer). Specifically, for the first shot, set the Red to 100% and Green and Blue to 0%. For the second shot, set Green to 100% and Red and Blue to 0%. And for the third shot set Blue to 100% and Red and Green to 0%.
Then merge them by setting the opacity of the first shot to 33% and the second shot to 50%, Then, merge the layers (flatten)
Adjust brightness until you are happy ...
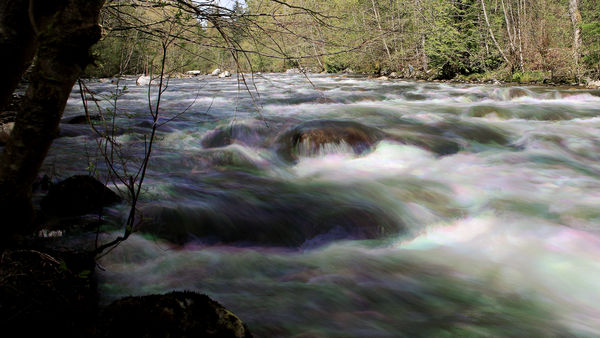
Here is another I shot today - (IMHO) a better part of the river for this type of shot ... no conversion to b&w first - I preferred this one to stay in color :)
thanks for looking and the opportunity to share technique
Phil
Apr 23, 2018 12:42:21 #
phil9945 wrote:
absolutely ... I take 3 shots (camera on tripod) l... (show quote)
Thanks, Phil. I look forward to giving it a try. Probably in the summer when I am bored with GREEN.
Apr 23, 2018 13:00:02 #

Apr 23, 2018 13:36:46 #
If you want to reply, then register here. Registration is free and your account is created instantly, so you can post right away.