How Important Is a Modeling Light for Learning Studio Portraiture?
Feb 11, 2018 10:31:16 #
berchman
Loc: South Central PA
I posted this question in the main section, but it just occurred to me that this is the more appropriate section in which to post it.
I would like to learn to do formal portraits of friends (spouse is resistant; says that flash bothers her) with a tethered Fuji X-T2. I've read about different lighting patterns (Rembrandt, clamshell, etc.), rim lights, background lights. I realize that there's also a lot to learn about posing, to say nothing of getting a good expression from the subject by talking to them a la Peter Hurley. I am most inspired by Yousuf Karsh's portraits and those of Steve McCurry. I already own three Nikon speedlights (2 SB900, SB700) and a flash meter (Sekonic 478DR), three Pocket Wizard Flex TT5's and a Westcott Apollo softbox. The new Flashpoint XPLOR 600PRO TTL With R2 Pro Transmitter for Fuji-Godox AD600Pro costs almost $1000, but it has a powerful 38W LED modeling light and can do HSS with the Fuji for backlit outdoor portraits.
I'm aware that Paul C Buff has just come out with the DigiBee DB800 which also has a powerful modeling light and costs a lot less, but by the time you buy his transmitter and receiver and portable power pack the cost is up there and it does not do HSS or TTL with the Fuji. The mounting ring is not the standard Bowens mount so one would have to either buy an adapter or use only PCB light modifiers. Moreover, although PCB has a great reputation for service, one reviewer says they need to be good at service because they are always fixing problems with their units. (Google "problems with paul c buff strobes").
So, getting back to the title of my question, how important is a modeling light for learning studio portraiture?
Feb 11, 2018 15:35:10 #
The modeling light will assist you in seeing where the strobe light will fall on your subject. You can move the light around to the correct spot for more or fewer shadows on your subject according to how you wish the shot to look. In time you will become accustomed to, and familiar with light placement but for now, use the modeling lights. PS, You really don't need to have the most expensive and best lighting equipment to start.
Feb 12, 2018 20:29:42 #

***This is the response I provided in the main section. I am re-positing it in the even that anyone else would like to comment or add to this thread.
Of course, equipment choices are important- we want to make sure that we are acquiring the right gear for the right job, especially when it comes to portraiture. In the man section their were a number of good suggestion but most of the responses were pertaining to equipment brands, specifications, features and price points. There is certain enough good equipment out there but before making a substantial investment. I always advice folks to drill a bit deeper down into portrait light. There are many fine points that are seldom discussed in online forums, books and even classroom setting. There is a wealth of information that has been passed down through the decades in the area of fine portraiture that has somehow evaded books and even formal academic environments. I glean many techniques from the old timers and masterful workers that mentored me as a young upstart. I participated in many classes and workshops over the years and sadly, many of my early teachers and mentors are gone. Sadly again, many of the younger folks entering the craft and the profession are reluctant to study "old school" philosophies and methodologies, not realizing that there are many classical techniques that are as applicable to more contemporary styles as the were to more dated approaches and still enable outstanding results.
For the OP- I am please that you are going attend classes. I am going to list a few topics here and, if you get a chance, tell me how man of theses terms you are familiar with. I will elaborate on anythg that is to you. I am sure others here will pitch in as well. Here's the topics:
Unseen secondary light, unity of lighting, lighting ratio, low, medium and high key, angle of incidence,facial analysis, similar and contra poses
, body mechanics in portraiture, subtractive lighting, feathering, lighting forms (butterfly, loop, Rembrandt, split, kicker, background, hair.) eye management, camera position, facial forms (full, 2/3 and profile), front and back profiles, head-shot, head and shoulders.3/4 full length, gorupos, background management, color and tonal mass, soft focus, optical diffusion, snoots, barn doors and grids,parabolic reflector methods, umbrella lighting technique, softbox and widow lighting, Fresnel spotlights, lighting movements-vertical, lateral and distance and their effects.
There is a lot of stuff- take your time and let me know.
***Meanwhile here is that other post form the other section.
Modeling lamps! If you are going to use electronic flash for fine portraiture, modeling lams are imperative. Of course, experienced photographers can improvise without them but there are many finite techniques that require very precise lighting control- methods such as "feathering", facial analysis, certain lighting patterns and styles and much more that need to be carefully observed while you are lighting a portrait subject.
A this point in you learning curve, try not to get too hung up on brand names and all the models and fancy features. The main consideration in a modeling lamp unit is that the lamps are powerful enough to make your lighting easy to see and perceive and that there is enough modeling light output to remain effective when light modifiers, such as soft-boxes and umbrellas. are employed. It is also important that the modeling lamp be concentric to the flash tube, so the beam will be more indicative of the effect of the actual flash. A incandescent (usually quartz) modeling lame in the 150 to 250 watt range will usually be sufficient. A dimmable or tracking modeling light feature is desirable for ratio (contrast) control in multiple lighting systems and there is another consideration: In direct flash usage (unmodified), if the modeling light is too bright, it is more difficult to judge the lightning pattern and it can cause the subject some discomfort and bring on squinting. Once you modify light, you will need the additional modeling light output to maintain is visual efficiency.
Another important consideration is the ACTUAL power of the flash it self. In portraiture, extremely powerful units are not usually required. You are working in close to the subjects and in may cases wider aperture are desirable for reduced depth of field in background management and other selective focus effects. Again, you might need a bit more power to compensate for the light absorption of modifiers. A good mono-light in the 300-600 watt-second ranr is a good average choice. For shallow depth of field application, you will need a unit that can be powered down- something that can go as low as 25- or 50 watt-seconds would be ideal.
For out of door use, oftentimes the visual usefulness modeling lamps are almost entirely negated- you ain't gonna overpower the sun with any practical continuous light source- you just won't see the effect on a bright day! You may see the effect on a dull day but unless the unit has a feature whereby the modeling light automatically shuts down upon flashing, the modeling light will likely factor into your exposure and mix the incandescent light with the daylight/flash temperature and mess up you color balance. For optimum control in out-of-doors environmental portraiture, I highly recommend reflector usage for adding directional lighting or fill in applications- what you see is what you get!
$$$ Budget is also a consideration. The buff units are decent and practical- the are well built and I have seen the in profession use- their customer service is impeccable. I use Photogenic brand equipment. I had tones of it in my studio- big old fashioned Studiomaster units. So I went to the Photogenic Powerlight lie because all my reflector and light modifiers, snoot and barn doors fit their current line. Other good brads are Bowens, Speedotron($$$$) and much more. The important thing is getting the aforementioned features for good lighting control.
To star with, believe it or not, 1 decent mono light, a soft-box, an umbrella and a flat (silver) reflector plus a couple of light stands comprise a great starter kit. I have 14 units in my studio for different jobs and purposes and my best stuff comes for simple 1 or 2 light setups- well hair, kicker and background lights are cool too, but the first step is to understand the basic main light functions.
In most portrait scenarios you are not in a gun and run situation. A fast recycling time is good but you don't need to fire away at 7 FPS or anything like that. You will want units that can accommodate regular parabolic reflectors in the 12 to 16 inch range, as well as smaller reflectors for modifier usage. A good inter-phasing mechanical design that works well with modifiers is nice too so you won't require an endless collection of adapters.
Feb 12, 2018 23:37:30 #
It is handy, to be sure, but hardly critical. Before I invested in studio strobes (Einstein) I used speedlights for years with no modeling lights.
Even today, I often forego the modeling lights but then I usually shoot tethered so I do see the results, even if it is just a second or so after the shot.
Even today, I often forego the modeling lights but then I usually shoot tethered so I do see the results, even if it is just a second or so after the shot.
Feb 13, 2018 09:32:37 #
I think I would say that when I was first starting out with film, they were imperative, I couldn't waste a ton of shots not knowing exactly what the light would look like, and I certainly couldn't ask a senior to come back in a few days after I developed the film, so I could adjust the lights one way or the other. With digital, film is free, and feedback is almost instant.
Now...on the other side of that. While it's certainly possible to learn without modeling lights, they are still VERY handy. The key with studio lights with modeling lights is that the light has to be controlled. If you are in a super bright room, then you won't be able to see what the modeling lights are doing, and won't be able to see the ratios.
The question is.... are you planning to strictly do "studio shots" in your house, or are you planning to shoot on location? If on location, it's VERY difficult to be in the right conditions where the modeling lights are helpful. Outdoors, is fairly impossible to see your ratios without just using a light meter, or looking at the results, preferably on a larger screen than what is on the back of your camera.
Feb 13, 2018 10:34:19 #
berchman
Loc: South Central PA
E. L. Shapiro>"For the OP- I am please that you are going attend classes. I am going to list a few topics here and, if you get a chance, tell me how man of theses terms you are familiar with. I will elaborate on anythg that is to you. I am sure others here will pitch in as well. Here's the topics:
Unseen secondary light, unity of lighting, [lighting ratio, low, medium and high key, angle of incidence],facial analysis, similar and contra poses
, body mechanics in portraiture, subtractive lighting, [feathering, lighting forms (butterfly, loop, Rembrandt, split, kicker, background, hair.]) eye management, camera position, facial forms ([full, 2/3 and profile]), front and back profiles, [head-shot, head and shoulders.3/4 full length], gorupos??, [background management], color and tonal mass, [soft focus], optical diffusion, [snoots, barn doors and grids],parabolic reflector methods, [umbrella lighting technique, softbox and widow lighting, Fresnel spotlights], lighting movements-vertical, lateral and [distance] and their effects.
There is a lot of stuff- take your time and let me know."
I didn't realize that I would need to study for a PhD in lighting! :) I have put the items that I know something about in brackets. I'm guessing that facial analysis involves checking which features need to be minimized or corrected--long nose, double chin, etc. Eye management might involve not having too much white showing and whether you want the subject looking directly into the lens or somewhere else. I guess that lighting movements have to do with where the shadow (if any) falls and how hard the edges and highlights are.
Feb 13, 2018 12:52:55 #
Berchman! Your lighting "IQ") is excellent- you are certainly on the right track! I wish there was really a PhD in "lighting", I would have stayed in school a lot longer!  The " honorary degree" I presently hold is "LL"- Lighting Lunatic- lighting is my passion and I keep studying it!
Seriously, the areas that are not in your brackets are the drilled down finer points that most folks don't usually get into. Those are the areas that absolutely require modeling lights or contentious lighting applications because of the finite observation and control that is necessary. A very slight vertical or lateral movement of a light, can make a significant different in the aesthetics of a portrait. These nuances in lighting placement, can't be be totally in diagrams, measurements, complicated geometric coordinates and instructions. You simply need to SEE the exact effect of the light on your subject.Once you get the gist of things and get the practice in, it's fast and easy. It get's to be second nature and enables you to work quickly and concentrate on communication with your subject and evoking great expressions. In this section, I will endeavor to put together and post more information on some of the finer points.
I too, have years of experience in shooting without modelling lights, after all, my entry level into this business was in wedding photography. Fortunately enough, the first studio I apprenticed, trained and eventually worked for, was one of the few in my city, at the time, that regularly worked with multiple lighting at weddings. Essentially, we learned to simulate various portrait lightnings by learning the basic angles and positions, in fact, the photographers began our training as light men or woman, as a "light man" my job was to properly place the light in relation to the photographer/subject positions- we learned positions from 20 to 135 degrees to the camera/subject axis- and we did this on the fly for all the candid shots as well as the formals- everything, single subjects, couples,groups, ceremony and crowed shots- the works! In many cases we just needed to light up the backgrounds areas to defeat the inverse square law and negate "black hole" backgrounds and provide a nice little kicker light at the same time. The strobe was mounted on a mono-pod and believe me we had to move fast, provide the right kinda lighting and stay out of the photographer's field of view and make certain not to flare out his lens when back-lighting.
There is no reason why decent portrait can not be made with speedlights, but again there are many finer techniques that would be difficult to employ. Another "argument" in favour modeling lights has to do with the use of ordinary parabolic reflectors rather than "softer" or modified light methods. Using a 12 or 16 inch parabolic reflector on a studio strobe or mono-light require more finite lighting control. With softer lightning systems, such as umbrellas and soft-boxes, we can "get away with murder" even if our lighting form is slightly off. With raw parabolic light, positioning and feathering is critical. Parabolic reflector usage offers a great scope of dramatic lighting effects in the rendition of texture, theatrical effects and character studies. Mastering the method is worth the effort.
So...as a dyed-in-the-wool lighting lunatic, well- I love the portability and ease of use of "speedlights" but I seldom use them. For weddings and events, I use the kinds old school portables with power packs. Theses have bigger interchangeable and removable parabolic reflectors, bare bulb capabilities, full coverage for wide angle, normal and telephoto shots, more power, more flashes per charge, very short recycling times and guess what- some of my lamp heads have built in modeling lamps. I can switch on the modeling lamps if I want a more precise portrait effect or even use it so I can see better expressions on a dark dance floor. In dimly lit party room, even a dim modeling light avoids that "deer in the headlights" look in their eyes that folks get when their irises are dilated in dark environments. I can also use the tungsten light from the modeling lamps (without flash) to augment candle light, sparklers etc.and strike a nice white balance.
My other modeling light "argument" is that I am big on overlapping my equipment investments. I like to buy gear that I can use for more that one kinda of work. I oftentimes use my mono-lights for commercial work, art-reproduction and interior architectural shots. I even use my BIG "commercial" lights- like the 2400 watt-second units with power packs and multiple lamp heads to light up large rooms at wedding, sports and event coverages.
Stay tuned!
The " honorary degree" I presently hold is "LL"- Lighting Lunatic- lighting is my passion and I keep studying it! Seriously, the areas that are not in your brackets are the drilled down finer points that most folks don't usually get into. Those are the areas that absolutely require modeling lights or contentious lighting applications because of the finite observation and control that is necessary. A very slight vertical or lateral movement of a light, can make a significant different in the aesthetics of a portrait. These nuances in lighting placement, can't be be totally in diagrams, measurements, complicated geometric coordinates and instructions. You simply need to SEE the exact effect of the light on your subject.Once you get the gist of things and get the practice in, it's fast and easy. It get's to be second nature and enables you to work quickly and concentrate on communication with your subject and evoking great expressions. In this section, I will endeavor to put together and post more information on some of the finer points.
I too, have years of experience in shooting without modelling lights, after all, my entry level into this business was in wedding photography. Fortunately enough, the first studio I apprenticed, trained and eventually worked for, was one of the few in my city, at the time, that regularly worked with multiple lighting at weddings. Essentially, we learned to simulate various portrait lightnings by learning the basic angles and positions, in fact, the photographers began our training as light men or woman, as a "light man" my job was to properly place the light in relation to the photographer/subject positions- we learned positions from 20 to 135 degrees to the camera/subject axis- and we did this on the fly for all the candid shots as well as the formals- everything, single subjects, couples,groups, ceremony and crowed shots- the works! In many cases we just needed to light up the backgrounds areas to defeat the inverse square law and negate "black hole" backgrounds and provide a nice little kicker light at the same time. The strobe was mounted on a mono-pod and believe me we had to move fast, provide the right kinda lighting and stay out of the photographer's field of view and make certain not to flare out his lens when back-lighting.
There is no reason why decent portrait can not be made with speedlights, but again there are many finer techniques that would be difficult to employ. Another "argument" in favour modeling lights has to do with the use of ordinary parabolic reflectors rather than "softer" or modified light methods. Using a 12 or 16 inch parabolic reflector on a studio strobe or mono-light require more finite lighting control. With softer lightning systems, such as umbrellas and soft-boxes, we can "get away with murder" even if our lighting form is slightly off. With raw parabolic light, positioning and feathering is critical. Parabolic reflector usage offers a great scope of dramatic lighting effects in the rendition of texture, theatrical effects and character studies. Mastering the method is worth the effort.
So...as a dyed-in-the-wool lighting lunatic, well- I love the portability and ease of use of "speedlights" but I seldom use them. For weddings and events, I use the kinds old school portables with power packs. Theses have bigger interchangeable and removable parabolic reflectors, bare bulb capabilities, full coverage for wide angle, normal and telephoto shots, more power, more flashes per charge, very short recycling times and guess what- some of my lamp heads have built in modeling lamps. I can switch on the modeling lamps if I want a more precise portrait effect or even use it so I can see better expressions on a dark dance floor. In dimly lit party room, even a dim modeling light avoids that "deer in the headlights" look in their eyes that folks get when their irises are dilated in dark environments. I can also use the tungsten light from the modeling lamps (without flash) to augment candle light, sparklers etc.and strike a nice white balance.
My other modeling light "argument" is that I am big on overlapping my equipment investments. I like to buy gear that I can use for more that one kinda of work. I oftentimes use my mono-lights for commercial work, art-reproduction and interior architectural shots. I even use my BIG "commercial" lights- like the 2400 watt-second units with power packs and multiple lamp heads to light up large rooms at wedding, sports and event coverages.
Stay tuned!
Feb 13, 2018 12:59:15 #

Feb 14, 2018 16:58:30 #
berchman wrote:
E. L. Shapiro>"For the OP- I am please tha... (show quote)
Facial analysis is something that those of us lucky enough to have met or at least go to a seminar or 5 put on by the late Monte Zucker are extreeeeemly excited about. You may be able to find some youtube stuff that people have posted from Monte. I find myself, even in non photography activities, like shopping, going out to eat, etc... just looking at all the faces (and bodies) of people and analyzing the "good side" what I would accentuate, and what I would try to "de-acceutuate" and see the beauty in every face. He would have us (before digital) imagine a line down someone's face, and picture it perfectly symmetrical. Then, you would be able to tell which side of the face was more thin than the other, you would see maybe the nostril one one side was a little "wonky" or the ear on one side stuck out further than the other.
The down side is, this tends to make you look longer at people, and unless you are going to photograph them, you can kind of come across as a weirdo. My lovely bride often has to give me a nudge when she sees me looking and analyzing people. It's actually fun to get an idea in your head of how you would light everyone you see, to bring out their best side.... just watch that you don't get punched in the nose for 'staring" too long.
Feb 14, 2018 18:21:25 #
berchman
Loc: South Central PA
bkyser wrote:
Facial analysis is something that those of us luck... (show quote)
I read Monte Zucker and I must say that I've never been able to figure out which of a person's eyes is the smaller.
Feb 15, 2018 09:25:56 #
berchman wrote:
I read Monte Zucker and I must say that I've never been able to figure out which of a person's eyes is the smaller.
Nobody's face is perfectly symmetrical. Sometimes the eye difference is really noticeable, that's when/why you worry about it. If you can't tell, then don't worry about the size of the eyes, and go on looking at the nose, ears, which side the part of the hair (if there is any hair...mine is parted in the middle....waaaay down the middle, with like a 4" part)
A fun exercise is to have someone face directly into the camera, take the shot. Make 2 copies of the image. (Keep the original to compare)
Draw a line down the center of the face, down the nose, through the chin. Copy the left side, paste and flip horizontal. That will give you a perfectly symmetrical face. Then do the same thing, but with the right side. One will look "fatter" than the other. You'll also notice other things that didn't jump out at first. Now, don't do this with everyone before you do their portrait session, but once you do it a few times with volunteers, it teaches you what to look for.
Once you see which symmetrical face looks better to you (normally, but not always the thinner one) that is their "good side"
You can overlay that image over the original, and lower the opacity, make a new layer, then use the brush tool to make notes and observations etc. I do this a lot when I'm editing portraits. You can then keep these notes and refer back to those pictures, so you can see the things that you regularly miss. This is what I did for a while, before I started "practicing" by looking at people in restaurants, stores, venues, etc...
It really does open your eyes, and help you start seeing the things you want to accentuate. I prefer that instead of looking for faults you want to cover up.... but that's me.
Feb 15, 2018 10:31:31 #
berchman
Loc: South Central PA
bkyser wrote:
br A fun exercise is to have someone face directl... (show quote)
That strikes me as an interesting and useful exercise.
Apr 20, 2018 23:49:57 #
19104
Loc: Philadelphia
My first studio space was the living room in my apartment. I had some old Vivitar 292 flashes, and Bought some Clamps and spotlight bulbs, and jury rigged them to flash heads. and Viola I had studio strobes with modelling lights. I had a couple cheap umbrellas, and I was off to the races. The point of all of this is that expensive is not necessary. IMO The more you shoot and read the better your photography becomes.
HTH
John
HTH
John
May 5, 2019 02:12:23 #
Timmers
Loc: San Antonio Texas.
The Use and Application of a Modeling Light in Studio Portraiture.
The subject represents and good question to raise. Let it be known that there are few workers who grasp any real understanding of what appears to be a some what unimportant part of the tools of portraiture.
Why is it that so many do not understand the tool? Because it is not JUST the modeling lights found in studio flash systems, rather it is an issue called ambient light. Keep in mind always that the modeling light portion of your flash is truly a part of ambient light. Any and all light is part of the light floating around in the studio environment. It is a portion of the image recording light and yet the primary light source for making an image is the short duration discharge of the electronic tubes that creates the majority of the image.
Having read the above typical technology type statement one would expect to now get all the technical descriptions. I could care less about the technology/engineering/mindless pabulum that most writers spew. They have the technical down pat but are so lost in that detail that as the old saying goes "they can not see the forest for the trees."
The main thrust of your study of portraiture is about the subject, the sitter. Studio or portable flash, modeling lights, watt seconds, environment, props, these are second tear aspects to the main point of portraiture, that is The Subject, also known as the sitter to keep it all simple.
Why are modeling lights or more to the point the ambient light so critical to the making of a portrait? It is what is rarely discussed/explained in discussions. What is that which is not/rarely spoken? It even has a name, a term if you like, it is called pupilation. Pupilation is the quality of the human eye to respond to light by the opening and closing of the pupil in the eye(s). Just how important is this? It is the most, most critical aspect to the subject of portraiture.
The term 'pupilation' comes to us by way of the Dean of Rochester Institute of Technology Dr. Leslie Strobles (in it's time one of the great centers of photographic research and knowledge). Research was done by having common people view a portrait of a woman in which the two photographs were viewed side by side, the two portraits were identical, except that in one the pupils of one were retouched to make the pupils slightly larger. Around 90% of the viewers selected the slight increase of the pupils to be significantly a better portrait of the sitter. Later, similar research was done and each time the choice went to the image were the pupils were retouched to a more open quality.
It was Dr. Strobles who coined the term ' pupilation' and it is now in the lexicon of portraiture.
Without bothering to take this pupilation at face value, it behooves those wanting to understand pupilation and the eyes specifically as the single most critical aspect in portraiture. Understand that 'modeling lights' are specific to the equipment only, so instead I include modeling lights as a part of ambient light. So now, you will do a series of tests for the sitter controlling the eyes as the single critical item in your portrait work.
Set up what ever is your favorite set up for an average portrait taking set. No worries, but keep to what is easy and nothing new. Now, for your first image see that EVERY LIGHT SOURSE is turned off, the room as dark as a coal pit at midnight. Give your sitter a few minutes to settle in, speak to them and when YOU are ready and they looking at where your voice is take the photo (big heads up, turn off the idiot auto focus, NO LIGHT). Turn on the lights in the room and view the portrait. You should have an image of your sitter as a drug addict. Eyes wide open and their pupils dilated like they just shot up!
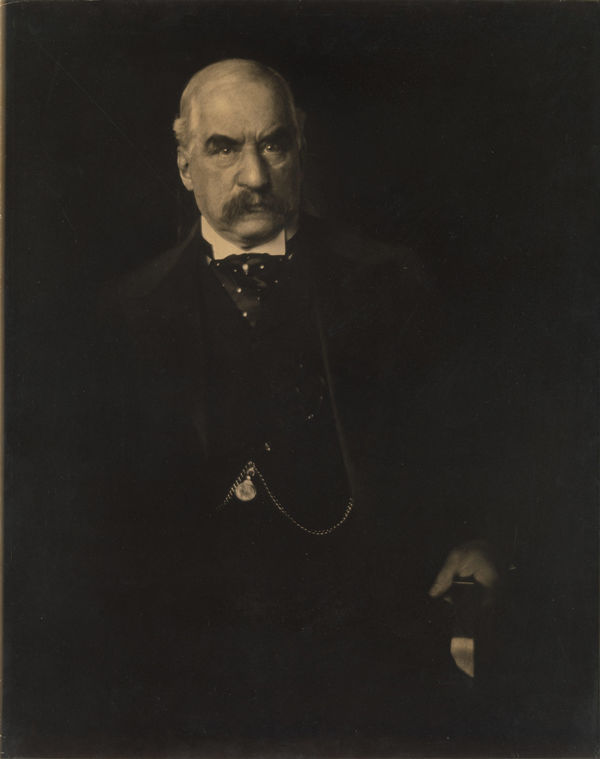
Now, do another portrait of your sitter, this time turn on all the lights you have, perhaps a strong movie light and turn up the modeling light to 100%. After you shoot the photograph and have enough out put you should see the effect of what is called 'snake eyes'. Edward Stricken did his portrait of JP Morgan where Morgan's eyes have this look and his had resting on a lacquered arm rest of a stuffed chair have the appearance of a knife blade. The knife effect heightened to image but it is the tiny dots on the light in Morgan's eyes that are dilated closed that are the statement that he is a 'snake' to the viewer.
It is critical for the expressive and creative photographer to understand the tools that you have at your disposal, how they will work for and against you in the creation of the images you are making. So it become critical to 'understand' the tools and regard these only as a tool to help you create images. Most importantly is to think about the tools that you have and how they are to be used. A modeling light is NOT the question in truth. The question is what is a modeling light and how does it work to help or hinder my creative work.
To further beat the dead horse, or the appearance of a dead horse. If you take a moment to look at the sky you will notice that there are two 'facts' about the sun you live under. First, there is only ONE sun and when viewed in a chrome surface it looks round. So my modeling light needs to be ONE and a round solid ball. If it doesn't look round or there are more than one (term is a catch light) in the eye, then the image will not look 'normal'.
But notice I said to notice that there are TWO things about the sun? The second is so obvious but so subtle that we don't get it at first. The sun COMES UP, does it every day, we are normal rational beings, right? There are nut jobs out there, some are so nuts that they are in institutions! Back to that expression, the sun comes up. You can see the sun as that single point of light in someone's eyes standing next to you. But know this, the eyes are spherical and look and you will see that the sun is ALWAYS in the upper half of a person's eyes. That is because the sun came up OVER the horizon. The mid point of the human eye is the horizon of the earth. So that catch light in a sitter's eye needs to be ABOVE the horizontal mid line of their eye(s). If not then you are telling the viewer that the person in the portrait is insane because they think the sun come up before it crosses the horizon of the sky (or that there are two or more sins in the sky, or they are rectangles, or squares or donut shaped!).
Your the photographer, be responsible for all the details of the image you make. And be creative and leave the engineering to the engineers while you create the magic that is the poetic expressive visualization of the image.
The subject represents and good question to raise. Let it be known that there are few workers who grasp any real understanding of what appears to be a some what unimportant part of the tools of portraiture.
Why is it that so many do not understand the tool? Because it is not JUST the modeling lights found in studio flash systems, rather it is an issue called ambient light. Keep in mind always that the modeling light portion of your flash is truly a part of ambient light. Any and all light is part of the light floating around in the studio environment. It is a portion of the image recording light and yet the primary light source for making an image is the short duration discharge of the electronic tubes that creates the majority of the image.
Having read the above typical technology type statement one would expect to now get all the technical descriptions. I could care less about the technology/engineering/mindless pabulum that most writers spew. They have the technical down pat but are so lost in that detail that as the old saying goes "they can not see the forest for the trees."
The main thrust of your study of portraiture is about the subject, the sitter. Studio or portable flash, modeling lights, watt seconds, environment, props, these are second tear aspects to the main point of portraiture, that is The Subject, also known as the sitter to keep it all simple.
Why are modeling lights or more to the point the ambient light so critical to the making of a portrait? It is what is rarely discussed/explained in discussions. What is that which is not/rarely spoken? It even has a name, a term if you like, it is called pupilation. Pupilation is the quality of the human eye to respond to light by the opening and closing of the pupil in the eye(s). Just how important is this? It is the most, most critical aspect to the subject of portraiture.
The term 'pupilation' comes to us by way of the Dean of Rochester Institute of Technology Dr. Leslie Strobles (in it's time one of the great centers of photographic research and knowledge). Research was done by having common people view a portrait of a woman in which the two photographs were viewed side by side, the two portraits were identical, except that in one the pupils of one were retouched to make the pupils slightly larger. Around 90% of the viewers selected the slight increase of the pupils to be significantly a better portrait of the sitter. Later, similar research was done and each time the choice went to the image were the pupils were retouched to a more open quality.
It was Dr. Strobles who coined the term ' pupilation' and it is now in the lexicon of portraiture.
Without bothering to take this pupilation at face value, it behooves those wanting to understand pupilation and the eyes specifically as the single most critical aspect in portraiture. Understand that 'modeling lights' are specific to the equipment only, so instead I include modeling lights as a part of ambient light. So now, you will do a series of tests for the sitter controlling the eyes as the single critical item in your portrait work.
Set up what ever is your favorite set up for an average portrait taking set. No worries, but keep to what is easy and nothing new. Now, for your first image see that EVERY LIGHT SOURSE is turned off, the room as dark as a coal pit at midnight. Give your sitter a few minutes to settle in, speak to them and when YOU are ready and they looking at where your voice is take the photo (big heads up, turn off the idiot auto focus, NO LIGHT). Turn on the lights in the room and view the portrait. You should have an image of your sitter as a drug addict. Eyes wide open and their pupils dilated like they just shot up!
Now, do another portrait of your sitter, this time turn on all the lights you have, perhaps a strong movie light and turn up the modeling light to 100%. After you shoot the photograph and have enough out put you should see the effect of what is called 'snake eyes'. Edward Stricken did his portrait of JP Morgan where Morgan's eyes have this look and his had resting on a lacquered arm rest of a stuffed chair have the appearance of a knife blade. The knife effect heightened to image but it is the tiny dots on the light in Morgan's eyes that are dilated closed that are the statement that he is a 'snake' to the viewer.
It is critical for the expressive and creative photographer to understand the tools that you have at your disposal, how they will work for and against you in the creation of the images you are making. So it become critical to 'understand' the tools and regard these only as a tool to help you create images. Most importantly is to think about the tools that you have and how they are to be used. A modeling light is NOT the question in truth. The question is what is a modeling light and how does it work to help or hinder my creative work.
To further beat the dead horse, or the appearance of a dead horse. If you take a moment to look at the sky you will notice that there are two 'facts' about the sun you live under. First, there is only ONE sun and when viewed in a chrome surface it looks round. So my modeling light needs to be ONE and a round solid ball. If it doesn't look round or there are more than one (term is a catch light) in the eye, then the image will not look 'normal'.
But notice I said to notice that there are TWO things about the sun? The second is so obvious but so subtle that we don't get it at first. The sun COMES UP, does it every day, we are normal rational beings, right? There are nut jobs out there, some are so nuts that they are in institutions! Back to that expression, the sun comes up. You can see the sun as that single point of light in someone's eyes standing next to you. But know this, the eyes are spherical and look and you will see that the sun is ALWAYS in the upper half of a person's eyes. That is because the sun came up OVER the horizon. The mid point of the human eye is the horizon of the earth. So that catch light in a sitter's eye needs to be ABOVE the horizontal mid line of their eye(s). If not then you are telling the viewer that the person in the portrait is insane because they think the sun come up before it crosses the horizon of the sky (or that there are two or more sins in the sky, or they are rectangles, or squares or donut shaped!).
Your the photographer, be responsible for all the details of the image you make. And be creative and leave the engineering to the engineers while you create the magic that is the poetic expressive visualization of the image.
May 5, 2019 08:06:26 #
Timmers wrote:
The Use and Application of a Modeling Light in Stu... (show quote)
What's your point? Are modeling lights bad, superfluous, should we not use them, are they all an example of poor engineering of lighting equipment?
I have used tungsten light and electronic flash equipment in many configurations for years. I understand about unseen secondary light source bouncing around a studio room and know how to factor it into ratios and exposure and take control of it. I understand the function of modeling lamps and realize that they may have different properties than the light emitted from a flash tube but nonetheless, they serve as a good guide as to the lighting I wish to achieve. I know how to combine them with flash exposure or entirely negate their effect on exposure by means of shutter speed control.
My clients never complain about their eyes resembling those of a snake or a narcotics addict in any of the portraits I make for them. I know how to manage catch-lights in the eyes. Multiple catch-lights can indicate unnatural disunity of lighting. Regardless of my equipment choices, I am able to relate to each subject and I fully realize the importance of capturing the essence of the sitter. I am never preoccupied with my equipment during a session- I don't fumble with it and work smoothly and instinctively enough to relate to each subject. I certain do wholeheartedly agree with this aspect of your quotation; "Your the photographer, be responsible for all the details of the image you make. And be creative and leave the engineering to the engineers while you create the magic that is the poetic expressive visualization of the image". Right on!
I have also designed lamp heads with carefully placed concentric modeling lamps and don't think that good equipment design is devoid of photographic or artistic knowledge or applications. When I talk about these technical aspects, I am, hopefully, not "spewing" drivel.
I have some understanding as to how we perceive light and how our eyes work. Next time I see my ophthalmologist, I'll ask him to bring me up to date on"pupilation" . The rest is way above my pay grade!
If you want to reply, then register here. Registration is free and your account is created instantly, so you can post right away.