Photoshop "how do I" Question
Jan 31, 2018 10:07:54 #
This morning like a gazillion others I took some shots of the "Blue Moon".
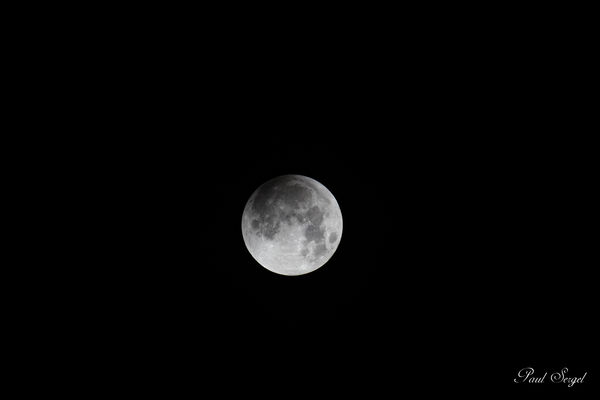
As the event was just getting started I took a shot of the normal moon.
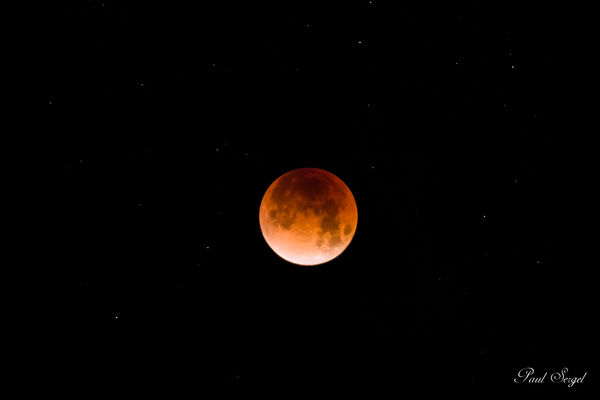
Just before the event reached total eclipse I took another shot.
The normal moonshot has a reasonable level of detail but by the time the eclipse was very advanced I had trouble focusing so the "Blue Moon" shot has no detail. Just blobs that suggest that it is the moon.
I think that there is probably a way (probably using layers and masks) to use the detail from the one shot and the color and brightness from the other shot.
Is there anyone out there who can either
-tell me how (in some detail) I might go about it or.....
-tell me it can't be done?
I'm not entirely unfamiliar with using layers and masks but I just can't quite get my head around this one.
Here are the two images I'd like to use.
As the event was just getting started I took a shot of the normal moon.
Just before the event reached total eclipse I took another shot.
The normal moonshot has a reasonable level of detail but by the time the eclipse was very advanced I had trouble focusing so the "Blue Moon" shot has no detail. Just blobs that suggest that it is the moon.
I think that there is probably a way (probably using layers and masks) to use the detail from the one shot and the color and brightness from the other shot.
Is there anyone out there who can either
-tell me how (in some detail) I might go about it or.....
-tell me it can't be done?
I'm not entirely unfamiliar with using layers and masks but I just can't quite get my head around this one.
Here are the two images I'd like to use.
Jan 31, 2018 11:28:04 #

You're right Paul, it DOES involve layers. I used a few tools that most folks don't have in their tool box, but thought I'd go ahead with the explanation anyway.
1. Start with the Blood Moon as the underlaying Background Layer. Created a Duplicate Layer: Layer>Duplicate Layer
2. Opened the Blue Moon as a standalone image. Used Piccure + to sharpen the image. I created a selection on the moon only using the Quick Selection Tool. Went to the Filters Menu and opened AKVIS Chameleon: Grab Fragment. Saved the Blue Moon selection (with all the high detail) to the clipboard and closed the Blue Moon image.
3. Reopened the Blood Moon image and made sure I was on the duplicated Layer. Invoked Filters>AKVIS Chameleon>Make Collage and positioned the selected Blue Moon over the Blood Moon, repositioning and resizing it so that the craters were aligned. The reason I used the selected moon only (as opposed to the whole layer) is so that I could align the moon and didn't have to worry about aligning all the stars that were shining through from the background layer
4. Changed the blending mode to Luminosity. This allowed the detail from the Blue Moon to be super-imposed over the Blood Moon, but retained the coloration of the Blood Moon. The orbs didn't align as closely as I liked so I used the Eliptical Marquee Tool (with the Shift key held down to create a perfect circle) to created a circular selection, which then realigned to cover most of the Red Moon. I inverted the Selection, then used the Smudge tool to push the color black into the circle. This gave it an overall circular appearance.
5. Invoked Filters>Camera Raw Filter and moved the Highlight slider to the left and the Clarity slider to the right.
6. Saved the composited image as a new file.
Jan 31, 2018 11:37:04 #
WOW!! This exactly what I was hoping to accomplish. I'm going to see what, where and how much AKVIS Chameleon is.
Also......as you go through your step by step you keep referencing the "Blood Moon" shot and I think there are places where you mean to say "Normal" or "Detailed".
At the risk of being a PITA, Could you clarify??
Also......as you go through your step by step you keep referencing the "Blood Moon" shot and I think there are places where you mean to say "Normal" or "Detailed".
At the risk of being a PITA, Could you clarify??
Jan 31, 2018 12:02:04 #
Psergel wrote:
When I talked of the Blood Moon image, it was the second one you posted in your original, with an orange hue as it would have looked during the Eclipse.WOW!! This exactly what I was hoping to accomplish. I'm going to see what, where and how much AKVIS Chameleon is.
Also......as you go through your step by step you keep referencing the "Blood Moon" shot and I think there are places where you mean to say "Normal" or "Detailed".
At the risk of being a PITA, Could you clarify??
Also......as you go through your step by step you keep referencing the "Blood Moon" shot and I think there are places where you mean to say "Normal" or "Detailed".
At the risk of being a PITA, Could you clarify??
AKVIS Chameleon is great for anyone who likes to work on composites. One can select a subject from one photograph, then superimpose on a different background with ultimate control over placement, sizing, rotation, and opacity.
Feb 1, 2018 01:40:05 #
IDguy
Loc: Idaho
Just a little clairification. A blue moon has nothing to do with the color. It is the second full moon in a month. It doesn’t happen often because the first full moon must be on the 1st of a 31 day month.
This moon also happened to be a “super moon”....about 14% larger than average because the moon was at its closest point in orbit to the earth.
And then there was the eclipse.
This trifecta only happens about once in 150 years.
Alas, it was cloudy where I live.
This moon also happened to be a “super moon”....about 14% larger than average because the moon was at its closest point in orbit to the earth.
And then there was the eclipse.
This trifecta only happens about once in 150 years.
Alas, it was cloudy where I live.
Feb 1, 2018 22:01:54 #

From the more-ways-to-skin-a-cat department (apologies to cat lovers), another approach. LR and PS, 5 minutes. I did not remove the extra concentric circle.
Feb 1, 2018 22:50:38 #
abc1234 wrote:
From the more-ways-to-skin-a-cat department (apologies to cat lovers), another approach. LR and PS, 5 minutes. I did not remove the extra concentric circle.
Share your workflow?
Feb 2, 2018 02:30:58 #
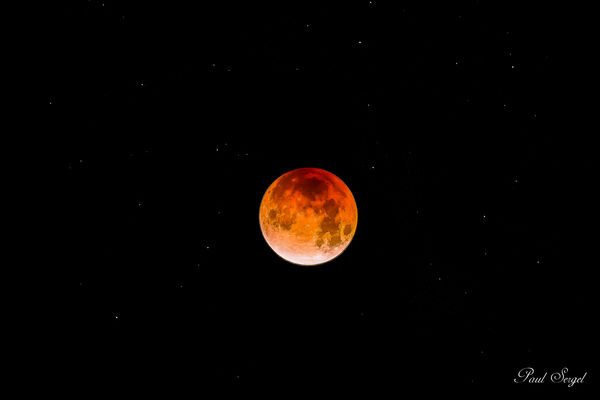
Bob, here you go. First in LR, 1.jpg. Next, PS where I sharpened with the high-pass filter followed by converting that layer to overlay. Back to LR, 2.jpg. If I spent more time, I would have removed that concentric ring and played around with other sharpening methods. My point was that using LR/PS was simpler, faster, and similar to the other post.
I thought the original post was a very good shot. Though a longer lens than the 100-400 one used would have produced more detail, the present shot with those stars has great presence. Look at how those stars jump out and look like they are twinkling. The body was a Canon 70D, 1/6 sec, f/5.6, ISO 800.
I thought the original post was a very good shot. Though a longer lens than the 100-400 one used would have produced more detail, the present shot with those stars has great presence. Look at how those stars jump out and look like they are twinkling. The body was a Canon 70D, 1/6 sec, f/5.6, ISO 800.
1, open in LR
3, finish off in LR
If you want to reply, then register here. Registration is free and your account is created instantly, so you can post right away.