Steps To Shooting in Manual
Dec 29, 2017 12:16:20 #
Forgot to say this: Many of us old-timers started out with cameras that did not have automation and we learned the "sunny 16 rule" and that still holds for outdoors. Choose the appropriate iOS for your lighting. Then set your shutter speed to be 1/iso and set the aperture for f/16. As an example, if you choose ISO of 200, then set your shutter for 1/200 s and the aperture for f/16. If you don't like f/16, then choose a different value and adjust the shutter speed up or down accordingly by the number of stops that you increased or decreased the aperture. This works so quickly.
Dec 29, 2017 12:25:08 #
This will be presumptuous, especially for a newcomer here, but I couldn't help but sympathize with Bill in his desire for a brief, useful introduction to shooting "manual,:" so I thought I'd try writing one. It is below. It goes without saying that I shall be deeply grateful for any corrections and/or additions all the talent here may have:
How to shoot on “manual:”
1. Light comes in packets called “photons.” The more photons that fall on a camera’s sensor, the brighter the image is. If too few photons fall on the sensor, the image is too dark, and we say it is “underexposed.” If too many photons fall on the sensor, the image is too light, and we say it is “overexposed.”
2. When you double the number of photons falling on a camera’s sensor, we say you have increased the exposure by one stop. When you halve the number of photons falling on the sensor, we say you have decreased the exposure by one stop. A one stop change in exposure makes a noticeable difference in the brightness of the image, but it does not double or halve the brightness. Indeed, you usually have a usable image if your exposure is within one stop of the optimum.
3. The sensitivity of the sensor in a camera is governed by the “ISO” setting. Setting the ISO for a low number means it will take more light (more photons) to produce a usable image; setting it for a high number means it will take less light to produce that image. Very high ISO settings, however, are prone to produce noise, so should be avoided unless there is a compelling reason to us them. For most everyday photography, an ISO setting of 200 should be adequate.
4. Once the ISO of the sensor is established, the camera has two controls that determine the brightness of the image: aperture and shutter speed. When you shoot on “P” the camera’s computer adjusts both of these controls to yield a usable image. When you shoot on “M” you adjust the controls manually. When is it to your advantage to do so? There are many circumstances when “M” is best, but perhaps the most common are these: a) your subject is moving rapidly and you need a fast shutter speed to “stop” it, and b) you want to control the “depth of field” (the zone of sharp focus) in your image, and you do this by adjusting the aperture: a large opening (low f-number) produces a shallow field of sharp focus; a small opening (high f-number) produces a deep field of sharp focus.
5. In practice, then, when shooting in the “M” mode, having chosen the ISO you might then choose a trial shutter speed and aperture (f-number) and check the exposure. If the exposure is too low, you can increase it either by reducing the shutter speed or increasing the aperture (by selecting a lower f-number). You continue making these adjustments until your exposure meter tells you you have a suitable exposure. In adjusting shutter speed and aperture, NOTE THAT halving the shutter speed increases exposure by one stop, and doubling the shutter speed decreases exposure by one stop. Similarly with aperture: exposure decreases by one stop when you decrease aperture from f1.0 to f1.4 and from there to f2.0, then f2.8, then f4.0, then f5.6 then f8.0, then f11.0, then f16.0, then f22.0, and then f32.0 (see https://binged.it/2DwwSJ3).
Dec 29, 2017 12:27:36 #

Dec 29, 2017 12:28:37 #

SS,
I received a lot of responses to my request, most of which is valuable. I particularly liked and can relate to your simplistic approach,
Forgive my lack of knowledge, but what are you referring to when you say "Then line up the meters needle"?
Bill
I received a lot of responses to my request, most of which is valuable. I particularly liked and can relate to your simplistic approach,
Forgive my lack of knowledge, but what are you referring to when you say "Then line up the meters needle"?
Bill
SharpShooter wrote:
Bill, people make WAY to much out of shooting in m... (show quote)
Dec 29, 2017 12:31:24 #
Dec 29, 2017 12:38:21 #
dadcowell wrote:
OK br I'm trying to move over to shooting in manua... (show quote)
Maybe. When I first put my camera (an older bridge camera) in manual, I was very nervous about doing so. Maybe I thought the thing would blow up in my face, or that using less than perfect settings would "break" the camera. Not so on either! For some reason, we have been led to believe that manual setting is rocket science or some kind of difficult undertaking. Just put the dial, knob, or whatever you want to call it, on the "M". While looking through the viewfinder, if you don't get a "WOW" reaction, try changing settings (shutter speed, aperture, iso, until you DO get a "WOW" view, then just press the shutter. If you are not happy with the results, there is always the little "trash" can option known as delete. You are not out the cost of film. Make adjustments as needed. If shots are too light/ bright (overexposed) try upping shutter speed or lowering iso. If shots are too dark (underexposed) try reducing shutter speed and/or upping iso. Experiment, but also learn from doing. I do outdoor photography and depend on natural light but if you are only going to be indoors and using flash then my advice may not apply as much. If I have been misleading, I apologize in advance.
Dec 29, 2017 12:38:57 #
dadcowell wrote:
OK br I'm trying to move over to shooting in manua... (show quote)
Bill I shoot in Manual 90% of the time to me there is no quick way to set up your camera. Sometimes I shoot one picture in auto check the setup and the picture what I want to improve in manual.There is the 3 setups I set it up take a test shot at times I get it right on and times I have to change one of the 3 or more.
I am sure a lot of your photographers here have better answers and I love to read about it, I am still learning.
Dec 29, 2017 12:39:07 #
stamac
Loc: Atlanta, GA
dadcowell wrote:
...but I'm looking for the condensed version in one place.
I'm hoping that one of the UHH members has felt the same way and can direct me to a great book or other write-up that can take me through the steps... Bill
I'm hoping that one of the UHH members has felt the same way and can direct me to a great book or other write-up that can take me through the steps... Bill
Hi Bill,
You don't need to spend money on books when there are a lot of free resources. Thing is to find the right ones that you don't feel overwhelmed given the avalanche of information. I suggest you a few, then you could do your own research based on a specific topic you might want to master or go deeper:
- http://imaging.nikon.com/lineup/dslr/basics/ (This is in the Nikon website, but it's a very easy, intuitive, and visual tutorial)
- https://photography.tutsplus.com/tutorials/the-ultimate-beginners-introduction-to-exposure--photo-3028 (One of the best when beginning to master manual shooting. Everything is there!)
- https://photography.tutsplus.com/articles/photography-kick-start-guide-adjusting-camera-settings--photo-232 (This same site has a lot of valuable tutorials and articles)
Just begin with these and get to know your own camera, the rest is practice...
Good luck and have a lot of fun!
Dec 29, 2017 13:11:38 #
dadcowell wrote:
SS,
I received a lot of responses to my request, most of which is valuable. I particularly liked and can relate to your simplistic approach,
Forgive my lack of knowledge, but what are you referring to when you say "Then line up the meters needle"?
Bill
I received a lot of responses to my request, most of which is valuable. I particularly liked and can relate to your simplistic approach,
Forgive my lack of knowledge, but what are you referring to when you say "Then line up the meters needle"?
Bill
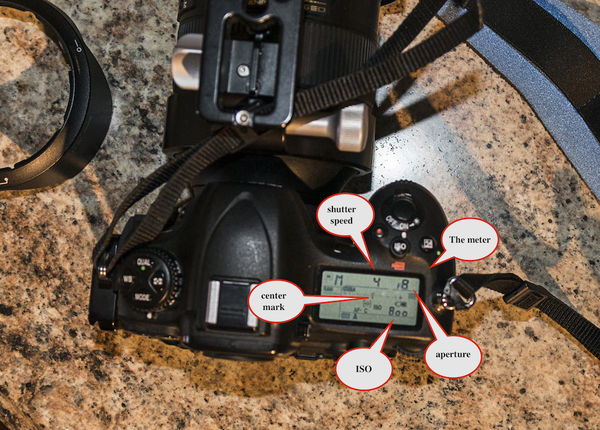
Bill, as you are obviously a beginning photographer it might benefit you to do some reading on photography in general and on your camera. Doing this will give you a good start in the right directions. Classes and workshops may help, too. Every camera has a meter in it. My camera has one on the top and, as I look into the viewfinder, one right at the very bottom of the frame. I don't know what kind of camera you have so cannot tell you about your specific meter location. The meter shows a range from dark to light, oftentimes with dark on the left and light on the right, but this, too, can be variable-there should be a plus and minus sign and then a center mark. The center mark is where the camera meter believes the scene to be correctly set for exposure, although the meter could be wrong and often is, depending on the situation and your intent. The center mark is a good starting point and in perfect light will allow you to get a fairly well exposed image. If I understood your question you do not know what a camera meter is so I have taken a photo of my camera meter to show you and I hope this is what you wanted to know:
Dec 29, 2017 13:43:45 #
Google didn't find the book recommended above. You might go to a library or used book store and look through the old, pre-digital books on photography. Some aspects of photography are timeless.
Dec 29, 2017 13:44:16 #
Wow!
Thanks so much for all your suggestions!!.
I had a basic understanding of the relationship among Aperture, Shutter Speed and ISO. Your comments really helped to advance my understanding. For example, I just took my camera outside. I put it in M, set the ISO for 100 (It is sunny and cold here in Myrtle Beach), set the Aperture for F16 and adjusted the meter (Which through your comments, I just discovered) with the wheel till it centered. That brought my speed to 1/60. I think that the meter, as dumb as it sounds to the experts, was the connection that I was missing. Prior to today, although I knew that those three points of the triangle were dependent each other, I did not realize, however, that I had a simple tool (the meter) to bring these three into line with the light available.
I knew I found the right place to learn. Thanks again to all.
Bill
dadcowell wrote:
OK br I'm trying to move over to shooting in manua... (show quote)
Dec 29, 2017 14:09:12 #
Bill,
Just realized you are from MYR. I lived in Sunset Beach from 1997 - 2011. Returned back to NJ. My friend Vic Pizzolato founded the Coastal Carolina Camera Club and I created the original website.(http://coastalcarolinacameraclub.org/) He also founded and the camera club in MYR http://www.mbcameraclub.org/Pages/default.aspx)
You may want to look into them. Excellent places for learning.
Good luck.
Mark
dadcowell wrote:
Wow! br Thanks so much for all your suggestions!!.... (show quote)
Dec 29, 2017 14:18:56 #

tomcat wrote:
From some of the answers, I don't think some of yo... (show quote)
That's basically the same just use a handheld vs built in meter. I do often set exposure without any meter at all but I wouldn't recommend the OP doing so at first. I would recommend that the OP choose a combination of aperture and shutter speed that makes the meter zero. That's a start. And then move on from that.
Dec 29, 2017 14:26:31 #

dadcowell wrote:
SS,
I received a lot of responses to my request, most of which is valuable. I particularly liked and can relate to your simplistic approach,
Forgive my lack of knowledge, but what are you referring to when you say "Then line up the meters needle"?
Bill
I received a lot of responses to my request, most of which is valuable. I particularly liked and can relate to your simplistic approach,
Forgive my lack of knowledge, but what are you referring to when you say "Then line up the meters needle"?
Bill
I'll answer on behalf of SS, since I have a T3i. Look at page 99 of your camera manual. First set your camera to a specific ISO, say 200. The manual explains how to set shutter speed and specific aperture settings. I would start with something like f/8, which will be displayed in the view finder, along with the shutter speed, and the ISO setting. In between the aperture value and the ISO value is a scale which displays a little arrow like symbol - the exposure level mark, see page 99. As you rotate the main control dial you should see the shutter speed values change, and the exposure level mark will move to the left or to the right. Dead center is what the meter thinks is the correct exposure. You can also use this to deliberately over or under expose. This will give you full manual control of exposure on a T3i.
This exposure level mark emulates the type of 'matched needle' exposure information in older cameras such as the Canon FTb, usually seen on the right hand side of the viewfinder where the center point was the 'correct' exposure, the needle up was over exposed and down was underexposed, hence "Then line up the meter's needle".
Does that help sufficiently? If so, try it out and go out and take a bunch of pictures, look at the results and the settings in the EXIF data. Especially look at the mistakes, don't delete them in camera, keep them so that you look at them in your software - once again I will recommend raw+JPEG and Canon DPP since it reproduces the camera settings on the computer. That will probably accelerate your learning process to using the camera in manual mode. It will also help you understand how all the auto modes work.
Once you have mastered manual exposure, don't avoid the auto modes, they're useful and the camera does a pretty good job, but it helps if you understand what the camera is doing in each of those modes. As others have suggested, don't try to play with manual focus at the same time. Manual exposure is the most useful, except in a few specialized circumstances, play with manual focus if you wish later.
I see you've just discovered that from your recent post while I was typing!

Dec 29, 2017 16:36:50 #
dadcowell wrote:
OK br I'm trying to move over to shooting in manua... (show quote)
A camera is nothing more than a tool and like any complex tool it has many ways to use it depending on what you want/need to do. Anyone that says they only shoot manual is missing out on a lot of opportunities to get great pictures. By all means, learn to shoot manual. It will make you a better photographer but learn to use the other modes also. The right tool for the time and place. Knowing when to use full auto or apature priority will make you an even better photographer.
If you want to reply, then register here. Registration is free and your account is created instantly, so you can post right away.