Purple Glow On Edges Of Objects In Photo
Jul 5, 2012 23:55:52 #
Hi, I recently took some photos of a wedding. When I received the prints I noticed a purple glow on the edges of objects in one of the photos. I didn't notice this on the computer, but after looking at the prints, I then had a closer look on the computer and sure enough it was there. It's also on the original. I have tried to edit in different ways but it just makes the purple glow worse. I don't understand what I did wrong unless it was the way the sunlight was lighting the subjects. Now looking at my setting I see they were a little off. Maybe this had something to do with it? Can you help UHH?
Camera and Lens: Nikon D700 /Nikkor 50mm 1.4
Setting: f/2, 1/4000 sec., ISO 100, -3.3 step, 50mm
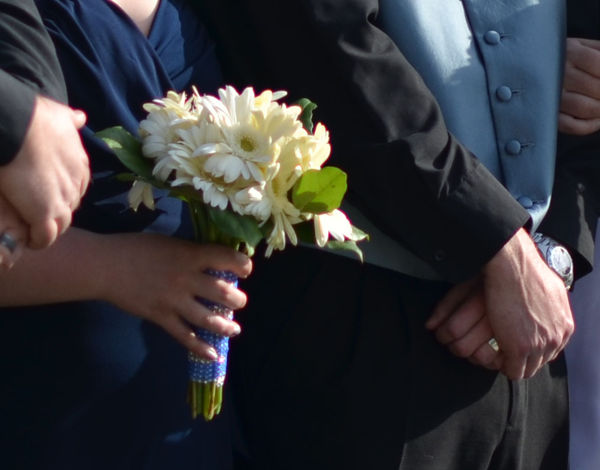
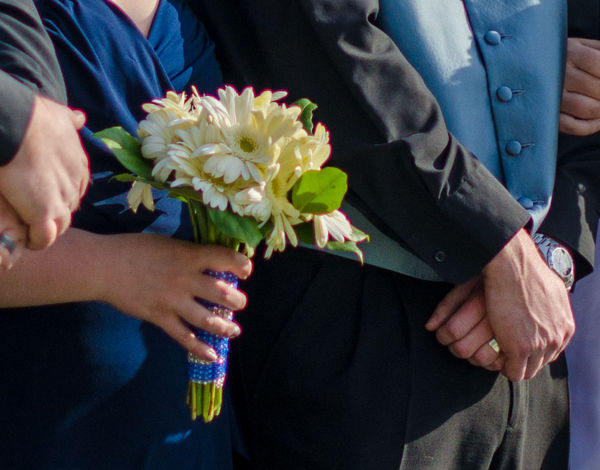
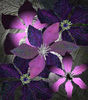
The following images are cropped portions of the photograph. Original and edited versions.
Camera and Lens: Nikon D700 /Nikkor 50mm 1.4
Setting: f/2, 1/4000 sec., ISO 100, -3.3 step, 50mm
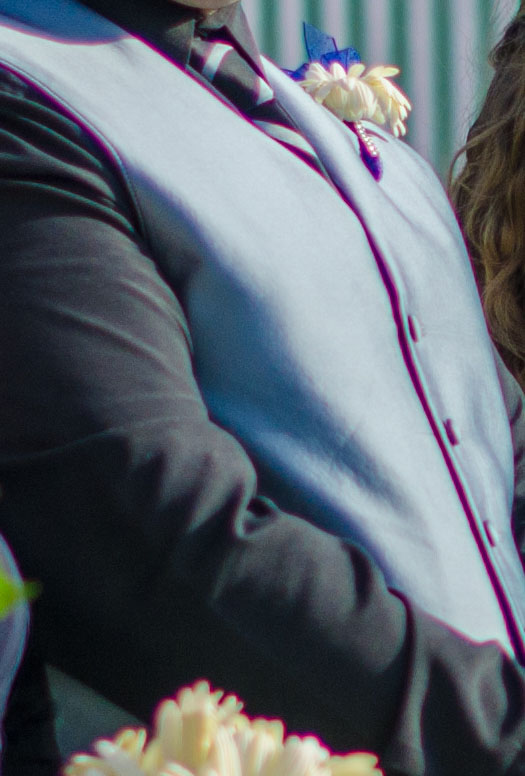
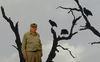
The following images are cropped portions of the photograph. Original and edited versions.
Original
Edited
Original

Edited
Jul 6, 2012 00:13:22 #
Jul 6, 2012 00:17:29 #
MT Shooter wrote:
A typical result of overprocessing the image.
How does this happen if it is on the originals though? Hope this isn't a dumb question...
Jul 6, 2012 00:18:36 #
Thank you for your help. I see that over processing does make it worse. What can I do to fix it, and not make it worse? It does show up in the original.
Jul 6, 2012 00:26:41 #
It looks to me as if you are shooting in JPG, I would check the preset processing parameters you have in your camera. Reset everything to factory presets and shoot in RAW, that will eliminate the color fringing and allow you more processing latitude as well.
If you were already shooting in RAW format, take a good look at your lens and see if you have a problem with the lens coating anywhere, especially on the rear element.
Also, why are you using -3.3 EV? Maybe try -.5 EV and F5.6 in these conditions, the settings you have posted as using almost make it look like you are trying to force an image that your cameras meter does not want to give you, the D700 has an Excellent metering system, take advantage of it when you can.
Jul 6, 2012 00:32:24 #
I listed my camera wrong. It's actually a D7000. I made a mistake and didn't change my settings from taking a previous photo. I did shoot in RAW and jpeg. I'm sure your right on it being the settings. Do you know how to fix it in PP?
Jul 6, 2012 02:25:08 #
peanutg1979 wrote:
Do you know how to fix it in PP?
I doubt that there is truely "fixing" in post processing. However, it is possible to get some improvement.
In the following Photoshop example, selections were made to confine operations to areas to those with the fringing. Note one area of fringing near the upper part of the photo was left out of the selection to show the difference between teated and untreated.
The tool used was Image/Adjustments/Replace Color. I find people at this site seldom mentioning it in their PP. It is a very useful tool, as it can be used in cases beyond what are thought of as strictly involving color. The saturation and hue slider are obviously for color adjustment. But, the lightness slider will work on issues of brightness even in B&W.
Notice in the example, that the active color picking eye dropper is the middle one. Using this mode alows acting on more than one are of color to be acted upon, which was necessary to defringe all the areas in question.

Jul 6, 2012 02:37:04 #
Thank you so much Bobber. That looks great. I'll give it shot and see what I can come up with. Thank you again.
Jul 6, 2012 02:44:54 #
peanutg1979 wrote:
Thank you so much Bobber. That looks great. I'll give it shot and see what I can come up with. Thank you again.
You are very welcome. You might want to keep the selections tighter as it is easy to affect colors you want to keep. Even in areas appearantly unaffected there can be hidden tints that you don't notice and find yourself making alterations beyond the target. I suspected some change in the flowers in this case.
Jul 6, 2012 05:41:02 #

I use Olympus camers and only Picasa to tidy my images, do not have/need Photshop, so I have never come across this but was curious about it.
Apparently a UV filter can reduce purple fringing but this site - http://www.great-landscape-photography.com/remove-purple-fringing.html - suggests a cure.
Hope this help coz it looks really bad in your image.
Artistwally.
Apparently a UV filter can reduce purple fringing but this site - http://www.great-landscape-photography.com/remove-purple-fringing.html - suggests a cure.
Hope this help coz it looks really bad in your image.
Artistwally.
Jul 6, 2012 07:10:11 #
FilmFanatic
Loc: Waikato, New Zealand
It is *not* a result of processing, it is a plain and simple case of Chromatic Aberation, which is due to the optical properties of your lens when shooting high contrast scenes. A UV filter won't help sorry guys.
Lightroom will get rid of this automatically, Photoshop can be convinced to remove it IIRC.
Lightroom will get rid of this automatically, Photoshop can be convinced to remove it IIRC.
Jul 6, 2012 08:46:25 #
connievloutely
Loc: Quaker State (PA)
FilmFanatic wrote:
It is *not* a result of processing, it is a plain and simple case of Chromatic Aberation, which is due to the optical properties of your lens when shooting high contrast scenes. A UV filter won't help sorry guys.
Lightroom will get rid of this automatically, Photoshop can be convinced to remove it IIRC.
Lightroom will get rid of this automatically, Photoshop can be convinced to remove it IIRC.
I agree with Film Fanatic it looks like CA to me
Jul 6, 2012 10:48:01 #

Definitely CA. Follow instructions for your editing program and it will be gone. It has nothing to do with settings or processing. It is a function of the lens. It has to do with the fact that lens elements bend different colours of light to slightly different amounts. Google 'chromatic aberration' for complete education on the subject.
Jul 6, 2012 12:59:48 #

mcveed wrote:
Definitely CA. Follow instructions for your editing program and it will be gone. It has nothing to do with settings or processing. It is a function of the lens. It has to do with the fact that lens elements bend different colours of light to slightly different amounts. Google 'chromatic aberration' for complete education on the subject.
Looks like CA to me as well. Bring the image into LR. In the develop module, go to Lens Corrections/color. They have a feature for this issue. Hope that helps with the problem
Jul 6, 2012 13:26:56 #

Bobber wrote:
quote=peanutg1979 Do you know how to fix it in P... (show quote)
Thank you, Bobber, this is a VERY neat adjustment trick to know.
If you want to reply, then register here. Registration is free and your account is created instantly, so you can post right away.