Shower Curtain Liner Diffuser
Oct 8, 2011 09:28:45 #

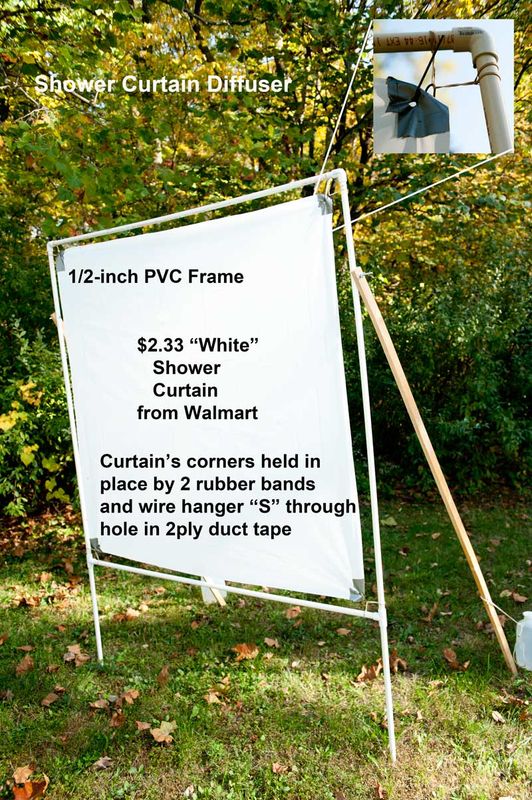
Credit for this idea goes to "jdtx" who suggested it to me in my previous post, "Homemade Diffuser Frame". I bought a white shower curtain liner from Walmart for $2.33 and I must say it makes for a wonderful diffuser material. I hung it in a basic frame made from 1/2 inch PVC pipe. I'm thinking of making a second frame just like the first to use as a reflecting "wall"
After constructing it I had to try it out. Unfortunately there were no models around so I served as my own guinea pig. Attached along with a photo of the diffuser frame is my first shot with it. Even without fill from a second source or reflector the inexpensive diffuser material does a wonderful job.
Also in addition to the "white" I bought a "frosted" shower curtain liner (also $2.33). I'm guessing it's a little less diffused but it looks like you might gain an f-stop.
Shower Curtain Liner Diffuser

Oct 8, 2011 09:37:26 #

plieber wrote:
Credit for this idea goes to "jdtx" who ... (show quote)
Very nice portrait. I admire your inventiveness. There's an online photography show on KelbyTv called "Cheap Shots" with Larry Becker. He does basically the same thing you do by suggesting inexpensive uses for everyday items in your photography. http://larryscheapshots.com/
Oct 8, 2011 09:48:53 #
Thanks Bob for the complement and the tip. I liked what I saw on larryscheapshots.com website so much that I bookmarked it.
Oct 8, 2011 09:52:06 #
plieber wrote:
Thanks Bob for the complement and the tip. I liked what I saw on larryscheapshots.com website so much that I bookmarked it.
I thought you would. You both are my kins guys. LOL
Oct 9, 2011 06:52:22 #
jdtx
Loc: SA, Tx.
there are also a lot of tips on DIY for this kind of thing..not sure of the exact URL but I am sure a search will get you to it
Oct 9, 2011 08:46:52 #

What an excellent idea Plieber.. but now I must ask a dumb question, I know you said a white liner, is this better than a cloth one? And if so, what would be the difference. I know the one I saw at this wedding was cloth. I think I'll go to the Dollar Store down here to get one, it'd be even cheaper and much closer to me.
Oct 9, 2011 09:44:35 #

Oct 9, 2011 10:39:13 #

wow this is a great idea, think im on my way to wally world to get some stuff. thanks for posting. Im always look for good cost friendly ways to make some of the stuff I need.
Oct 9, 2011 11:10:11 #

One of my Flickr contacts has a few nice ideas too using Starbucks coffee cups and pringles cans
http://www.flickr.com/photos/steveblackdog/5721348001/in/photostream
http://www.flickr.com/photos/steveblackdog/5721431391/in/photostream/
http://www.flickr.com/photos/steveblackdog/5721348001/in/photostream
http://www.flickr.com/photos/steveblackdog/5721431391/in/photostream/
Oct 9, 2011 11:46:55 #
Mattie wrote:
What an excellent idea Plieber.. but now I must ask a dumb question, I know you said a white liner, is this better than a cloth one? And if so, what would be the difference. I know the one I saw at this wedding was cloth. I think I'll go to the Dollar Store down here to get one, it'd be even cheaper and much closer to me.
The typical material for commercial diffusers is white nylon. I own several and the "white" liner is just as good. I say "white" because it comes in "clear" and "frosted". I don't think you can find any cloth as cheap.
Oct 9, 2011 14:14:11 #

David Hobby: "So I knew I wanted some extra-large sized on-axis fill.
"Solution: an el cheapo queen-sized sheet from Wal-Mart. It's so thin it only has one side, but it transmits light Like A Boss.
Find his discussion and a photograph of his setup here: http://strobist.blogspot.com/2011/09/bjorn-stopped-by-house-on-way-home.html#more
-----
The bedsheet light diffuser produces a very flattering quality of light for portraits. Yesterday, I used a bedsheet hanging from the crosspiece of a background stand for the portrait below, inside my house, just testing it. Later, I aim to use it outdoors, in my backyard, to shoot subjects with foliage and the sunset in the background.
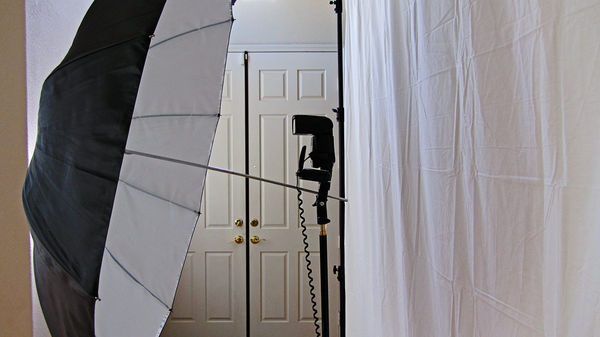
Instead of the bare flash per the DH setup, I used the flashgun shot into an umbrella which bounced the light into the bedsheet (see setup photo below). This approach reduces the hotspot from a bare flashgun, while it sends a diffused flash lighting to the bedsheet, which in turn diffuses the lighting more.
But then the HS per the DH setup may not affect the subject unfavorably because of the large HS size and the distance from it to the subject. The HS would tend to fall off and spread during its travel to the subject. I assume DH tested the distance between the flashgun and the bedsheet for the best lighting effect.
In the portrait below, the subject stood about 3 feet from the bedsheet (camera right). The quality of light resembles window light. With some more setup adjustment, the lighting could improve for a better effect.
So one needs limited equipment to achieve this fine lighting: A background stand, a large thin bedsheet, a lightstand with an umbrella mounting, a flashgun, an umbrella, and a flash triggering mechanism (I used Pocketwizards). Note that I also used a battery pack (optional) for the flashgun to reduce recycle time.
I put the flashgun on Manual at full power with the flashgun zoomed to 105mm, to maximize light power output.
With this setup, one can shoot from the edge of the bedsheet or to one side of it.
"Solution: an el cheapo queen-sized sheet from Wal-Mart. It's so thin it only has one side, but it transmits light Like A Boss.
Find his discussion and a photograph of his setup here: http://strobist.blogspot.com/2011/09/bjorn-stopped-by-house-on-way-home.html#more
-----
The bedsheet light diffuser produces a very flattering quality of light for portraits. Yesterday, I used a bedsheet hanging from the crosspiece of a background stand for the portrait below, inside my house, just testing it. Later, I aim to use it outdoors, in my backyard, to shoot subjects with foliage and the sunset in the background.
Instead of the bare flash per the DH setup, I used the flashgun shot into an umbrella which bounced the light into the bedsheet (see setup photo below). This approach reduces the hotspot from a bare flashgun, while it sends a diffused flash lighting to the bedsheet, which in turn diffuses the lighting more.
But then the HS per the DH setup may not affect the subject unfavorably because of the large HS size and the distance from it to the subject. The HS would tend to fall off and spread during its travel to the subject. I assume DH tested the distance between the flashgun and the bedsheet for the best lighting effect.
In the portrait below, the subject stood about 3 feet from the bedsheet (camera right). The quality of light resembles window light. With some more setup adjustment, the lighting could improve for a better effect.
So one needs limited equipment to achieve this fine lighting: A background stand, a large thin bedsheet, a lightstand with an umbrella mounting, a flashgun, an umbrella, and a flash triggering mechanism (I used Pocketwizards). Note that I also used a battery pack (optional) for the flashgun to reduce recycle time.
I put the flashgun on Manual at full power with the flashgun zoomed to 105mm, to maximize light power output.
With this setup, one can shoot from the edge of the bedsheet or to one side of it.
Portrait with flash lighting diffused through bedsheet

Setup for diffusing flash lighting via bedsheet
Oct 9, 2011 19:32:08 #
Oct 9, 2011 19:40:05 #
At one point I thought of using a bed sheet as a diffuser but thought it would not transmit enough light. But if you are bouncing light from an umbrella I'm obviously wrong.
Oct 9, 2011 19:59:53 #
Shower curtain, one-sided bedsheet, thin window curtain, traditional scrim -- all and suchlike transmit diffuse light. I never tried a bedsheet before but had read about it. The DH setup got me going. A background stand helps to hang these diffusers, although the traditional scrim comes framed, some with their own stand. Anyhow, this approach sure can produce a flattering lighting effect. I like it also because it illuminates a relative large area. Meanwhile, I want to keep experimenting with it to duplicate true window light.
Your portrait using the shower curtain came out with a soft, flattering light, too. I may try a shower curtain next.
Your portrait using the shower curtain came out with a soft, flattering light, too. I may try a shower curtain next.
plieber wrote:
At one point I thought of using a bed sheet as a diffuser but thought it would not transmit enough light. But if you are bouncing light from an umbrella I'm obviously wrong.
If you want to reply, then register here. Registration is free and your account is created instantly, so you can post right away.