White Balance Setting
Oct 19, 2017 07:29:53 #
Oct 19, 2017 07:30:49 #

Tenny, I shoot RAW exclusively. One of the steps I do in processing, once in Photoshop, is a white balance for each photograph I process. It's tailored to each image.
--Bob
--Bob
tenny52 wrote:
I shoot raw mostly along with a jpg version for ba... (show quote)
Oct 19, 2017 08:12:40 #

burkphoto wrote:
Here's the deal. The menu settings on your camera,... (show quote)

Thanks Burk, way too much wrong information being tossed around about White Balance and RAW vs JPEG right here...
Best,
Todd Ferguson
Oct 19, 2017 08:21:28 #

From my understanding and experience, the WB setting is recorded in the file's meta data. It is used when you initially display a RAW file, but it has no impact on the base data in the file. I generally set WB to auto that way I have a sort of close starting point for adjusting the file in post.
Oct 19, 2017 08:23:39 #
Your histogram display on the camera LCD is based on the camera settings and a jpeg produced form the RAW photo data. There are a number of factors that impact and limit the image that you will see on the LCD versus what you can produce from the RAW file with some post processing. My suggestion would be to view some of the Joe Brady videos on using a Sekonic meter and ColorChecker Passport in landscape photography that are on YouTube. I think this will help your understanding. He will show how a file that does not look great on your LCD can and does contain the data that with a few adjustments in PP can become a stunning photo/image. A handheld light meter can be useful but is certainly not mandatory and most people will nt bother to use one.
Best,
Todd Ferguson
Best,
Todd Ferguson
CindyHouk wrote:
For someone learning.....I have my camera set to Raw only right now --- I should set it to both Raw + JPG and if the preview on the lcd looks good...then I have the settings correct for the situation...if the preview looks bad...I have something wrong? Whether that be exposure, f stop, shutter...etc I have the Nikon D5300...would that be a good learning tool?
Oct 19, 2017 08:37:12 #

RAW is not a universal file. It requires special sotware to bring back all the goodness the file has to offer. Because it is raw data from the sensor none of the settings made to the camera will take effect, that you have to do during editing. A JPEG file is a universal file, all editing programs can read it. If you are experienced editing JPEG files there are many parameters that can be changed and WB is one of them...but you have to know what you are doing.
I have shot many JPEG files with my D610 and honestly, the files need very little to no adjustments in Photoshop, that good I find them in quality.
I have shot many JPEG files with my D610 and honestly, the files need very little to no adjustments in Photoshop, that good I find them in quality.
Oct 19, 2017 08:47:33 #
camerapapi wrote:
<snip> none of the settings made to the camera will take effect<snip>
Except for aperture, shutter speed and ISO.
Oct 19, 2017 08:59:21 #
Yours is a good example of someone who is putting out inaccurate and wrong information about RAW vs JPEG files... Unfortunately people would be better off to read Wikipedia than about half the misinformation that gets posted in this forum...
Best,
Todd Ferguson
Best,
Todd Ferguson
camerapapi wrote:
RAW is not a universal file. It requires special s... (show quote)
Oct 19, 2017 10:20:06 #

tenny52 wrote:
For my limited understanding, if the LCD display has clippings(flashing some highlights or dark areas), that means some information in the picture are not captured even in the raw files. Otherwise, the picture is considered OK with all the details?
Not necessarily true. The raw file contains a much wider range of information (12 to 14 stops, these days). The JPEG contains around 5.5 to 6 stops of information. So if you record a raw image, you can use post-processing software to compress the tonal range of the raw file into the usable range of a JPEG file. OR, you can pick which part of the information you wish to save in the JPEG file. Or a bit of both...
Many people work exclusively in raw. They deliberately "expose to the right" or "expose beyond the right" of the histogram. The "blinkies" are blinking, but they know (through prior testing) that they can "overexpose" their raw files by a stop or so and still record recoverable highlight detail. A side benefit of this is improved shadow detail and enhanced dynamic range. In this case, they totally disregard the look of the JPEG preview image... They know they will process the raw file to get what they want.
Oct 19, 2017 10:33:48 #
burkphoto wrote:
Not necessarily true. The raw file contains a much... (show quote)
Thanks a million Bill for all the great information you so kindly share with us.
Oct 19, 2017 10:41:21 #
Yes, I know from calibrating my camera's sensor I can very safely shoot 2.5 to 3 stops above middle gray and not blow out highlights. This is a handy thing to know in my view. I would say most cameras today can safely shoot 2.0 to 2.5 stops above middle gray and PP fine if they are shooting RAW.
Best,
Todd Ferguson
Best,
Todd Ferguson
burkphoto wrote:
Not necessarily true. The raw file contains a much... (show quote)
Oct 19, 2017 10:49:55 #
In reference to your comment, "...that means some information in the picture are not captured even in the raw files".
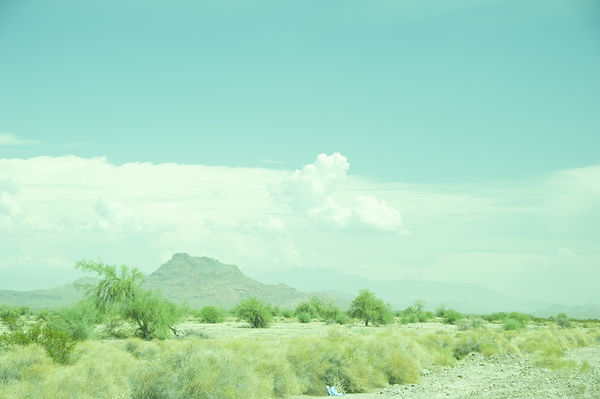
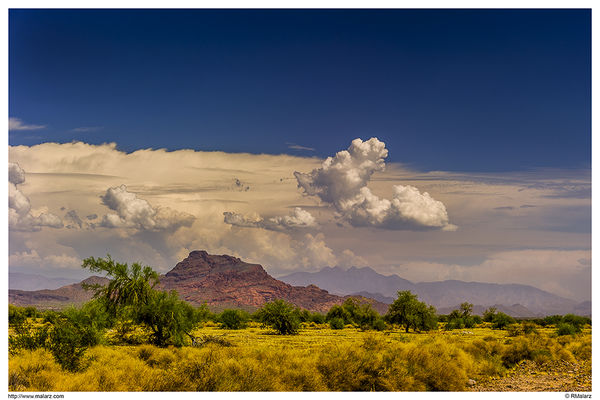
Not quite true. If you know your camera's limits, shoot manual, and spot meter you can achieve considerable control over your final photo. Every time this topic arises, I drag these two well worn images out to show as examples.
At the time of capture, there were blinkies all over this image. I ignore those. In fact, I rarely 'chimp' at all, as it proves useless. it also shows that Todd is absolutely correct. This is pushed a bit more than 2-1/2 stops. But, that is what this camera can handle, as determined through exhaustive testing.
--Bob
tenny52 wrote:
For my limited understanding, if the LCD display has clippings(flashing some highlights or dark areas), that means some information in the picture are not captured even in the raw files. Otherwise, the picture is considered OK with all the details?
Oct 19, 2017 11:14:18 #
rmalarz wrote:
In reference to your comment, "...that means ... (show quote)
It's a great example! JPEGs from the camera will never record all that cloud detail along with the rest of the scene. You can tweak the menu settings to a point, but there's just too much brightness range in the scene to retain it all in an SOOC JPEG. Now, if the entire sky is overcast, with indistinct shadows, that's another matter...
Oct 19, 2017 11:29:41 #
amfoto1
Loc: San Jose, Calif. USA
big-guy wrote:
When shooting JPG the camera assigns, as best it can, a white balance. When shooting RAW there is no white balanced assigned and leaves that to PP. For you, shooting both, the camera will show you on the JPG what it deems as correct but won't/can't touch the RAW version.
This isn't entirely correct...
When shooting JPEG, a white balance is assigned and applied. And, if you're using Auto White Balance, it will be the camera's "best guess". But if using any of the "presets" such as "sunlight", "shade", "cloudy", "tungsten", etc., that is what will be applied to the JPEG. Note that the "presets" are just coarse estimates as to what's "correct" in any given situation. They're probably wrong far more often than they're right!
When instead saving RAW files, the same white balance is recorded, but not yet applied to the image. It is used for any reviews on the camera's LCD, for the histogram calculations, and by most RAW conversion/post-processing software for previews of the image. If you simply convert the RAW "as shot", the WB that was recorded is what will be used. The difference is that with RAW files you are free to change the WB without any loss, since it's not yet actually been applied to the image. Yes, any adjustments done with the sliders in Lightroom will change the WB when you export the file from LR. (But remember that LR is "non-destructive", so any changes you made to WB are reversible, if you wish. The RAW file actually hasn't been changed and you can re-adjust or revert to the original WB, then do another conversion at the different settings.)
tenny52 wrote:
...
Should LR be sufficient that the output jpg need no further process (levels,color, contrast, brightness, etc) in PS?
Should LR be sufficient that the output jpg need no further process (levels,color, contrast, brightness, etc) in PS?
This is up to you. IMO... Nope. Personally I use LR to generate "proofs" of images... But I do not find it sufficient for fully finished images that will be used to make prints or other "higher" uses. I always start out working an image in LR, which has rather basic "global" adjustments and minimal, rather coarse retouching capabilities... Then I ALWAYS finish images further in Photoshop. It might be just a little work done in a few minutes, or up to an hour or more work to fully finish an image.
[/quote]If one hesitates of the exposure during shooting, underexposed is better than overexposed Or the same, (of course by the same amount) ?[/quote]
Nope.... underexposure IS NOT better than slight overexposure. Underexposure that needs to be be corrected later in post-processing will amplify noise in images. A little or A LOT (depending upon the image and how much it's exposure needs to be "pushed").
Slight overexposure is better. In fact, digital images are nowhere near as prone to highlights getting "blown out", than people think. It's actually short comings of their computer monitors or the LCD screen that make people think highlights are being blown out. Most tend to "clip" highlights quite a bit (so before you trash an image for blown out highlights seen on-screen, make a print from it with a quality photo printer.... When printed there is nearly always a lot more detail in both highlights and shadows, than can be seen on screen). Plus, in fact, there are times when things actually are pure white in images.... when highlights are not blown out, but are being correctly rendered.
The whole principle of Expose To The Right (ETTR) utilizes the concept that it's much better to slightly overexpose, than it is to underexposure. It's better to "pull" back exposure slightly in post-processing. There won't be an increase in noise in the shadows, doing that. And highlights are more recoverable than people realized.
However, "slightly" is still a key word. You don't want to overexpose too much.
So, what do you need to do? Well, if you find all or most of your images need some "push" up in exposure when working through them in Lightroom... you're a candidate to start using ETTR.
On a related note, unless your computer monitor is properly calibrated and regularly re-calibrated, you are just guessing and probably adjusting your images incorrectly. Calibration is absolutely essential for accurate post-processing. Without it, nearly all computer monitors are way too bright to correctly adjust image exposure... That will cause you to make your images too dark, which will show up in prints or when the images are displayed online. Similarly, color rendition needs to be calibrated.
Plus, computer monitors gradually change both brightness and color rendition over time, as the monitor ages. For that reason, re-calibration needs to be done periodically. (I do it every two months... some people do it more often, others less often.)
Finally, particularly if you do very much printing, a calibration device and software will essentially pay for itself in savings of wasted paper and ink!
rmalarz wrote:
...This is pushed a bit more than 2-1/2 stops...
--Bob
--Bob
Good example Bob. However I'd call that a "pulled" exposure adjustment... not "pushed". It's just semantics... but seems to me that it makes most sense when "overexposure is pulled back down to a correct exposure" versus "underexposure pushed up to a correct exposure". Back before digital, we used to "push" and "pull" film when we developed it.
Oct 19, 2017 11:40:51 #
Alan, the exposure was pushed. In fact, about 3 stops over what the camera indicated for spot metering the brightest portion of the clouds. The processing was pulled to compensate for that pushed exposure.
--Bob
--Bob
amfoto1 wrote:
Good example Bob. However I'd call that "pulled" exposure... not "pushed". It's a minor thing, but as in "overexposure pulled back down to a correct exposure" versus "underexposure pushed up to a correct exposure". Back before digital, we used to "push" and "pull" film when we developed it.
If you want to reply, then register here. Registration is free and your account is created instantly, so you can post right away.