Converting RAW to JPEG for Sharing
Sep 11, 2017 14:08:42 #
I have a Nikon D750 and shoot in RAW. When sharing the files with others, via email, Air Drop, etc, I need to convert to JPEG and reduce the file to a reasonable size. What settings do you recommend for the conversion? Do you reduce the number of pixels, or reduce the quality? What do you consider to be a reasonable file size when sharing a picture?
Sep 11, 2017 14:17:09 #
What are you using for the conversion? Lightroom has a lot of settings; Mac's built-in Preview application only a few.
I figure most people are going to be viewing photos on a computer screen, so I save with settings that keep that in mind. I also shrink the file size down to 3 MB or less.
I figure most people are going to be viewing photos on a computer screen, so I save with settings that keep that in mind. I also shrink the file size down to 3 MB or less.
Sep 11, 2017 14:24:22 #

There is NO "answer" as there are so many variables. But when sending a file for someone to view on their computer, I usually just size it to 1500 pixels on the long side and a quality of 9 or 10. The PPI number is irrelevant. If it is a situation in which I want them to see the image, but not be able to make a reasonable print, I might reduce that to 500-600 pixels on the long side and a quality of 6-7. But then, people will print almost anything regardless of the lack of quality!
Sep 11, 2017 14:26:51 #

BruceT4891 wrote:
I have a Nikon D750 and shoot in RAW. When sharing the files with others, via email, Air Drop, etc, I need to convert to JPEG and reduce the file to a reasonable size. What settings do you recommend for the conversion? Do you reduce the number of pixels, or reduce the quality? What do you consider to be a reasonable file size when sharing a picture?
Both. I share images that are 2048 on the longest side, and with a quality setting of 70. Your mileage may differ.
Sep 11, 2017 14:53:20 #

I want them to see the highest quality image, but I want them to "receive" it too. I too reduce the long side to 2048 pixels but leave the quality setting at 100% (Lightroom). The resulting files range from 1MB to 3MB depending on the original image, a reasonable size for sending 1 or 2 attachments via email. Or even, generating a ZIP file of a larger number of images at 2048 pixels for posting to a download site where the recipient(s) can download on their end. As mentioned by Cliff, sending smaller sized files can be used to limit the use of the files beyond simply viewing. These techniques provide a range of options depending on your specific needs and the capabilities, if applicable, of your target audience.
Sep 11, 2017 20:27:44 #
CHG_CANON wrote:
I want them to see the highest quality image, but ... (show quote)
Paul, how did you arrive at using 2048?
Sep 11, 2017 22:16:49 #
Hey Greg - my images are targeted primarily for 500px or Flickr. The 500px guideline is a minimum of 2000 pixels on the long side for "medium" web-ready use. Although the 500px site currently displays a smaller image, this 2048px "long side" approach allows me to create files targeted for the various social media sites without creating unique files for each (500px, Flickr, Instagram, and Facebook). It also allows the image to be used on large monitor displays, where a full-screen display option exists. A file at 2048px will fill (or virtually fill) a 27-in or 30-inch monitor with a typical resolution of 2560 pixels in width, whether displayed from a media site or using a image file I provided directly. They look just as good on smaller monitors and mobile devices, including Retina displays.
As mentioned earlier, the resulting files are reasonable in size for sending to these sites as well as sharing via email attachments or in bulk via file-share sites, assuming both my upload bandwidth and my target's download bandwidth.
The 'quality' level on the export impacts the compression applied to the JPEG. Common wisdom is 100% down to 70% is virtually indistinguishable to the human eye when displayed. But, the file size savings can be significant, in some cases reducing the file size by more than 50% when the quality setting is lowered to 70%.
If the file was being shared as a proof where a potential customer might keep the proof without paying for the high-resolution image, then I would employ a smaller size on the long-side and may too consider a lower quality setting.
As a final observation, 2048 is too large for UHH. That is, I no longer attach anything directly to a post in UHH. Rather, I use a URL link to the corresponding image posted to 500px or Flickr. Flickr provides a dynamic choice in the image size created for the url link. Using 1024 "fills" the screen on a UHH page for landscape oriented images without causing the user to need to scroll, well at least on my own laptop and desktop displays... The same url link to an image hosted in 500px displays smaller than 1024, but larger than the default thumbnail created by an attachment directly to the post. As said in my original comment, I seek to maximize the display quality of my images.
Sep 12, 2017 08:59:22 #
RichieC
Loc: Adirondacks
Well, I assume you have photoshop. Web photos are typically 72dpi (ppi)... if they are viewed at 100% at 100 percent size. If you want a ballpark, try what I do , crop the photo if needed, then size one dimension to 8", (an arbitrary size that looks nice and big on the typical screen- but you can pick any) drop dpi to 144dpi ( allows for people to zoom it!), then in photoshop, FILE > EXPORT > SAVE FOR WEB (Legacy)>Dialog. You are presented with settings you can adjust in real time and preview the result.. comparing it to the original with as many as 4 windows ( original uncompressed in the one window so you can view the degradation as you compress the file with settings) with one or three options, each individually adjustable...
I lower the setting till the artifacts become JUST unacceptable, then back it off a tinch for smallest file size when doing website images etc. But the same concept can be figured out by you for your less demanding needs. Note the resulting file size in lower left reflects your settings- also reacts in real-time. Anyways, you can set one window to see what it will look like as a jpeg, a gif, a png 8 or png 24, or all jpegs each with their own adjustments, you highlight the one you like and hit save... this "module" is designed for getting the file size as small as possible and looking its best, so you you might just use the sliders to back off the file size a touch, not trying to get it weenie for fast page loads etc. But it is an easy and fail-safe way to reduce your file sizes as a jpeg without guessing at the compression effects so you can send them easily.
Remember the first step was to reduce the original file size and or crop, while saving the image as a JPEG this way will not affect the original... you did adjust the original in my first step- DO NOT OVERWRITE YOUR ORIGINAL BY MISTAKE BY HITTING SAVE ONCE THIS MODULE CLOSES AND YOU RETURN TO THE ORIGINAL FILE YOU DOWNSIZED! You are just temporarily adjusting the file size then saving as JPEG through the module/sub routine, go back and close the original WITHOUT saving your changes... you have your jpeg as a separate file.
Tutorial by Lynda.com at youtube.
https://www.youtube.com/watch?v=OL0DwX7dnto
look around for other related video tutorials if you want to learn something new FAST! I do this all the time and I started learning on PSD 2.0 ( 1991) - I am never above learning something new or re-learning something- or just brushing up using this video tutorial tip about any software skill.
Sep 12, 2017 10:29:01 #

RichieC wrote:
Well, I assume you have photoshop. Web photos are typically 72dpi (ppi)...
If I may just add: DPI (a printing term) and PPI are not interchangeable, and 72 hasn't been a standard for anything since Apple stopped using it for their display and printer in the 90s. The correct way to specify an image for web use is in pixels (typically on the long side). In PS, under file/export/save for web, just specify the size in pixels in the boxes provided.
Sep 12, 2017 10:40:03 #
gvarner
Loc: Central Oregon Coast
For our photo club's contest submissions we use 1024x768 and a file size limit of 500kb. The photos are then examined by judges on a computer monitor. I guess if it's good enough for them it's worth using that as a guide.
Sep 12, 2017 10:48:45 #

Sep 12, 2017 14:30:50 #

Raw is noted to be all the information your camera can give you. If you are serious in photography, this is the format you should be using. When you want to use the image you have to convert it to another format such as: jpeg, psd, bmp, gif, dcm, tiff, etc. Jpeg if most often used for printing or showing pictures. The trouble with jpeg is: As you repeatedly save it, it will continue to lose information until it is no longer acceptable. I have two cameras. One I shoot raw with, and the other I can only shoot in jpeg. When comparing the images, I see a lot of difference between the two.
Sep 12, 2017 15:53:11 #
RichieC
Loc: Adirondacks
TriX wrote:
If I may just add: DPI (a printing term) and PPI are not interchangeable, and 72 hasn't been a standard for anything since Apple stopped using it for their display and printer in the 90s. The correct way to specify an image for web use is in pixels (typically on the long side). In PS, under file/export/save for web, just specify the size in pixels in the boxes provided.
72 dpi is still the current standard print measurement, there are 72 points in an inch, 12 points in a pica, 6 picas to an inch. Text is still measured in points. etc. etc. Apple merely chose it because it nested nicely in their output devices set at 144dpi and the fact that it was a graphic based machine and 72 points to an inch IS still a current standard. Just the computer keeps track of it all no matter what measurement you choose to plug in.
ppi and dpi are essentially interchangeable when talking to a professional printer, pixels per inch, really equals the concept and mechanics of points per inch,- they will not correct you- rolls off the tongue- they know the difference, as do I.
However you are correct... all images on screen are a pixel dimension, you can get to the dimension in many ways. 144 ppi x a desired inch x inch dimension converts the image to a consistent and expected size for viewing on most screens but is unsuitable for print. What anybodies screen is set to is another matter. I have many choices on that. 2560x1440 ( my current duo screens) , 2048 x 1152, 1600 x 900, 1280 x 720. Same image will appear at different sizes when screen resolution is set to any of these.
You can plug in anything anywher you wish- it is all converted to pixels in the end. Dimension won;t change unless you choose " resample"
72ppi at 3" x 4"
=
300ppi at 1.83cm x 2.44cm
=
600ppi at 2.16p x 2.88p (picas)
ALL =
216px x 288px
All available and current measurements in the latest and greatest PhotoShop CC.
Sep 12, 2017 17:09:25 #
RichieC wrote:
72 dpi is still the current standard print measure... (show quote)
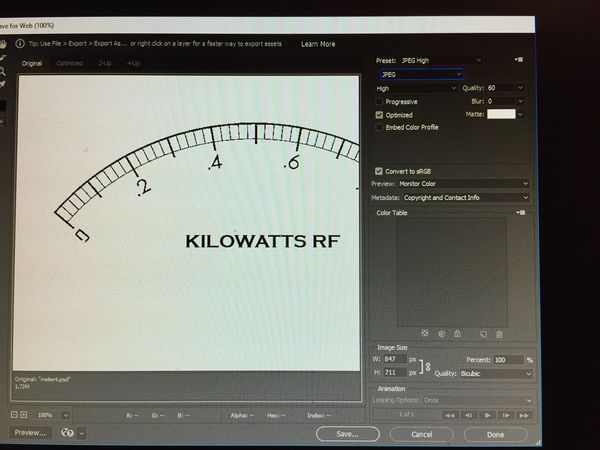
But we are not discussing printing. I acknowledge your knowledge in that area and also am aware of the original source of 72 points per inch. The op's question concerned sharing images electronically, and you specifically said that 72 dpi (PPI) is the standard for web photos - it isn't, and regardless of the fact that printers may use the terms interchangeably, it isn't correct. Dots have a physical dimension and pixels have an RGB value. You can use PPI to describe the resolution of a display if you wish, but the standard is simply Y Pixels x X Pixels, the same as for an image to be used on the web. I'm using the latest version of PS cc as well and here is a shot of the save for web dialogue box - please note the image size boxes in pixels. Btw, this subject is currently being discussed on another thread as well - it appears regularly. http://www.uglyhedgehog.com/t-484733-1.html
Sep 13, 2017 11:43:44 #
amfoto1
Loc: San Jose, Calif. USA
BruceT4891 wrote:
I have a Nikon D750 and shoot in RAW. When sharing the files with others, via email, Air Drop, etc, I need to convert to JPEG and reduce the file to a reasonable size. What settings do you recommend for the conversion? Do you reduce the number of pixels, or reduce the quality? What do you consider to be a reasonable file size when sharing a picture?
I make JPEGs for online sharing and proofing that are no larger than 700 or 800 pixels on the long side and are sRGB color space. That's large enough for most purposes, but not large enough that folks can make prints from my images or use them for other purposes, without my permisssion (I also watermark them). sRGB color space is what most people have on their monitors, too. The standard for display now is about 100 pixels per inch (a little more for "4K" or "5K" displays), so 700 or 800 pixels renders an image 7" or 8" on the long side, on most people's computer monitors. (For printing I use 300 pixels per inch, which is more than enough for most printing processes... many printers only require 170 ppi to 240 ppi... but the math is easier to do in my head with 300 ppi.)
Also don't "Save for the web".... In many software programs that removes EXIF data, which includes copyright protection information. Just "save" the JPEG instead.
Depending upon the software, you also may be given options for JPEG quality (the very maximum typically isn't needed for online display, so experiment with lower settings that will make for smaller files and allow images to load faster when people view them).
And you might be given automatic sharpening options (use "sharpen for screen", if any is needed at all... down-sizing the image might make it unnecessary to sharpen the image).
If you want to reply, then register here. Registration is free and your account is created instantly, so you can post right away.